• Home
  • Eat
    • Breakfast
    • Appetizers
    • Main Dishes
      • Chicken
      • Beef
      • Seafood
      • Healthy Dishes
      • Paleo Dishes
      • Salads
    • Desserts
      • Decorated Cookies
      • Cookies
      • Bars and Brownies
      • Cakes and Cupcakes
  • Shop
    • Cookie Decorating Supplies
    • Bakeware
    • Cookware
    • Kitchen Gadgets
    • House
  • About
    • Contact
    • Bucket List
  • Cookie Decorating 101

Follow the Ruels

Golden Mango Turmeric Smoothie

July 26, 2017

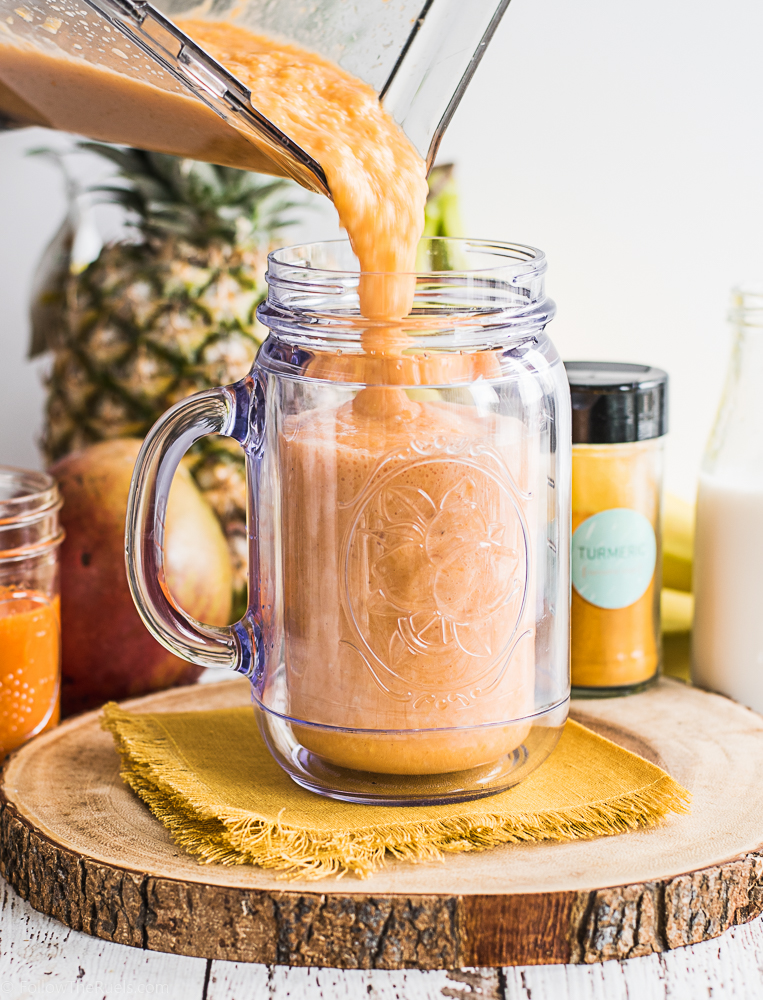
Turmeric is so hot right now. Have you noticed? Everywhere I look, turmeric is popping up in very unexpected places. In milk. In cake. In supplements. And now in this mango turmeric smoothie!

There is a reason turmeric has become so popular – it is so good for you! Who knew that this bright yellow spice could also help prevent Alzheimer’s, lower blood sugar, treat arthritis, boost your mood, and cure cancer! Okay, that last one is a bit of an exaggeration, but just barely.

Because of all those reasons (and more), I now start my day with this delicious mango turmeric smoothie. 

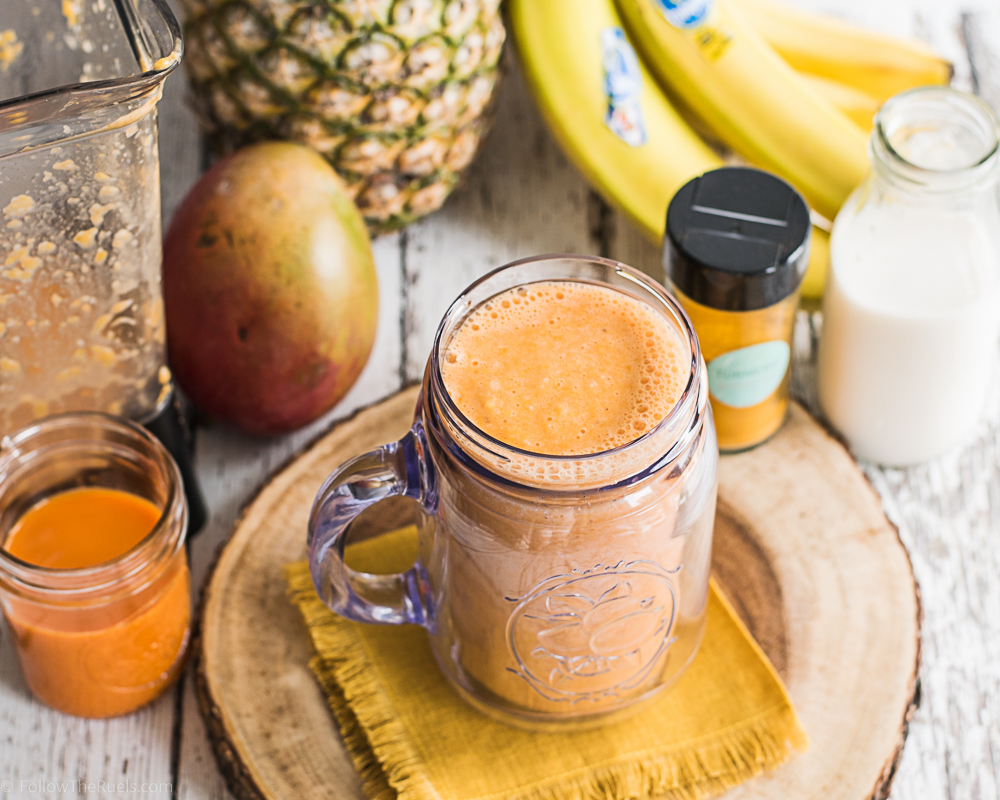
This smoothie doesn’t just have the added benefit of turmeric, but I also snuck in some carrot juice. Gotta have some veggies in there!

To give the smoothie its flavor, I mixed together some of my favorite Summer fruits: mango and pineapple which create a delicious tropical flavor!  

Now, you may also notice an unlikely ingredient lurking down in the corner of the picture – pepper. Why on earth would I add pepper to my smoothie? I’ll tell you why! All those benefits of turmeric aren’t well absorbed without it. Basically, don’t bother adding turmeric if you aren’t going to add the black pepper.  

The good news is that you can’t even taste the pepper. I don’t add a lot, just a pinch of two. Enough to make sure my golden mango turmeric smoothie isn’t consumed in vain.


Since you all know how to make a smoothie, I won’t bore you with those details. Instead, I will tell you about some other things I like to add to my smoothies. 

I almost always add a protein powder to my smoothies. Right now my favorite is collagen protein because I like to think that it’s helping my joints and my skin (let’s be honest, it’s really about my skin).

If I am drinking my smoothie right away, I may add some chia seeds, too. However, if I am taking my smoothie into work, I will leave the chia seeds out because after a few minutes then turn into a gelatinous blob….not super appetizing in a smoothie. 

Also, for the most part, I only use frozen fruit in my smoothies (don’t be fooled by the fresh stuff in these pictures). I do that because 1) frozen fruit is always available, and 2) there’s no need for ice cubes! I even freeze my bananas. Since I typically only use half a banana per smoothie, I will cut the other half up and store it in the freezer for those days when I run out of the naners. 

Ok, enough about the intricacies of smoothie-making. Who knew it could be so complicated?!

This mango-turmeric smoothie is my go-to breakfast right now. Not only does it help me beat the heat after my train ride into work, it is delicious and extra nutritious! 

If you want to make this smoothie at home but are not convinced about adding carrot juice, you can swap it with some orange juice instead. But definitely give the turmeric a shot. I promise you will be all the better for it!

[show_shopthepost_widget id=”2760415″]
[yumprint-recipe id=’120′]

/ Filed In: Drinks, Healthy Dishes
Tagged: carrot juice mango, drink, smoothie, Summer, turmeric

Watermelon Rose Slushie

June 30, 2017

I should really give my husband more credit. For instance, this watermelon rose slushee was all his idea. You see, he likes to browse Reddit, where he finds all sorts of crazy things, one of which was a watermelon keg. In the video (or maybe just a post) they cut open the top of the watermelon, used an immersion blender to blend the inside, then poured in some rose. Add a tap, and you have yourself a watermelon keg!

Now, I’m pretty sure we didn’t need a whole watermelon keg. But a watermelon and rose cocktail sounded delicious!

HOW I MADE IT


I started by cubing then blending the melon until smooth. 


Then I poured it through a sieve to get rid of all the pulp.
I poured the juice into an ice cube tray to let freeze overnight.


The next day, I blended the watermelon ice cubes with rose and a toich of lemon juice until I had something that resembled the Slurpee I used to get at 7-11.

It is basically a grown up Slurpee. Just not as sickenly sweet and, you know, boozy.

But its not too boozy. I only used 3/4 cup of wine for what was essentially 4 large cups. You could definitely add more if you want more of the rose flavor. But I loved how refreshing it tasted thanks to all that sweet waltermelon juice.

It’s the perfect Summer cocktail!

[yumprint-recipe id=’114′]

/ Filed In: Drinks, Eat
Tagged: cocktail, drink, rosé, Summer, watermelon, wine

Watermelon, Feta, and Blueberry Bites

June 27, 2017

Watermelon and feta are an unlikely pair, aren’t they? That juicy, sweet fruit with rich and salty feta. When you top them with a drizzle of tangy balsamic, it almost becomes the perfect bite of food!

I added a handful of blueberries to my balsamic reduction and to the top of the feta to really amp up the blue, making these little bites perfect for 4th of July!

HOW I MADE IT

I started by making the blueberry balsamic reduction. You could use a plain balsamic reduction (or buy a bottle of balsamic glaze from the grocery store) if you don’t feel like making thw blueberry variety.

But it’s actually pretty easy to make. I put some blueberries, balsamic, and agave (you could use honey, I just couldn’t find mine) in a sauce pan and then let it simmer until it had reduced by half. And viola! Blueberry balsamic reduction that you can impress your friends with. Just remember to say “blueberry balsamic reduction” in the snootiest way possible. 

For the watermelon part, of course you could just cut out cube, but where’s the fun in that? I had my star cookie cutter already out from making pie last week so I decided to make star shaped watermelon. Very patriotic!

Now comes the easy part! I stacked a cube of feta on top of the watermelon and skewered them with a toothpick and blueberry.

Then just drizzled on the balsamic reduction. 

Now these cuties are ready to be devoured! I have a feeling they will go quickly at any 4th of July party or Summer backyard barbecue! They are refreshing and satisfying all in one bite!

[yumprint-recipe id=’113′]

/ Filed In: Appetizers, Eat, Other Savories New
Tagged: 4th of July, appetizer, blueberries, feta, Summer, watermelon

Water Color Fruit Cookies (+ NEW Sugar Cookie Recipes!)

June 23, 2017

I am really excited about this post for a couple of reasons. First of all, I love these cookies. They are some of my favorites to date! I have been loving this painting on cookies technique that I picked up over the past couple of months. It’s actually somewhat therapeutic to sit and paint. Plus, with watercolor, you don’t have to be so precise and exact, which I certainly appreciate! 


The second reason I love this post is that each one of the watercolor fruit cookies represents the flavor of the cookie! I have been playing around with different flavors for a couple months and settled on four that will be my (actually, you have already seen them in the rotation) my go-to cookie flavors for Summer (and probably beyond). 

But I will get to the flavors in a second. First let me show you how I painted the cookies! (P.S. It’s super easy!)

So the trick is to “water down” your food coloring with a bit of a clear alcohol or extract, like almond extract. You don’t want the color to be TOO pigmented, or else it won’t look like water color. Then I just mixed my colors until I found a shade I liked and painted directly on the dried icing. There is no science to it at all! I did have pictures of water color fruit up in front of me while I did this so I had something to work off of. But after a while, I just did what I thought looked good. 

Now back to these cookie flavors. 

I know I share a lot of sugar cookie recipes. So instead of posting all the recipes here, or sharing them one by one over the course of the Summer, I decided to put together a little mini recipe e-book with all four recipes which you can get here. Each recipe is not only delicious, but I spent a lot of time in Photoshop making them pretty, too! That way you can print them out and save them for the next time you want to make some wonderful cookies. 

The lemon cookie is lemon-mint flavored and is absolutely refreshing and delicious! The raspberry cookie is a raspberry lemonade flavor, which reminds me of my all time favorite summer drink. The strawberry is strawberry and honey flavor which is subtle and sweet. And finally the lime cookie is lime and sea salt flavored which almost tastes like a margarita! (As I was decorating, I couldn’t help but think of the Willy Wonka line “the snozeberries tastes like snozeberries!”)

Also, I should mention that these recipes are not my normal sugar cookie recipe with a couple extracts thrown in. I re-developed my sugar cookie recipe just for Summer! It’s lighter and softer than normal. Plus the flavors are all natural! They are not engineered for a flavor extract, which makes the cookies that much more wonderful and delicious! 

If you do end up downloading the e-book and trying out the recipes, I would love to know what you think. Also, if you like this idea, I already have some thoughts on another e-book for the Holidays!

 
[show_shopthepost_widget id=”2717110″]

/ Filed In: Cookie Decorating 101, Cookies New, Decorated Cookies, Eat
Tagged: cookie decorating, cookies, lemon, lime, raspberry, strawberry, sugar cookies, Summer, water color

Easy Pie Crust Recipe

June 18, 2017

A pie can only be as good as it’s filling, right? I’d argue that it’s only as good as it’s crust. Okay, maybe the combination of the two. 

As a pie crust lover (as a kid I would ONLY eat the crust, not the filling), I’m not above turning my nose up at a pie that has a soggy, rubbery crust (call me a pie snob). A great pie not only has a delicious filling, but MUST be surrounded by a flakey, buttery crust.

Trouble is that getting that perfect pie crust at home isn’t always so easy. It can be a pain in the butt to cut the butter into the flour and make sure you get the right consistency. That’s why frozen pie crust exists! 

But frozen pie crust is not the answer. I have found the secret to delicious, flakey, buttery pie crust that you can make at home while barely lifting a finger: the food processor!

You may be thinking that a food processor is just a cop out or its cheating, or that it just can’t produce a good pie crust. I’m hear to tell you that you are wrong and that it can make an excellent pie crust, with one simple tip.


The key to any pie crust is cold butter. I cubed mine up and set it in the freezer for about 10 minutes. Once it was hardendd I added about 3/4 of the butter to the food processor. I kept the rest off to the side to add in later. 

Then I processed the butter with just a bit of flour to chop it into smaller pieces.

Finally, I added the rest of the flour and pulsed it in the food processor until it resembled a coarse sand. At this point I added in the reserved butter (so I could have some bigger chunks of butter in there), and turned the processor to low speed while I drizzled in the water.

I knew the dough was ready when it started coming together but still looked a bit dry. 


After letting the dough chill for a while,  I rolled it out into a relatively thin sheet. I kept a portion of the dough off to the side to decorate with later.


To transfer the dough to the pie dish, I likr to fold the dough in half twice then place the center corner in the center of the pie dish. Then all I do is unfold it, form it to the pan, and trim the edges.

From here, you can fill it with any filling you like. I filled mine with a berry filling that I was testing out (verdict: tastes delish, but method needs some tweaking). You can see that the filling is pretty wet and you may be worried I’ll end up with a soggy bottom (any British Baking Show fans out there?). Well, never fear! This pie crust can stand up to some pretty soggy filings!


I also tried out some fun decorative lattice work. I braided a couple strips and layered then with some plain strips of dough. The I cut out tye extra dough with a small star cutter and placed then aroubd the outside. After a generous egg wash, the pie is ready for the oven!

I couldn’t wait to dig into this pie!! I did my best to let it cool so the filling wouldn’t topple out every where. And iy was worth it! A delicious  filling surrounded by a crispy, buttery, and flakey crust. 

The pie crust lover in me loved this pie, especially the crust. The best bites were the ones right at the end when it’s 97% crust and 3% pie filling. 

I encourage you to try your hand at making your own pie dough at home! I promise, if you let your food procesor do the work for you, its almost as easy as buying the stuff from the store!

[yumprint-recipe id=’110′]

/ Filed In: Desserts, Eat, Jaimie, Other Sweets New
Tagged: baking, dessert, easy recipe, food processor, pie crust, pies, Summer

Red White and Blue Water Color Gingham Cookies

June 9, 2017

If you have stopped by my Instagram feed (@followtheruels) lately and seen any of the cookies that I have posted in the past couple months, you know that there are two things I am obsessed with: water color and royal icing flowers. Adding a little floral touch to cookies is such an easy way to make a plain ol’ cookie look super fancy.

It’s the same for the water color effect. Painting cookies is also a very easy thing you can do to decorate cookies, especially if you don’t like piping. 

So that’s what I did, I combined my love of gingham (I wear a lot of gingham) with my two current favorite cookie decorating techniques to make these water color gingham cookies that are PERFECT for 4th of July!


Here are all the recipes and tools that I used:

  • Royal Icing Recipe
  • Sugar Cookie Recipe (I actually used a special flavor of sugar cookie that I will be sharing very soon!)
  • Food Coloring 
  • Almond Extract
  • Paint Brushes
  • Paint Tray
  • White Drop Flowers – #107 tip
  • Red Rosettes – #18 tip
  • Blue Drop Flowers – #225 tip
  • Light Blue Rosettes – #16 tip
  • Pink Dots – #5 tip

So festive and patriotic, aren’t they? I love them even with all of their flaws and wonky lines. It makes them look a bit more homemade and rustic. 

You could of course use some guides to make sure your lines are straight. But sometimes the character is in the imperfection, am I right?

 
[show_shopthepost_widget id=”2702796″]

/ Filed In: Cookies New, Decorated Cookies, Eat
Tagged: 4th of July, cookies, decorated cookies, flowers, gingham, royal icing, Summer, watercolor

Strawberry Mojito Recipe

June 2, 2017

A few years ago (eight, actually), Billy and I found ourselves in Miami on the way to Puerto Rico. The first night we walked down the beach to find a place to eat (and drink), when we stumbled upon the Clevelander. Actually, you don’t really stumble upon the Clevelander. You are sort of drawn to it. It’s a huge restaurant on a corner with an expansive patio and a towering neon sign. Nevertheless, we settled in and ordered a couple mojitos. 

About six mojitos later, it was decided; these were the best mojitos we had ever had! Sure, it could have been that we had consumed SIX mojitos. But I promise you I wouldn’t have had more than one if they weren’t special. 

Once we got to Puerto Rico, we made a point to take a trip to the Bicardi factory where we learned even more about mojitos. From that point on, Billy and I were on a mission to make a mojito as good as the ones we had in Miami and San Juan!

We have actually gotten pretty close over the years. Every Summer when limes are in abundance, we stock up and try out hand at a few mojitos. This Summer I wanted to mix things up. We have had plenty of plain ol’ mojitos. Why not try a strawberry mojito?!

How I made them

Mojito’s require a little bit of elbow grease. Forget just pouring a couple liquids together. You have to work for this one!


In the bottom of a glass, I put mint leaves strawberries, and a bit of sugar. I don’t have a muddler, so I use the back of a wooden spoon to muddle the strawberries and mint leaves. I want my mint leaves to be beat up and the strawberries to be smashed. The sugar just acts as an abrasive to help with both of those things.


To that, I add the rum and some simple syrup and stir everything together. I top it with some ice and sparkling water. I had some lime La Croix’s on hand, and that worked perfectly!

Then I drink it as quickly as possible and make myself another one!

Just kidding! You guys have no idea how slow of a drinker I am. It’s pathetic. But I drank this strawberry mojito before the ice had a chance to melt. And that’s saying something!

It really is the perfect Summer drink! Lime and mint is already a refreshing combination. But with the addition of strawberries, it is sent over the top! It’s like that perfect drink to sip on a hot day by the beach, by the pool, or on the patio.No need to fly down to Miami or Puerto Rico. Unless you happen to find yourself there. Then definitely find a spot at the Clevelander and settle in!

[amd-yrecipe-recipe:164]

/ Filed In: Drinks
Tagged: lime, mint, mojiito, rum, strawberry, Summer

Sangria Granita

August 29, 2016

Sangria Granita

I know it feels like Summer is almost over because the kids are going back to school and all, but we still have a whole month left! Come on guys, don’t give up on Summer yet. 

Actually, I am ready for Summer to be over, who am I kidding….

I digress. One of my favorite things I made all Summer was this Rose sangria. It was scrum-didily-umptious! Unfortunately (or maybe fortunately) I couldn’t polish off a whole batch myself, so I had a ton left over. The great thing about sangria is that it keeps pretty well. For the sangria that was left, I strained out the fruit and put it back in a clean wine bottle (this is where twist tops come in handy). I could have just had a glass of sangria every night for the rest of the week, but I decided to do something a bit more fun with it. 

Make granita!


I used to make granitas all the time back in the day. Not only are they easy, but they can be pretty healthy. Take whatever liquid you like, freeze it, fork it, BOOM you have yourself some granita. 

And that is exactly what I did with the leftover sangria. I poured it in a shallow dish, then placed it in the freezer. Every couple hours, I scraped a fork over the surface to create tiny little sangria ice crystals. I repeated that step a couple times until the whole thing was frozen. By the end, what I had was akin to a wine shaved-ice. Yum, right?

Sangria Granita

This sangria granita made such a great little dessert at night. It was almost like having a glass of wine after dinner, but better!

Sangria Granita

So don’t give up on Summer just yet. Try making this sangria granita while it’s still hot outside. I promise, it’s probably the next best way to enjoy wine on these hot Summer days after an actual glass of fresh sangria, of course. 

[amd-yrecipe-recipe:71]

/ Filed In: Desserts, Eat
Tagged: fruit, granita, ice, sangria, Summer, wine

Healthy Greek Yogurt Pops

August 22, 2016

Healthy Greek Yogurt Pops

I don’t know about your neck of the woods, but over here in my neck of the woods (North Carolina) it’s been HOT! This has definitely been a hot Summer. The hottest I have experienced here in Charlotte.

It’s been hard on me and our AC. 

As a way to beat the heat, I decided to turn one of my favorite breakfasts, post-workout snacks, and desserts into a popsicle. Greek yogurt is one of my favorite foods because it is packed with protein and can be mixed with just about anything for a delicious treat. For these Greek yogurt pops, I mixed non-fat Greek yogurt with a bit of whipped cream, honey, vanilla, and berries. 


I know what you are thinking….whipped cream isn’t very healthy! And you are partially correct. Normally whipped cream has tons of sugar in it, which makes it pretty unhealthy. Yes, it does has fat, but fat isn’t always bad. Trust me, I am working on the whole fat thing, too. We have been conditioned here in the US to think that fat is bad, when it’s not.

But the whipped cream is key because it helps add air to the Greek yogurt to make them more light and airy. Without it, these pops would just be a block of yogurt ice. So if you want to ditch the whipped cream because you are afraid of the fat, do so at your own risk. 

Greek Yogurt Pops-8

Making these Greek Yogurt pops was easy. Waiting for them to freeze was hard. I was so impatient, I probably ruined a couple checking on them before they were ready.  

Oh well…they still tasted great! It was just like eating a big bowl of mixed berry Greek yogurt, except frozen and on stick. Which actually made it the perfect on-the-go breakfast on my walk to the train station in the mornings. 

And really, what’s better than a yummy breakfast popsicle on a hot Summer morning? 

Greek Yogurt Pops

[amd-yrecipe-recipe:70]

/ Filed In: Desserts, Eat, Healthy Dishes
Tagged: berries, breakfast, frozen, Greek yogurt, popsicle, snack, Summer

Mexican Street Corn

August 12, 2016

Mexican-Street-Corn-title

This may be one of my all time favorite recipes. And not just mine, but my husband’s, too! It is incredible, if I do say so myself. I tend to be critical of my cooking and will never say that my recipe is better than someone elses because in the end, taste is pretty subjective. But I will admit that this may be the best Mexican Street Corn you will have. 

We tried out a new Mexican restaurant here in Charlotte and when we saw Mexican Street Corn on their menu, we had to order it! All of our food came out and we just inhaled our tacos. But when my husband took a bite of the Mexican street corn, he looked at me and said, “your’s is way better”. To took a bite and agreed. I had to come home and make my recipe again, just to be sure. 

Yep…so much better. 

We even invited our good friend Matt over as an impartial judge. His review: two big thumbs up. 

Matt is a fire fighter, which means he is responsible for cooking dinner for a bunch of guys in the fire house every couple of weeks. He took some serious notes when I was making this because he plans to make this for the guys the next time he’s tasked with making dinner. 


Fortunately for both of us, this recipe is actually pretty simple. I like to start with fresh corn sliced off the cob, but can also work with frozen corn. I sauteed the corn in a bit of oil with garlic and jalapeno. Once the corn is soft (or the moisture has evaporated if using frozen), I transfer it to a bowl to let it cool. 

Once it’s cool, I mix it with some mayonaisse, sour cream, queso fresco, cilantro, salt, and pepper. After a few taste tests to make sure it’s seasoned properly, the corn is done! See…easy!

Mexican Street Corn-1

But just a note on the cheese in this recipe. My preferred option would be to use cotija cheese. Unfortunately, I can’t find it anywhere here in the Carolinas. The next best option is queso fresco, which I found in the sliced cheese section of the grocery store (not the fancy cheese section). The last option would be to use feta cheese, which is basically the Greek version of cotija. All taste great in this recipe, I assure you. Mexican Street Corn-3

You must make this next time you make tacos, faitas, hamburgers…really, it will go with just about anything. You can eat it as a side, topping, or a dip. I can promise you that you won’t be able to get enough. 

[amd-yrecipe-recipe:65]


/ Filed In: Appetizers, Eat, Other Savories New
Tagged: corn, cotija cheese, queso fresco, Summer

Watermelon, Feta and Cucumber Salad

August 10, 2016

Watermelon Cucumber Salad-7

I don’t know about you, but it was drilled into me from high school through grad school, “cite your sources!”. It’s now a huge pet peeve of mine when people (especially bloggers) don’t acknowledge the source of the inspiration. That’s why I have no problem telling you where the inspiration for my recipes comes from (got to give credit where credit is due!), Like this particular salad which was 99.9% inspired by this recipe.

Watermelon Cucumber Salad-11

I saw it posted over at the Kitchn, and I was smitten. I mean, it’s just so pretty! I had to make it the first chance I got. Fortunately, that chance would come pretty quickly when I had to make a salad to bring to our Small Group dinner on Sunday.

The salad was pretty much constructed based on the picture alone and I didn’t actually consult the recipe (not that I needed to, the picture speaks for itself). That’s why my recipe is just a tad different, like the addition of lettuce, dressing, red onions, and balsamic reduction. 


I started with a bed of romaine lettuce that I lightly dressed with some white balsamic vinegar and olive oil. I topped it with the spiralized cucumber that I cut into smaller noddles to make it easier to serve and eat. Next came the watermelon balls and the chucks of feta. I kept my feta pretty big because I wanted everyone to get a big hunk of cheese with every bite. I then topped it with thinly sliced red onion, mint, and the balsamic glaze (from Trader Joes). 

Watermelon Cucumber Salad-10

All of these flavors go so well together. The sweet from the watermelon, crispness of the cucumber, saltiness from the feta, bitterness from the onion, and tangy-ness from the balsamic. It reminds me a lot of one of my favorite (and super easy) appetizers. It’s so refreshing and flavorful. It’s a great salad to make during these hot and muggy dog days of summer. 

[amd-yrecipe-recipe:66]


/ Filed In: Eat, Healthy Dishes, Salads
Tagged: cucumber, feta cheese, healthy, salad, spiralizer, Summer, watermelon

Pretty Rosette Peach Tartlets

August 5, 2016

Pretty Peach Tartlets

If you are looking for an impressive dessert you can bring to your Summer parties, I have got the recipe for you! Don’t let these little peach tartlets fool you, they are actually really easy to make and only require six ingredients. 

Peaches

Puff Pastry

Mascarpone

Sugar

Cinnamon

Nutmeg

I’m sure it wasn’t the ingredient list that concerned you about this recipe. What you are probably thinking to yourself is, “there is no way I can make these look like a rosette!”. Ok, you may not be thinking that, but that’s what I was thinking. I was willing to give it a try, but was convinced that they would end up looking like crap. 

Sure the first one wasn’t my best, but I got the hang of it really quickly!

I’ll show you exactly how I made them. 


First, I sliced a couple peaches into very thin slices. Like, I sliced them just about as thin as I could. In hindsight, using a mandolin would have been a good idea to get consistently sliced peaches. 

Next, I unfolded a puff pastry sheet and rolled it out so that it was pretty thin (it should be thinner than what you see in this picture). Then I cut it into 6 strips. I spread out the mascarpone mixture onto each strip. 


Now comes the tricky part (hint: it’s not that tricky). To make the pretty rosette pattern with the peaches, I layered the peach slices one on top of the other along one half of the puff pastry strip making sure that a significant portion of the top of the peach was sticking out. On some of the tartlets, I added a second layer of peach slices just below the first. Not only did it help me use up all my peach slices, but the ratio of peach to puff pastry was much better. 

Then I folded the other half of the puff pastry up and rolled the entire thing into a tight spiral. The trick to getting the peaches to roll is to put your thinner peach slices on the end that will be in the center and the thicker ones on the outside. 

Easy peach tartlets

I placed each of the tartlets in a muffin tin then sprinkled some more sugar and nutmeg over the top of the peaches. All that was left to do was bake them and pray they still look like rosettes afterwards. 

Pretty rosette peach tartlets

And once they were out of the oven I breathed out a big ol’ sigh of relief because they turned out super cute! Not to mention, they are delicious with a side of some vanilla ice cream!

Don’t they look like they just walked out of a bakery? You could totally impress your friends with these pastries, don’t you think?

[amd-yrecipe-recipe:63]


/ Filed In: Desserts, Eat
Tagged: dessert, muffin tin, pastry, peach, puff pastry, Summer, tart

S’more Brownies

July 20, 2016

Smore-Brownies-title
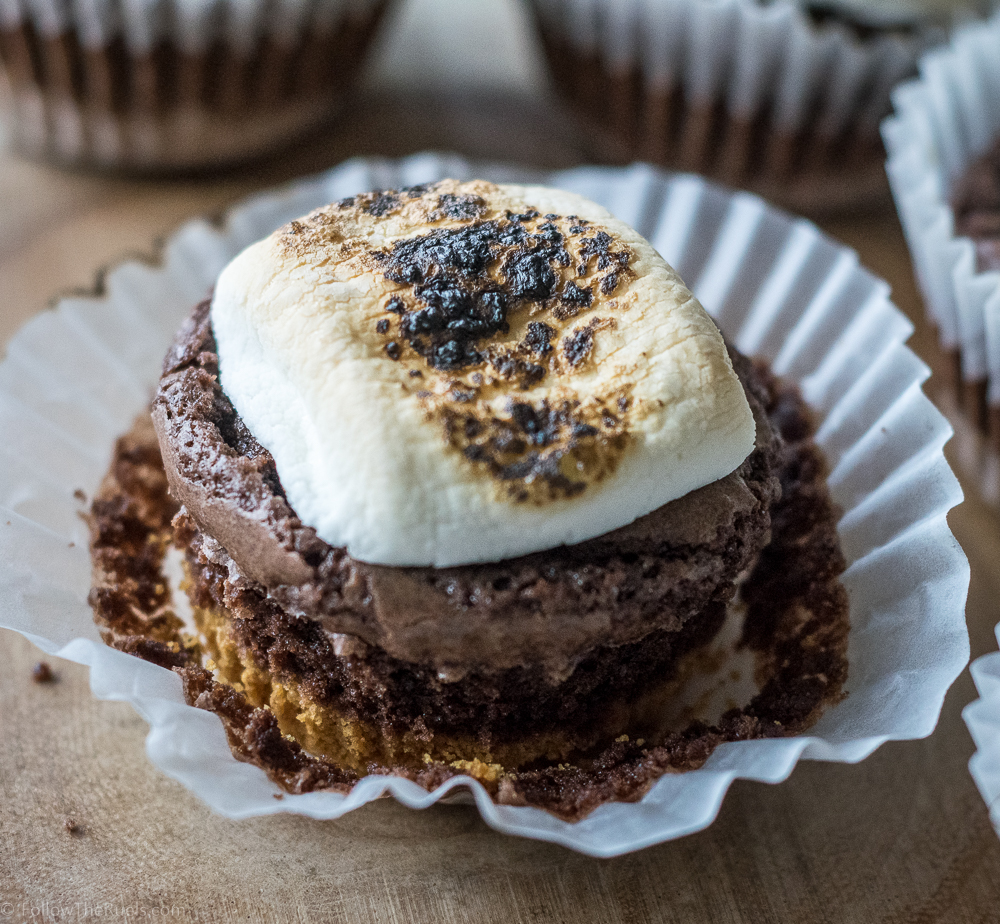
To me, s’mores are the quintessential summer dessert. Sitting around the camp fire, roasting marshmallows is one of those memories that remind me most of Summer. Because of that, I knew I wanted to make something s’mores-related for our 4th of July-firework watching-picnic. Since we wouldn’t actually have access to a camp fire, I had to come up with some other way to serve up s’mores. Then it hit me, s’more brownies!
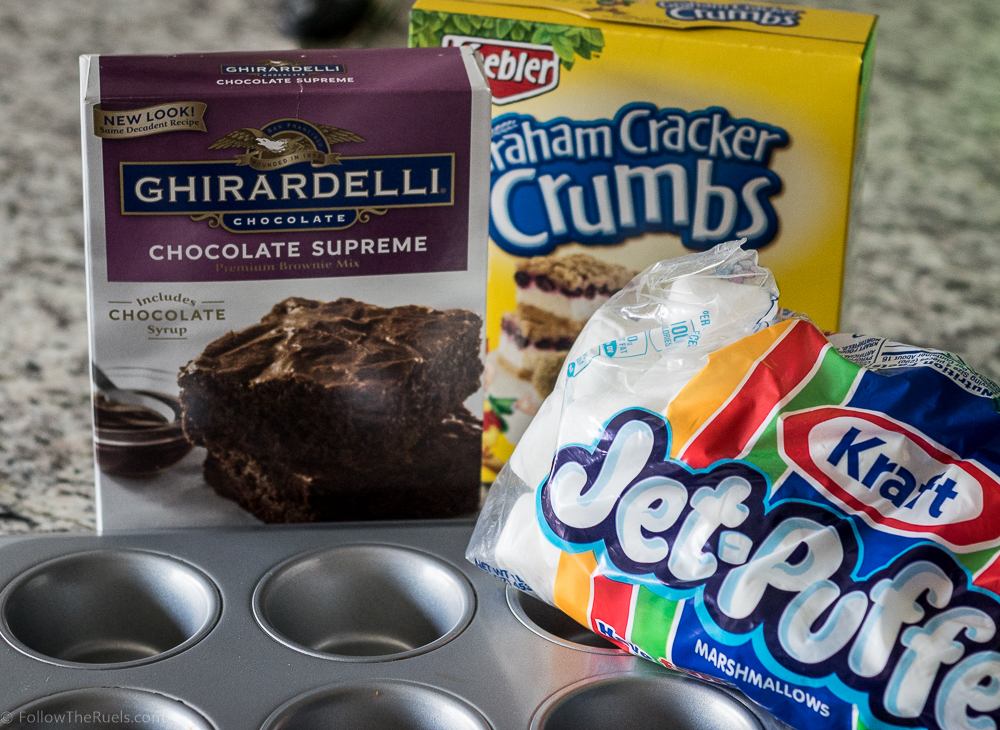
Smore Brownies-1

These s’more brownies are actually incredibly easy to make. If you follow me on snapchat, you saw that I made these brownies in less than 60 minutes while rushing out the door. All I used were some graham cracker crumbs (and butter), brownie mix, and marshmallows.


First, I mixed the graham cracker crumbs with butter and a hint of sugar, then pressed about 1-2 tbsp into the bottom of a muffin tin. I used the bottom of a sprinkles bottle to help me get an even press.

Then, I mixed together the brownie batter following the instructions on the back of the box. I have to say, this Ghiradelli brownie mix is the best boxed brownie mix I have tried. It is amazing!

Smore Brownies-6

Once the brownie were almost all the way baked, I put a marshmallow on top of each of the brownies and let those bake for about 3 minutes until they became slightly golden brown and puffy.

I had attempted charring the marshmallows under the broiler, but every time they became overly burned. That’s when I settled on the baking method which gets the marshmallows all gooey, then I could just go back over them with a kitchen torch to get them nice and charred. 

Smore Brownies-11

To me, the char is the most important part. I love a good roasted marshmallow. Like, I want that sucker on fire! (Actually, the broiler method would have been fine for me, but I know other people don’t like they food that toasted.) It’s that gooey, fire roasted marshmallows are what make this brownie so good.

Smore Brownies-12

First, you’ll bite into the top and sink your teeth into the soft marshmallow, then you’ll get a bite of the rich chocolate brownie. Then at the end, you’ll get that graham cracker crunch. It’s not exactly your fire-side s’more, but it is just as good and definitely brings back all those wonder summer memories.

[amd-yrecipe-recipe:55]

/ Filed In: Desserts, Eat
Tagged: brownie, dessert, muffin tin, s'mores, Summer

4th of July Cookies

June 27, 2016

America Cookies-12

By now you guys probably know that decorating cookies is one of my favorite hobbies. It was just last 4th of July that I shared one of my first decorated cookies here on the blog. While the stars and stripes cookies were very festive, I knew I could step my game up this year to make some even better 4th of July cookies. 

America Cookies-1

To make these cookies, I used a United States shaped cookie cutter that I picked up from Sur La Table. At the time I figured I would only use it for 4th of July, but now I have come up with lots of other ideas for USA shaped cookies.  Like for the Olympics or to celebrate moving across the country (which I may be making soon for a friend who is moving to North Carolina from Kansas). 


To create the flag design on the cookie, I marked out 13 evenly spaced lines from top to bottom. I then marked off where I wanted the blue square to start and stop. Of course, if you don’t want to pipe so many stripes (it was a pain in the butt), you could do fewer. Once I was happy with the lines, I piped out the field of blue with flood consistency royal icing. I then dotted several lines of 5 or 6 dots across for the stars.


Next, I piped the stripes, starting with red, then white, then red, and so on with flood consistency icing. I used a scribe tool (you can use a toothpick), to move the icing as close to the stripe above so that there were no gaps between the red and white. If you just can’t picture how that works, I would recommend watching the video I made for the stars and stripes cookie to see it in action. If that seems too difficult, you can also fill the whole striped portion of the flag with white icing, and then pipe, paint, or draw on the red strips. If you look at the “Freedom” flag in the picture at the top, that’s what I did. I piped the whole thing in white, then piped over it with red stripes. I just couldn’t fit as many stripes in that way.


I let the cookies dry overnight so that the icing was completely hardened. The next day, I used piping consistency icing to pipe on some fun patriotic words and phrases like, “born in the USA” or “‘Merica”. The latter was my husband’s suggestion. Actually, he wanted me to spell it “Murica”. We compromised. Once that icing had dried, I brushed over it with some edible gold paint. 

4th of July Cookies


I will definitely be saving these in the freezer and bringing them to our 4th of July festivities. One of my husbands friends just moved to town, so we are excited to show him and his fiance how Charlotte celebrates the 4th! I hope you all have a wonderful holiday weekend and let me know if you attempt these cookies! I would love to see how they turn out!

I used this sugar cookie recipe and this royal icing recipe. 

/ Filed In: Cookies New, Decorated Cookies, Eat
Tagged: 4th of July, cookies, decorated cookies, Summer

Farmer’s Market Tomato Tart

June 1, 2016

Farmer's Market Tomato Tart

On a recent trip to my local farmers market I noticed that tomatoes were everywhere. They had all sots of colors, shapes, and sizes. It’s got to be tomato season, right? (a quick Google search confirms that tomato season here in the Carolinas is May through October).  And even though I am a terrible food blogger for not knowing the appropriate seasons to buy produce, I do know when there is a good deal on heirloom tomatoes you snatch them up as quickly as possible. And then turn those tomatoes into a delicious and colorful tomato tart.  

Farmer's Market Tomatoes

These were the tomatoes that I picked up. I mean, aren’t they pretty? I was actually sad that I had to cut them up…but only until I tasted a slice and it was so juicy and delicious! I really love tomatoes. I know they aren’t everyone’s favorite, which doesn’t totally make sense to me, but to each their own. They are just missing out!

Farmer's Market Tomato Tart

The first thing you have to do when you are baking with tomatoes is let them drain. They are some slippery little suckers (name the movie!) and I didn’t want them to make my tart all soggy. So I placed the slices of tomato on some paper towels to drain until the tart was ready to be prepped. 

Tomato Tart

To assemble the tart, I started with some refrigerated pie crust. You are more than welcome to make your own, but I know my strengths and pie crust is not one of them. Then topped that with some caramelized onion, Gruyere cheese, then those lovely tomatoes, and then topped with some extra Parmesan cheese and thyme. 

Tomato Tart with Gruyere and Thyme

Of course all the ingredients probably sound pretty similar to a pizza, so it would be no surprise that this tastes a lot like a pizza, but so much more “French” (as I mentioned on Snapchat). It also tastes so fresh and light, it was a perfect summer lunch.

Farmer's Market Tomato Tart

When I make this again (because it’s not a matter of if) I will definitely serve it a long side a big Summer salad filled with lots of veggies. I would also make this again for a brunch or in mini form for a baby or bridal shower. It is sure to be a hit (unless you are friends with those pesky tomato haters)!

[amd-yrecipe-recipe:37]

/ Filed In: Eat, Main Dishes, Other Savories New
Tagged: farmers market, Summer, tart, thyme, tomato

Not Your Father’s Root Beer Float

May 27, 2016

Root-Beer-Float

A couple weekends ago we had some out of town friends staying with us while they looked for apartments deciding whether or not to move to Charlotte. Of course my husband and I rolled out the red carpet which involved stops at some of our favorite breweries and barbecue spots. Somehow after a day of  beer drinking and meat eating we thought it would be a good idea to stop by the grocery store to buy up all the flavors of Oreos we could find and fixings for some root beer floats. The girls were in charge of the Oreos (we left with 6 of the over 10 possible flavors), the boys were responsible for the root beer floats. 

Somehow they ended up with some Not Your Father’s Root Beer. Typical boys right? If you haven’t had it before, it tastes EXACTLY like root beer, but is alcoholic. It’s very dangerous. And you know what makes it even more dangerous? Pouring it over vanilla ice cream. 


Seriously, It had been a while since I had a root beer float, but man they are good. And I am not sure it it was all the Oreos are the kick in the root beer, but this was the best root beer float I have had. Creamy, sweet, refreshing, with a bit of a kick.

Root Beer Float-4

I know there are some other brands of alcoholic root beer, but this is the only one I have had and can vouch for. If you can’t get your hands on some but still want to make your own adult root beer float, I would recommend adding a shot of vanilla vodka. I mean, if you really wanted to have a party you could add the vodka with the alcoholic root beer and I bet it would be amazing. 

Root Beer Float-6

So if you want to have some nostalgic fun this Memorial Day weekend, make yourself your own Not Your Father’s Root Beer Float (or any adult root beer float). I promise it will bring back some childhood memories with all the grown up benefits!

Have a safe and happy holiday weekend!

[amd-yrecipe-recipe:35]

/ Filed In: Desserts, Drinks, Eat
Tagged: drink, ice cream, root beer, root beer float, Summer

  • Newer Entries
  • 1
  • 2
  • 3
  • Previous Entries

Follow

Hey There!

Hey there, I'm Lindsey. I'm a number cruncher by day and a home cook and baker by night. While I love to eat healthy and find fresh and healthy alternatives for my favorite foods, I will never turn down dessert! Life is all about moderation, right?

Recipes

  • All Recipes
  • Breakfast
  • Appetizers
  • Salads
  • Main Dishes
  • Side Dishes
  • Desserts
  • Drinks

Favorite Finds

[show_lookbook_widget id=”388783″]

Theme by 17th Avenue · Powered by WordPress & Genesis