• Home
  • Eat
    • Breakfast
    • Appetizers
    • Main Dishes
      • Chicken
      • Beef
      • Seafood
      • Healthy Dishes
      • Paleo Dishes
      • Salads
    • Desserts
      • Decorated Cookies
      • Cookies
      • Bars and Brownies
      • Cakes and Cupcakes
  • Shop
    • Cookie Decorating Supplies
    • Bakeware
    • Cookware
    • Kitchen Gadgets
    • House
  • About
    • Contact
    • Bucket List
  • Cookie Decorating 101

Follow the Ruels

Fondant Flower Stem Cookies

August 20, 2018

There are lots of things that inspire me and my cookie decorations, but I tend to find lots of inspiration from cake decorators! They are just so talented and are working with a very similar medium (and limitations), which make adapting certain cake designs to cookies pretty easy.

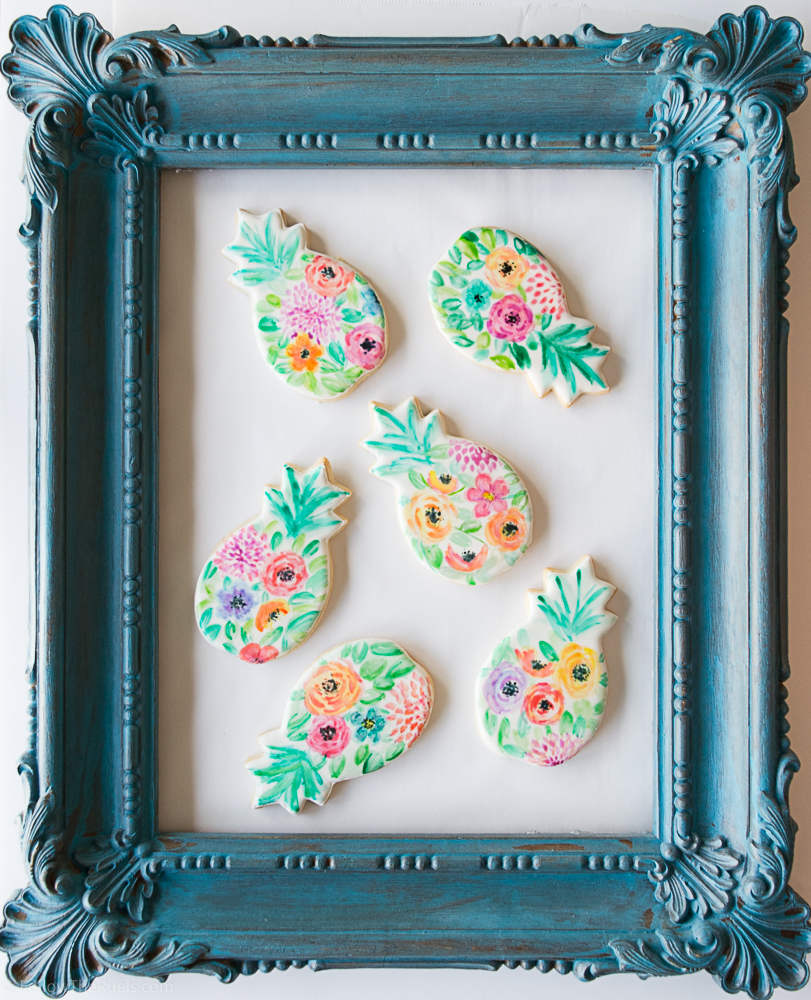
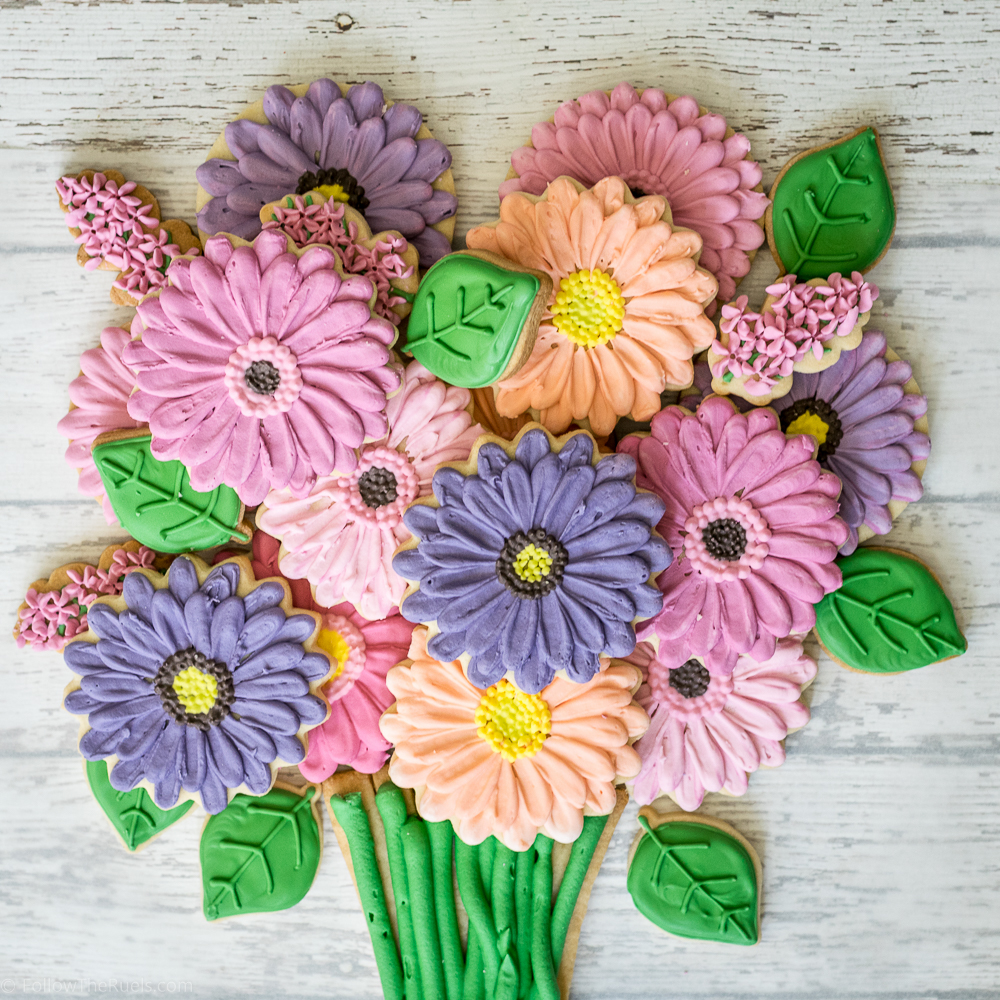
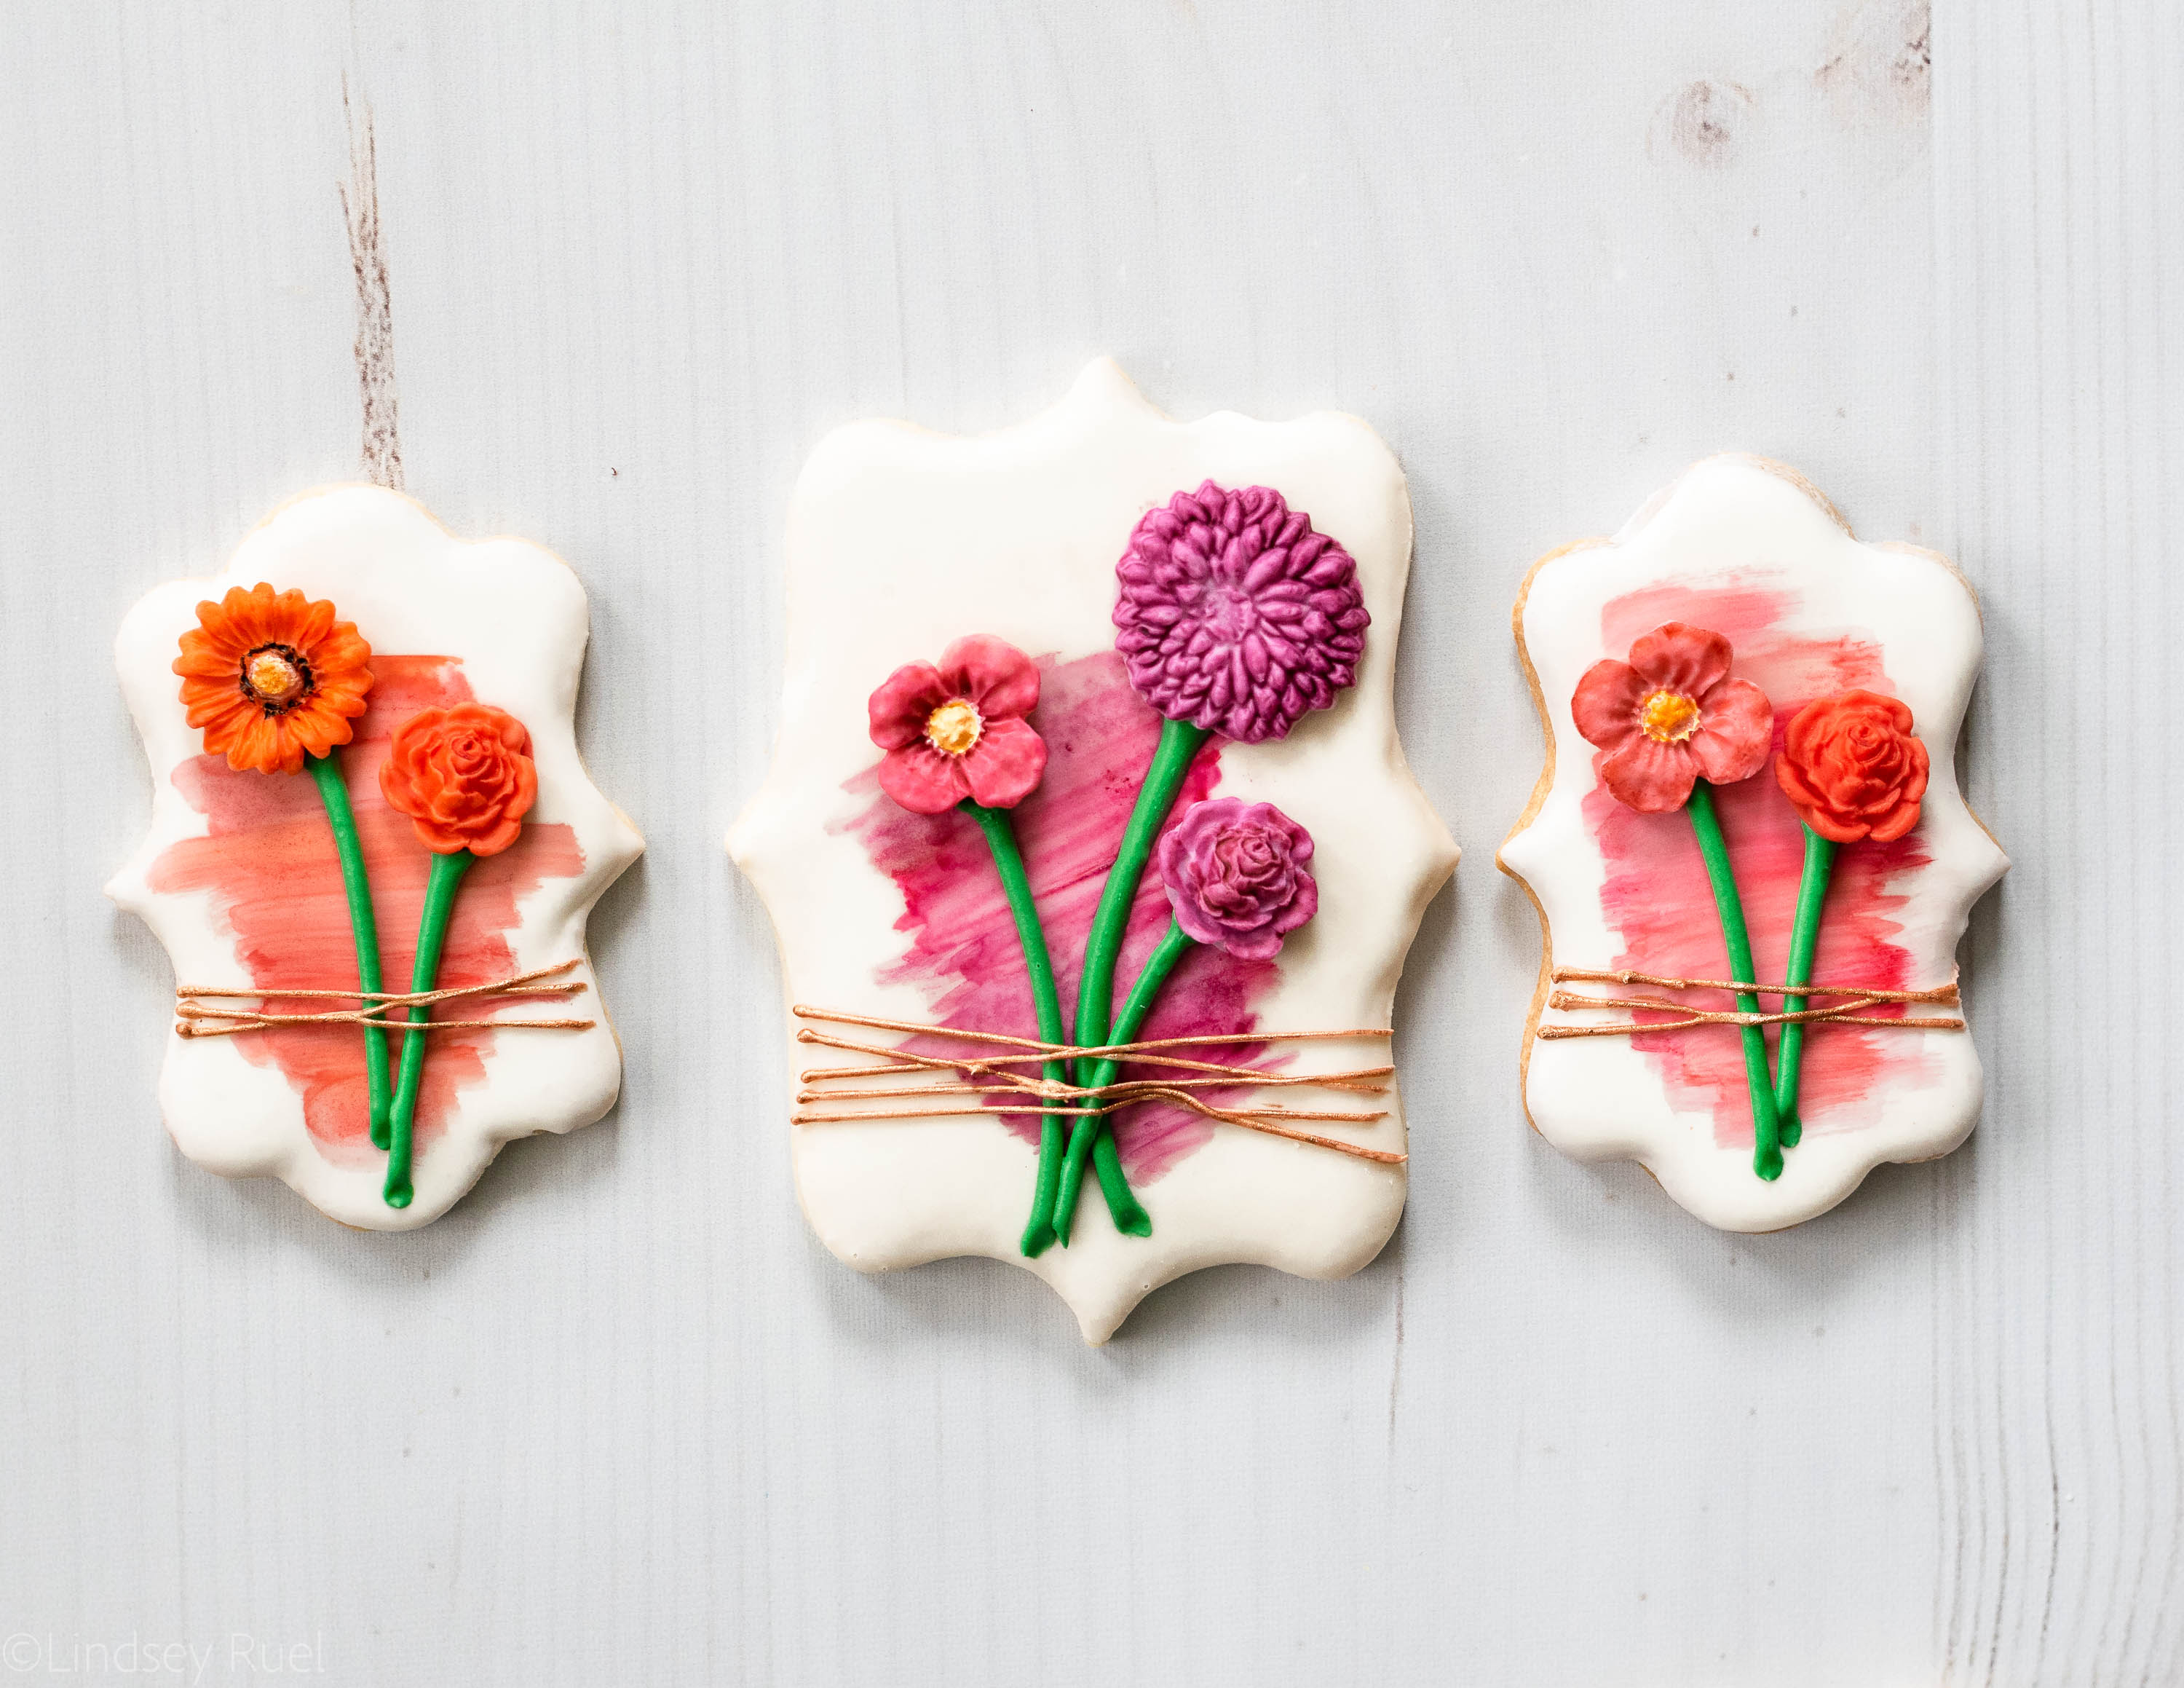
These particular cookies were inspired by a cake an Australian cake designer who goes by @donttellcharles. His cake was very simple. A little bit of a painted effect topped with two beautiful ranunculuses, tied to the cake with a bit of twine. I mean, it’s just gorgeous! 

Which is why I had to make something similar in cookie form. And while they aren’t quite the same – they don’t have fresh flowers on them – I did try to recreate the flowers using clay and fondant molds. 

Tools and Recipes

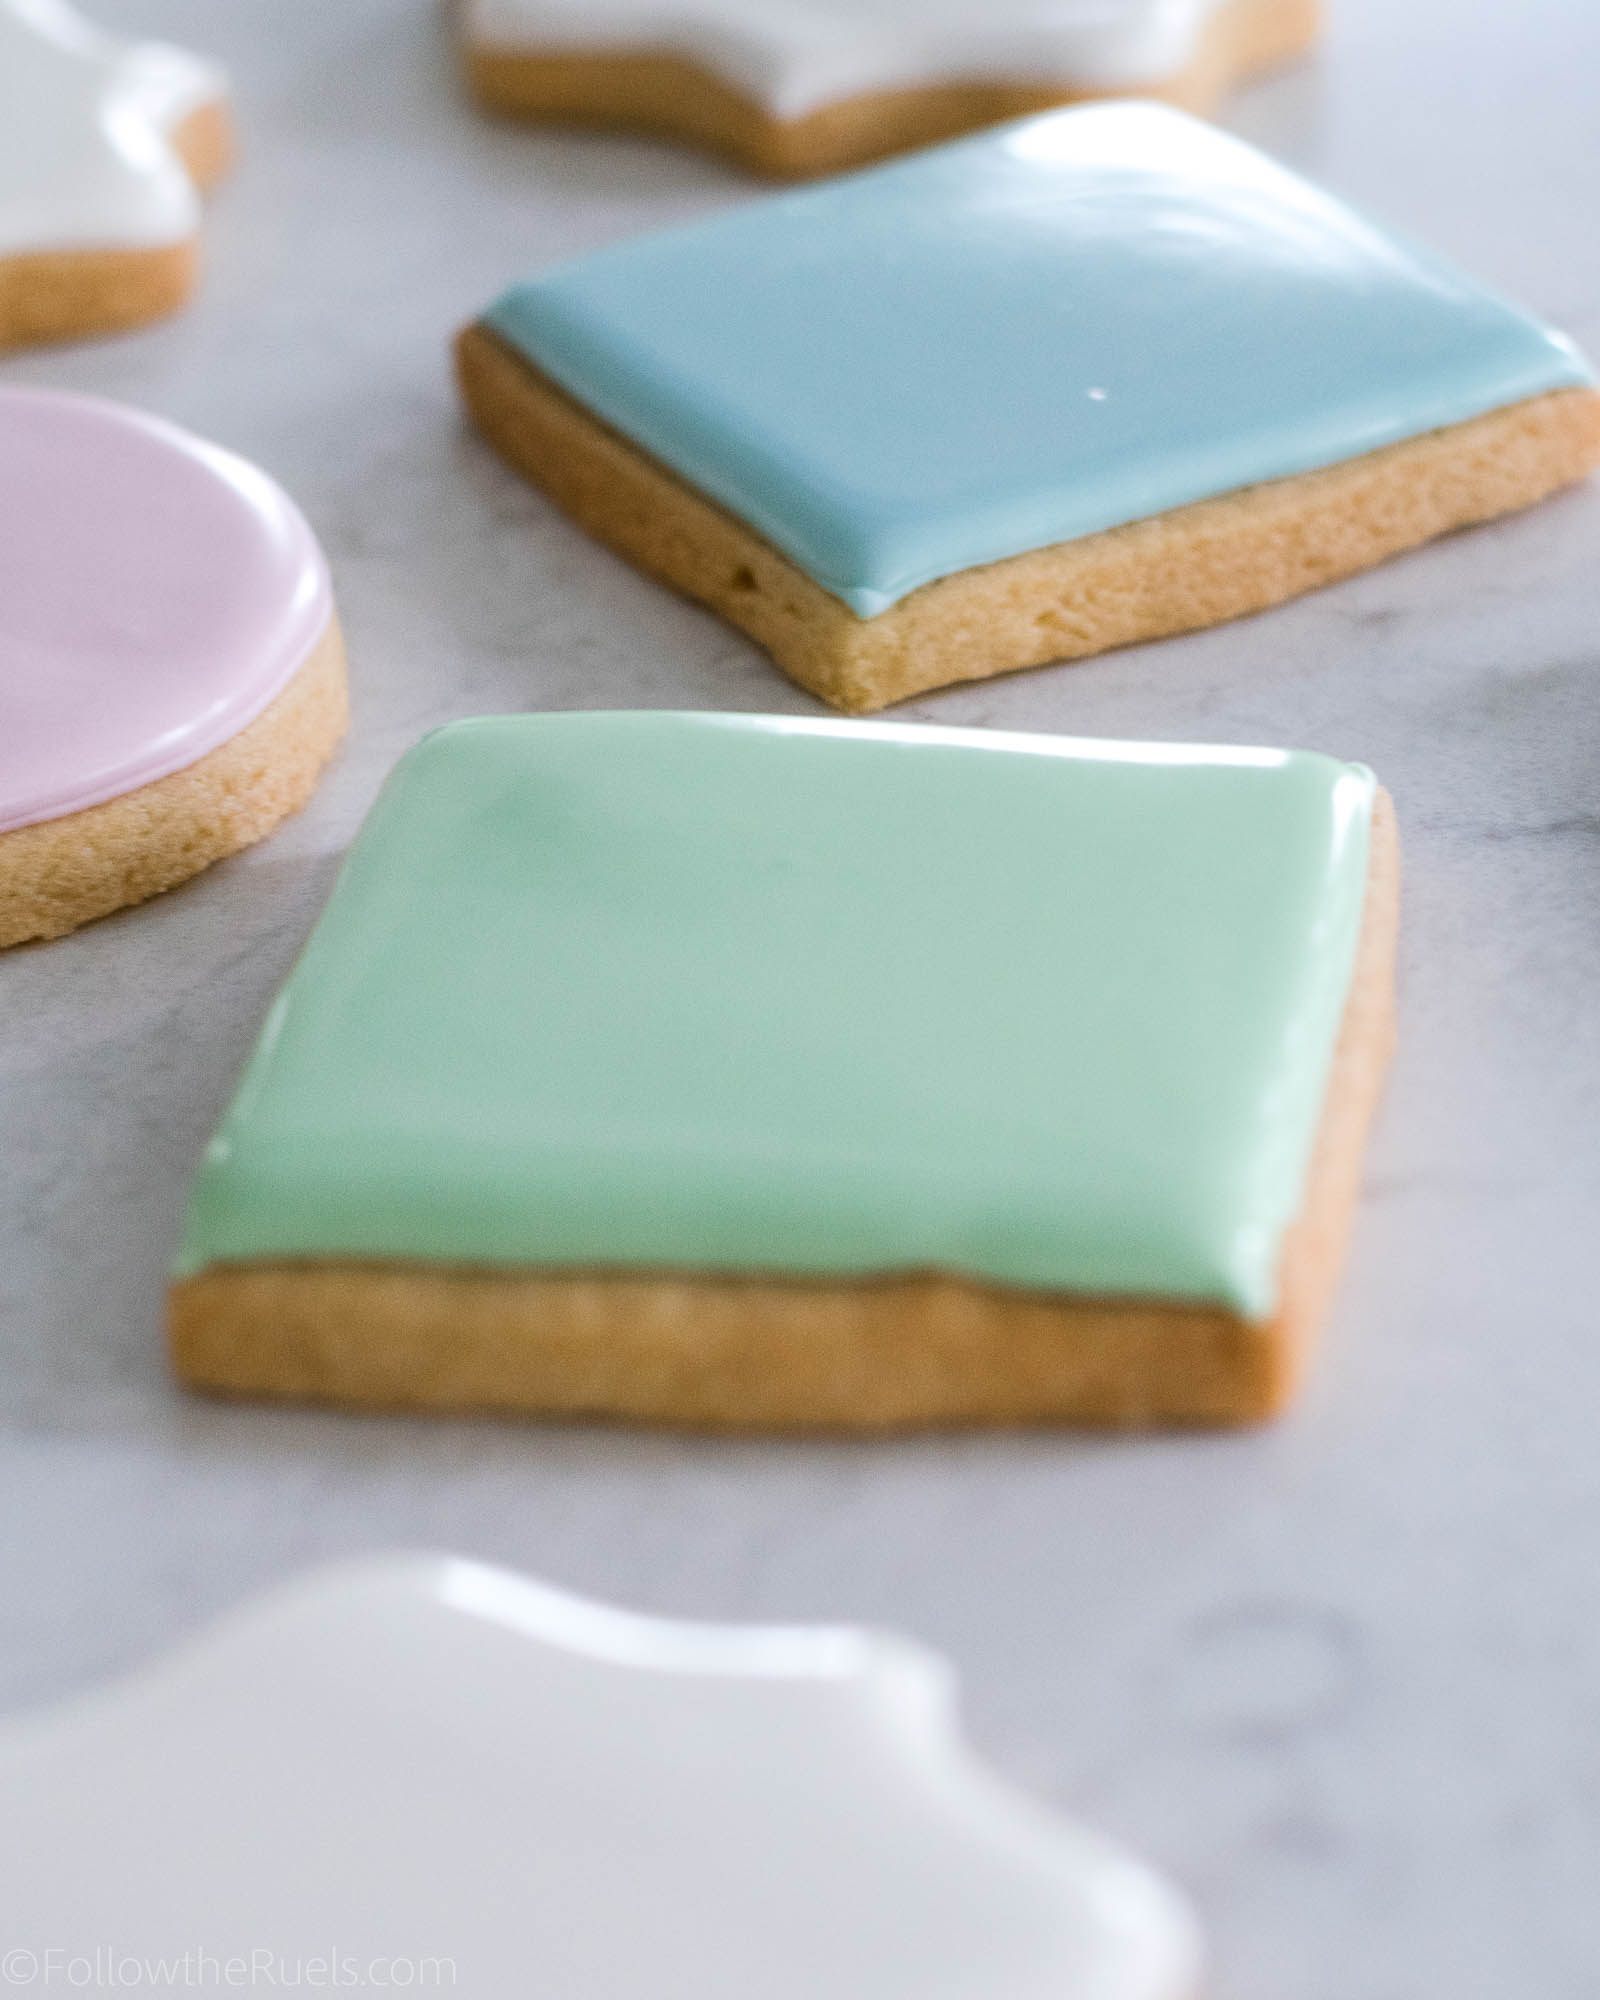
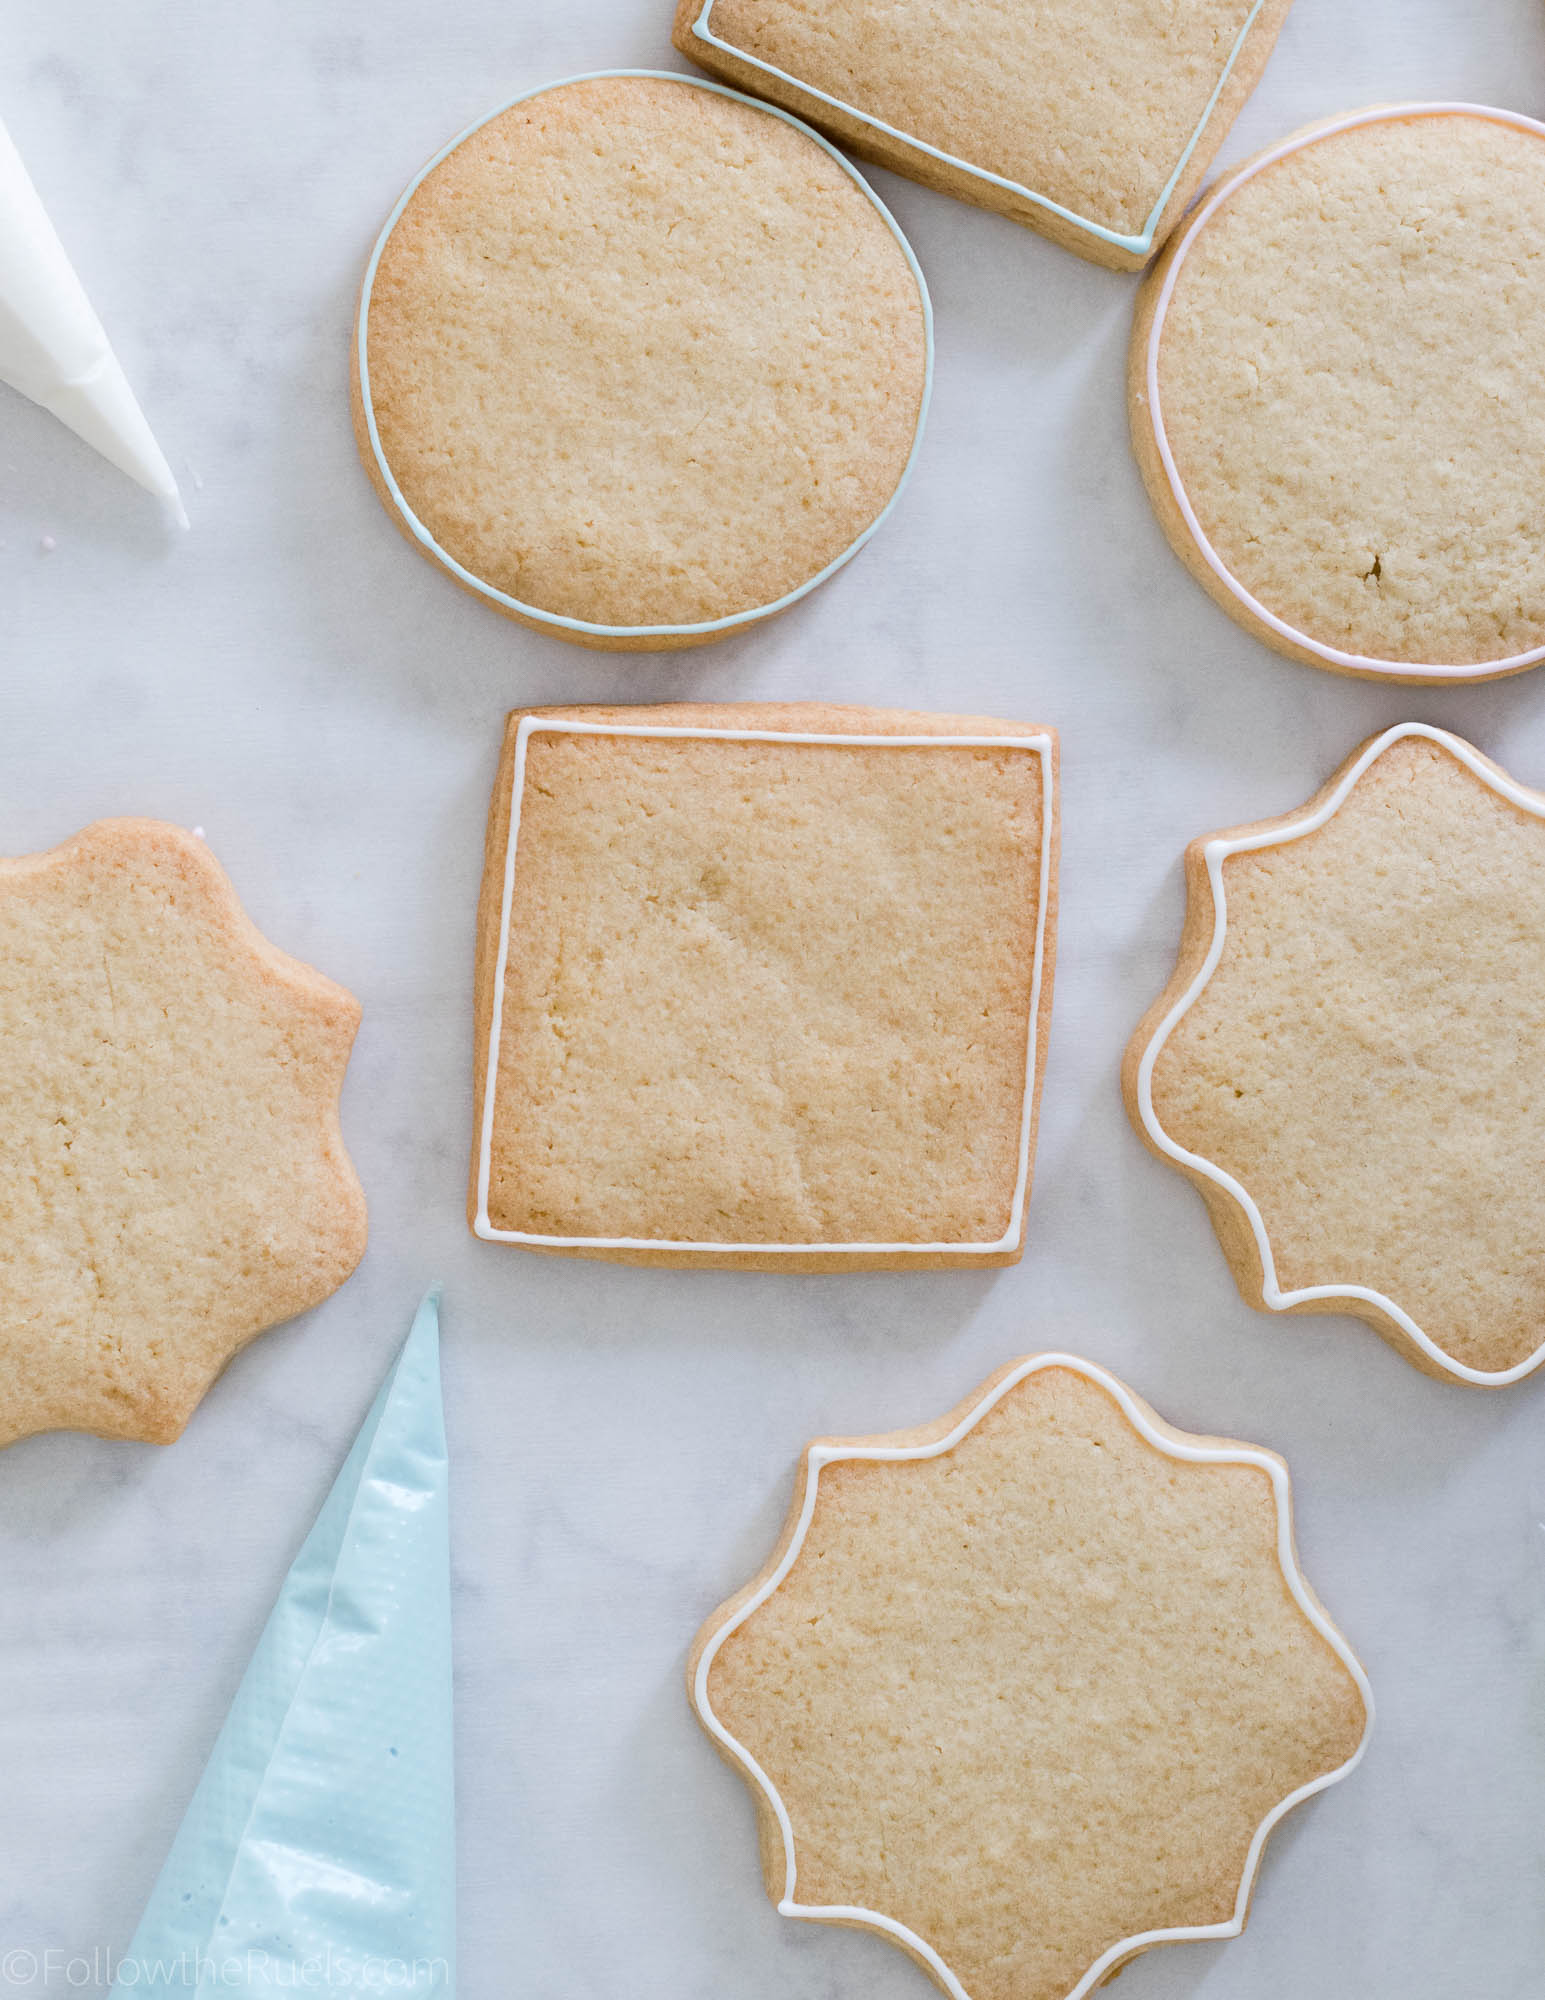
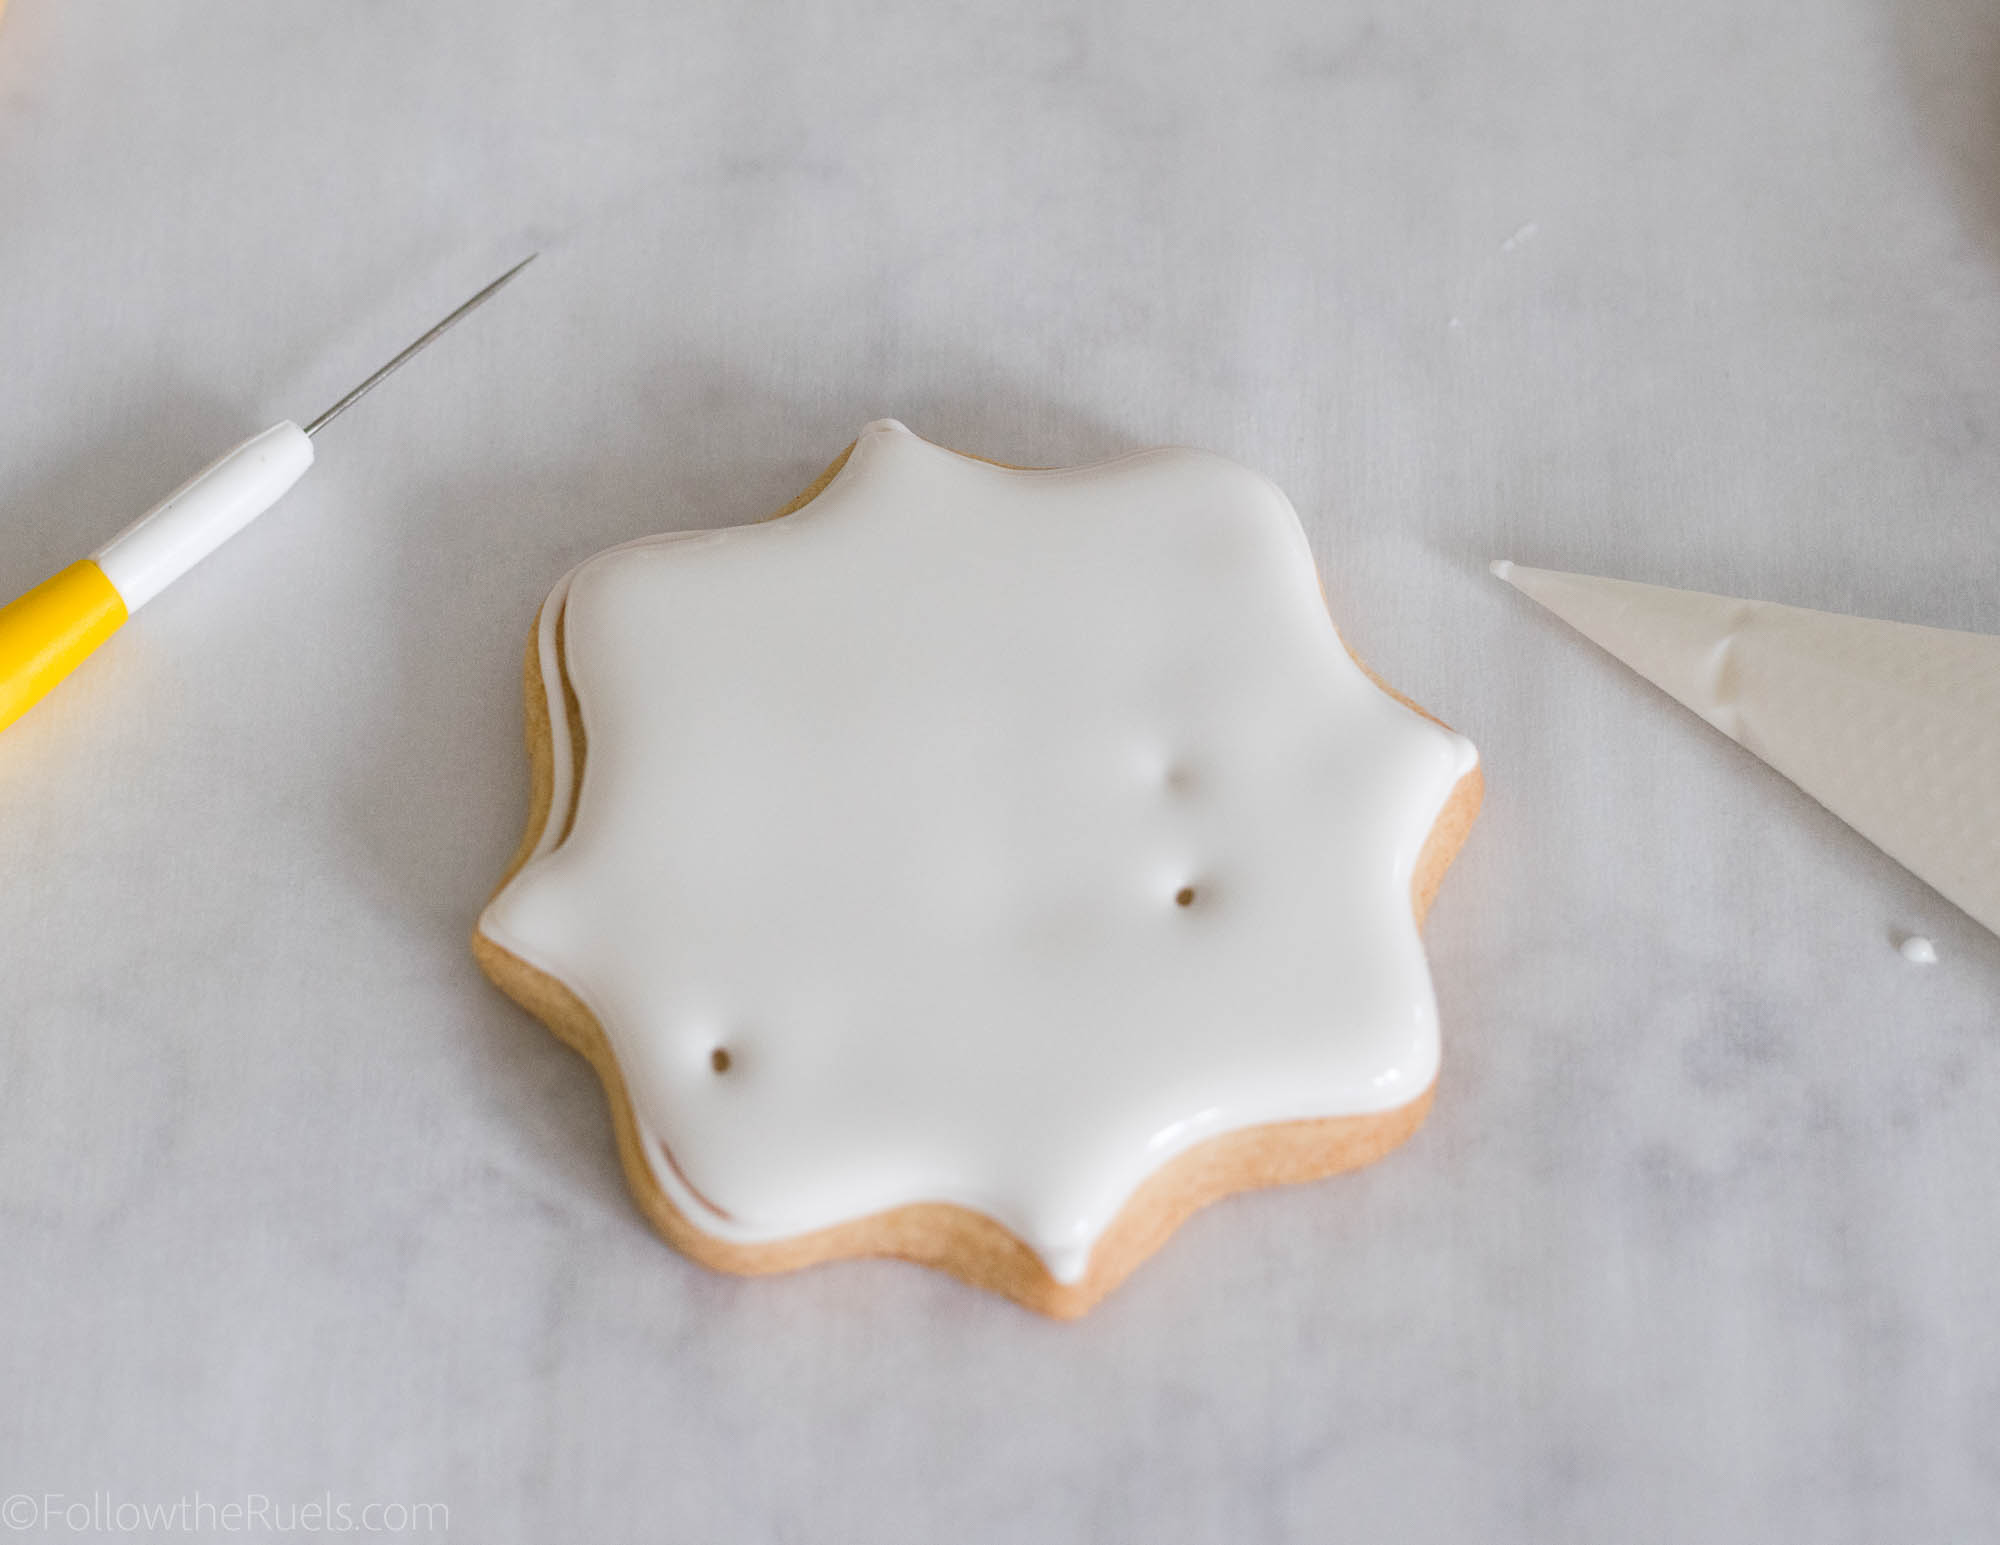
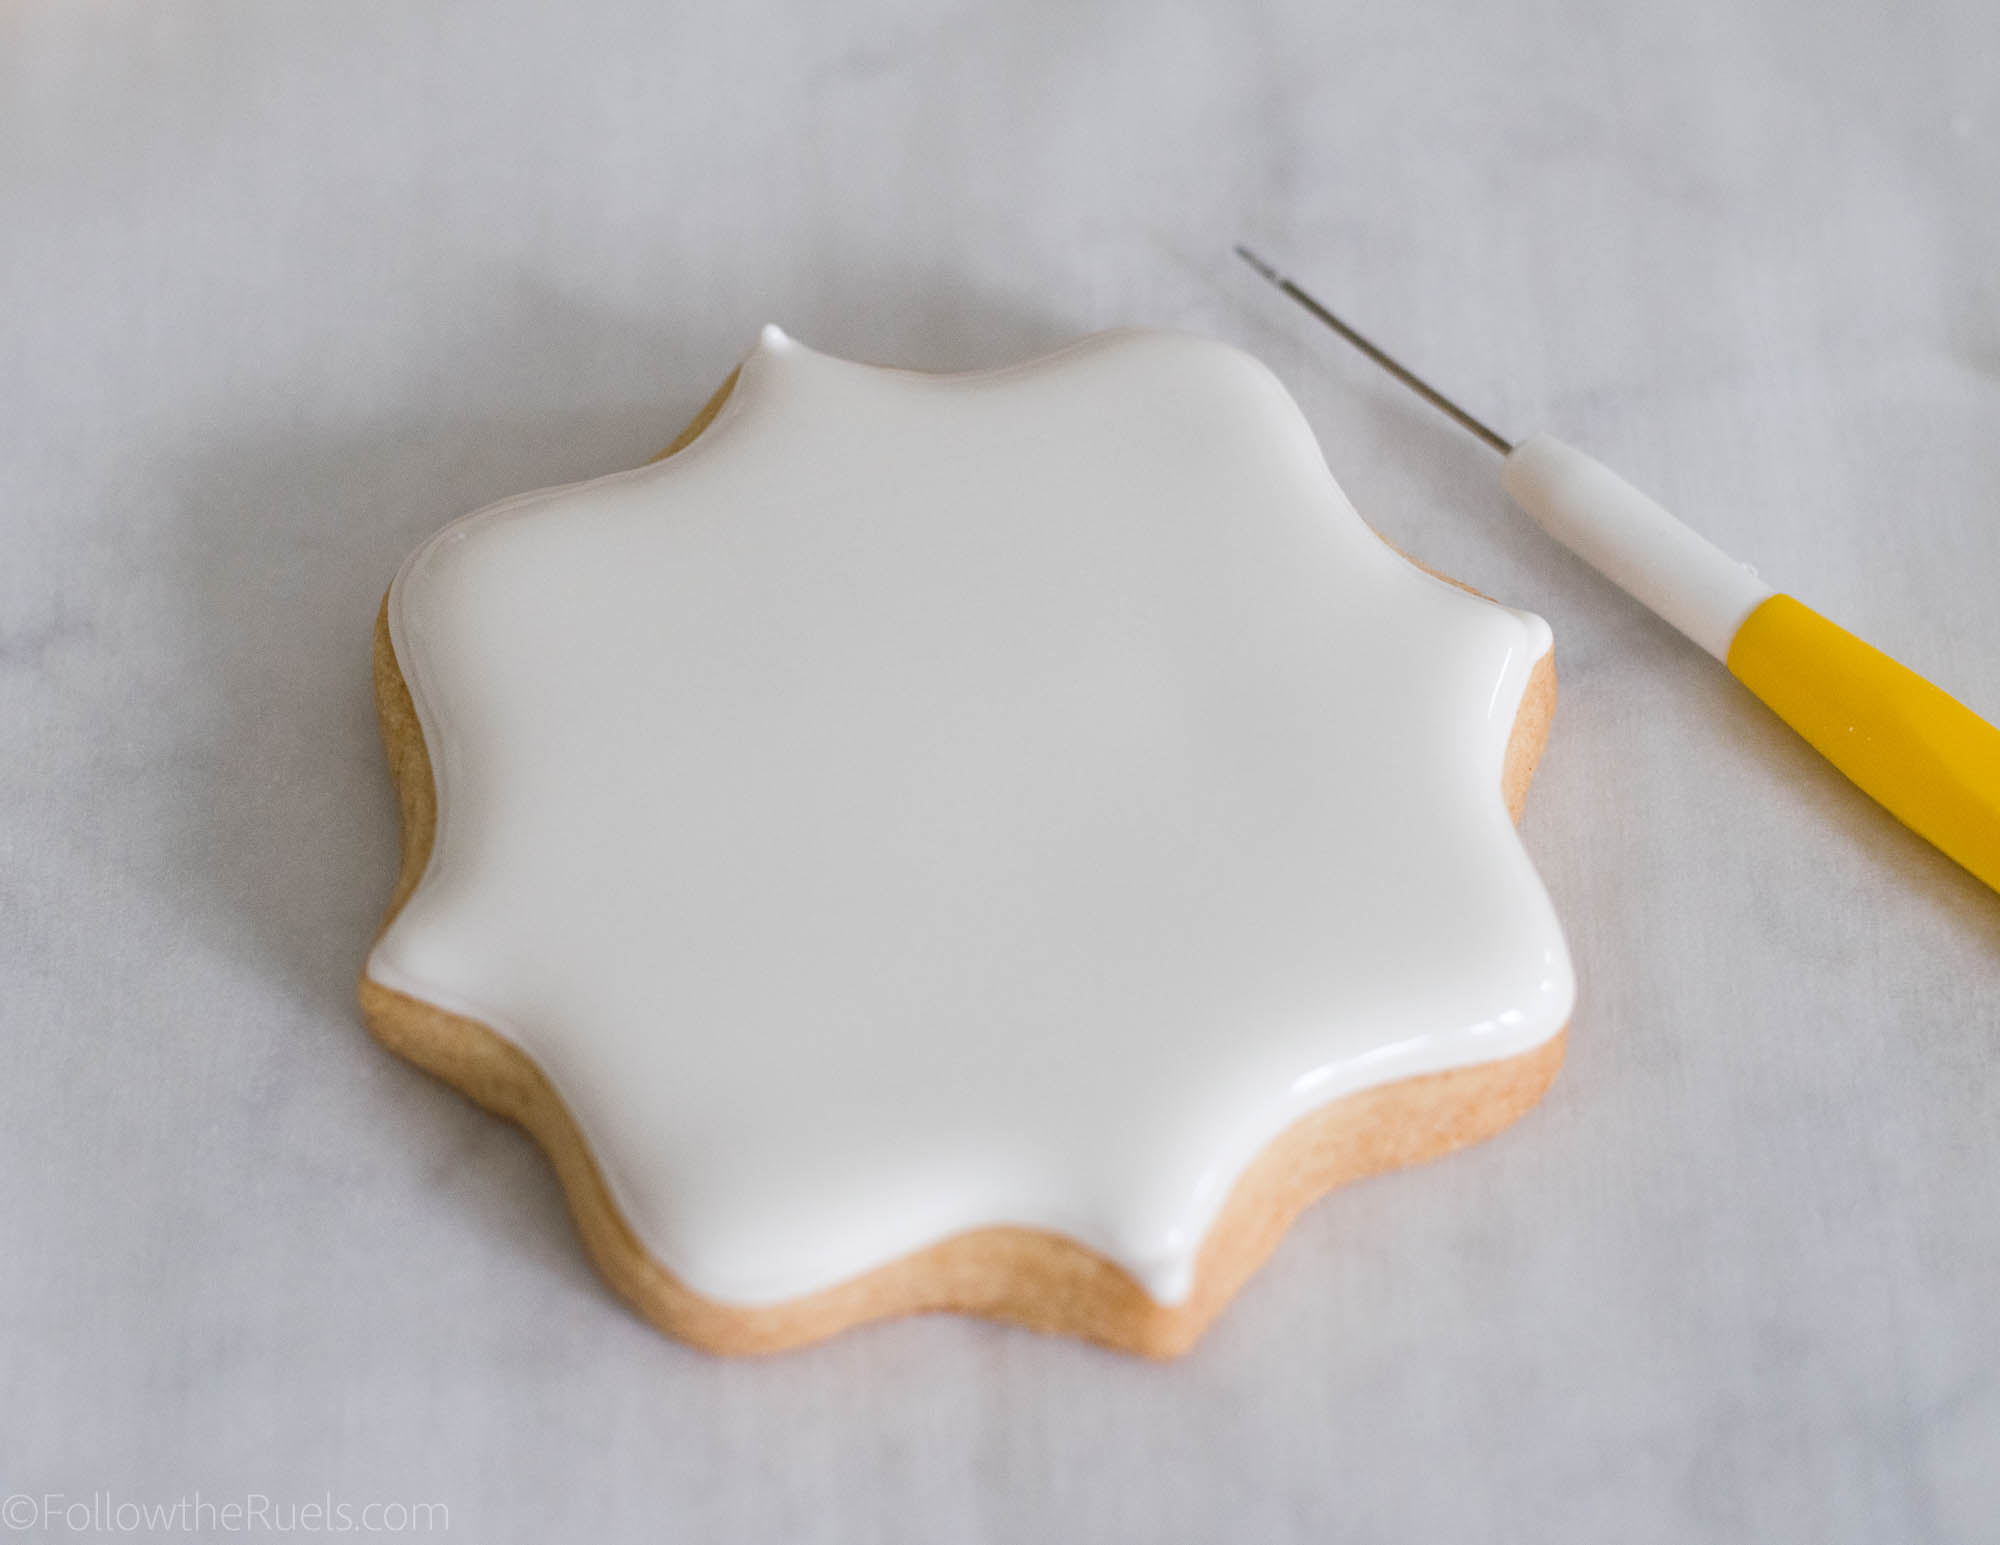
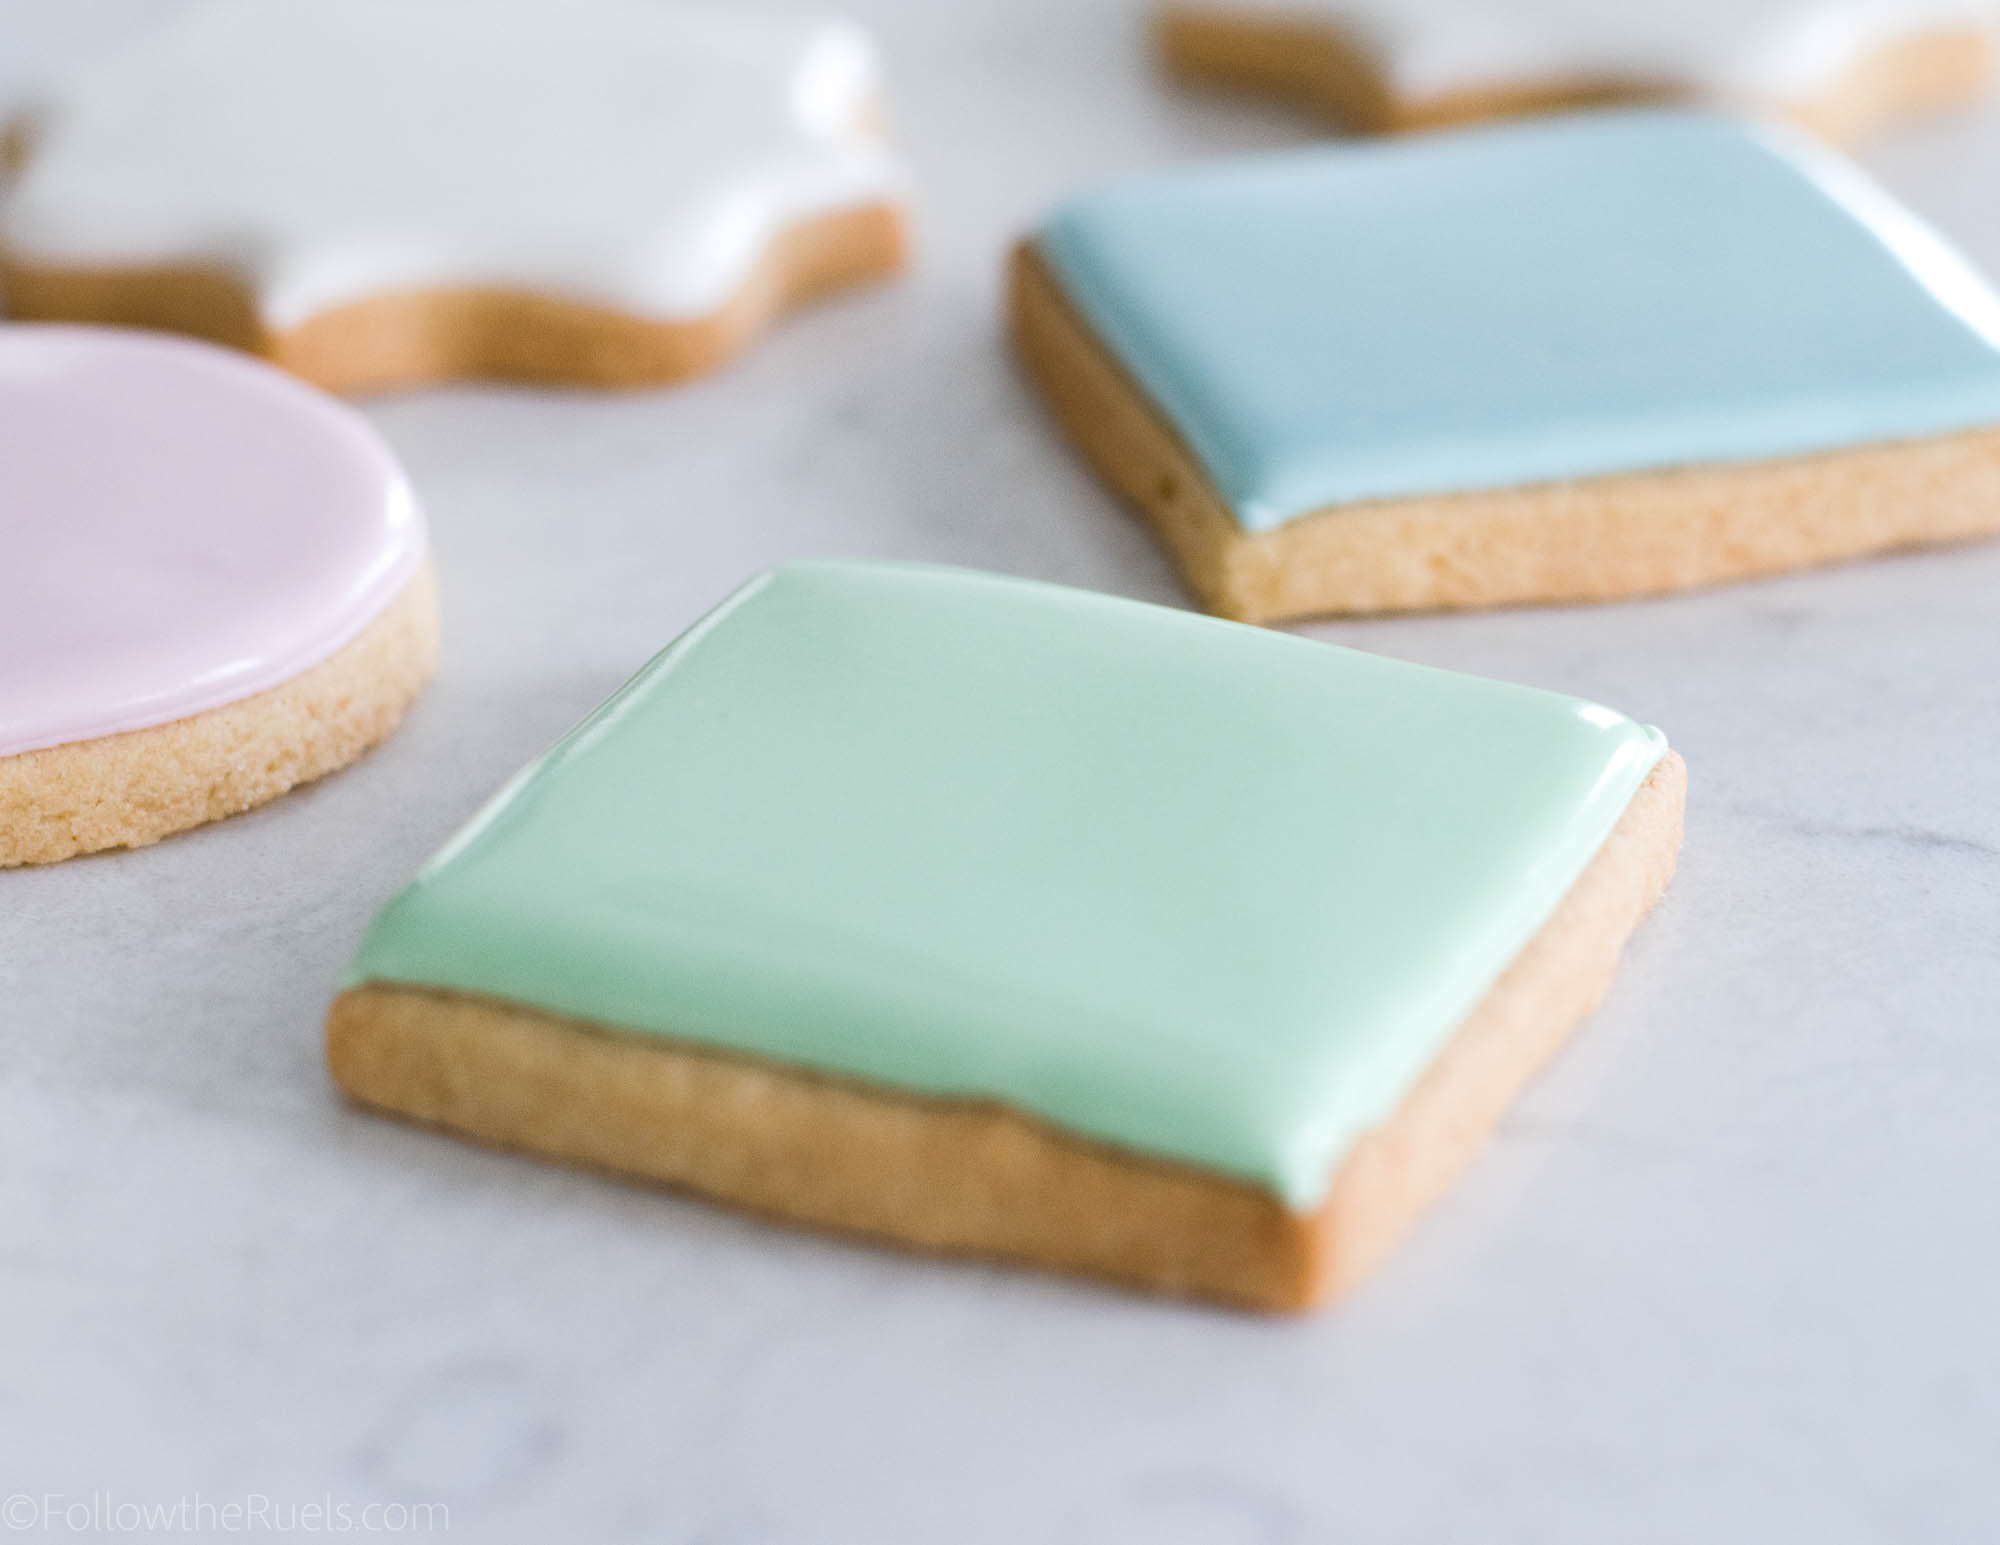
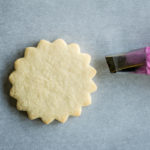
For these cookies you will need sugar cookies cut into some sort of basic shape, like a rectangle or plaque. 

You will also need royal icing:

  • White or plain flood consistency icing
  • Green stiff consistency icing
  • Brown stiff consistency icing

To make the flowers you will need:

  • Fondant
  • Gel food coloring
  • Fondant or clay molds (I included some of my favorites below)

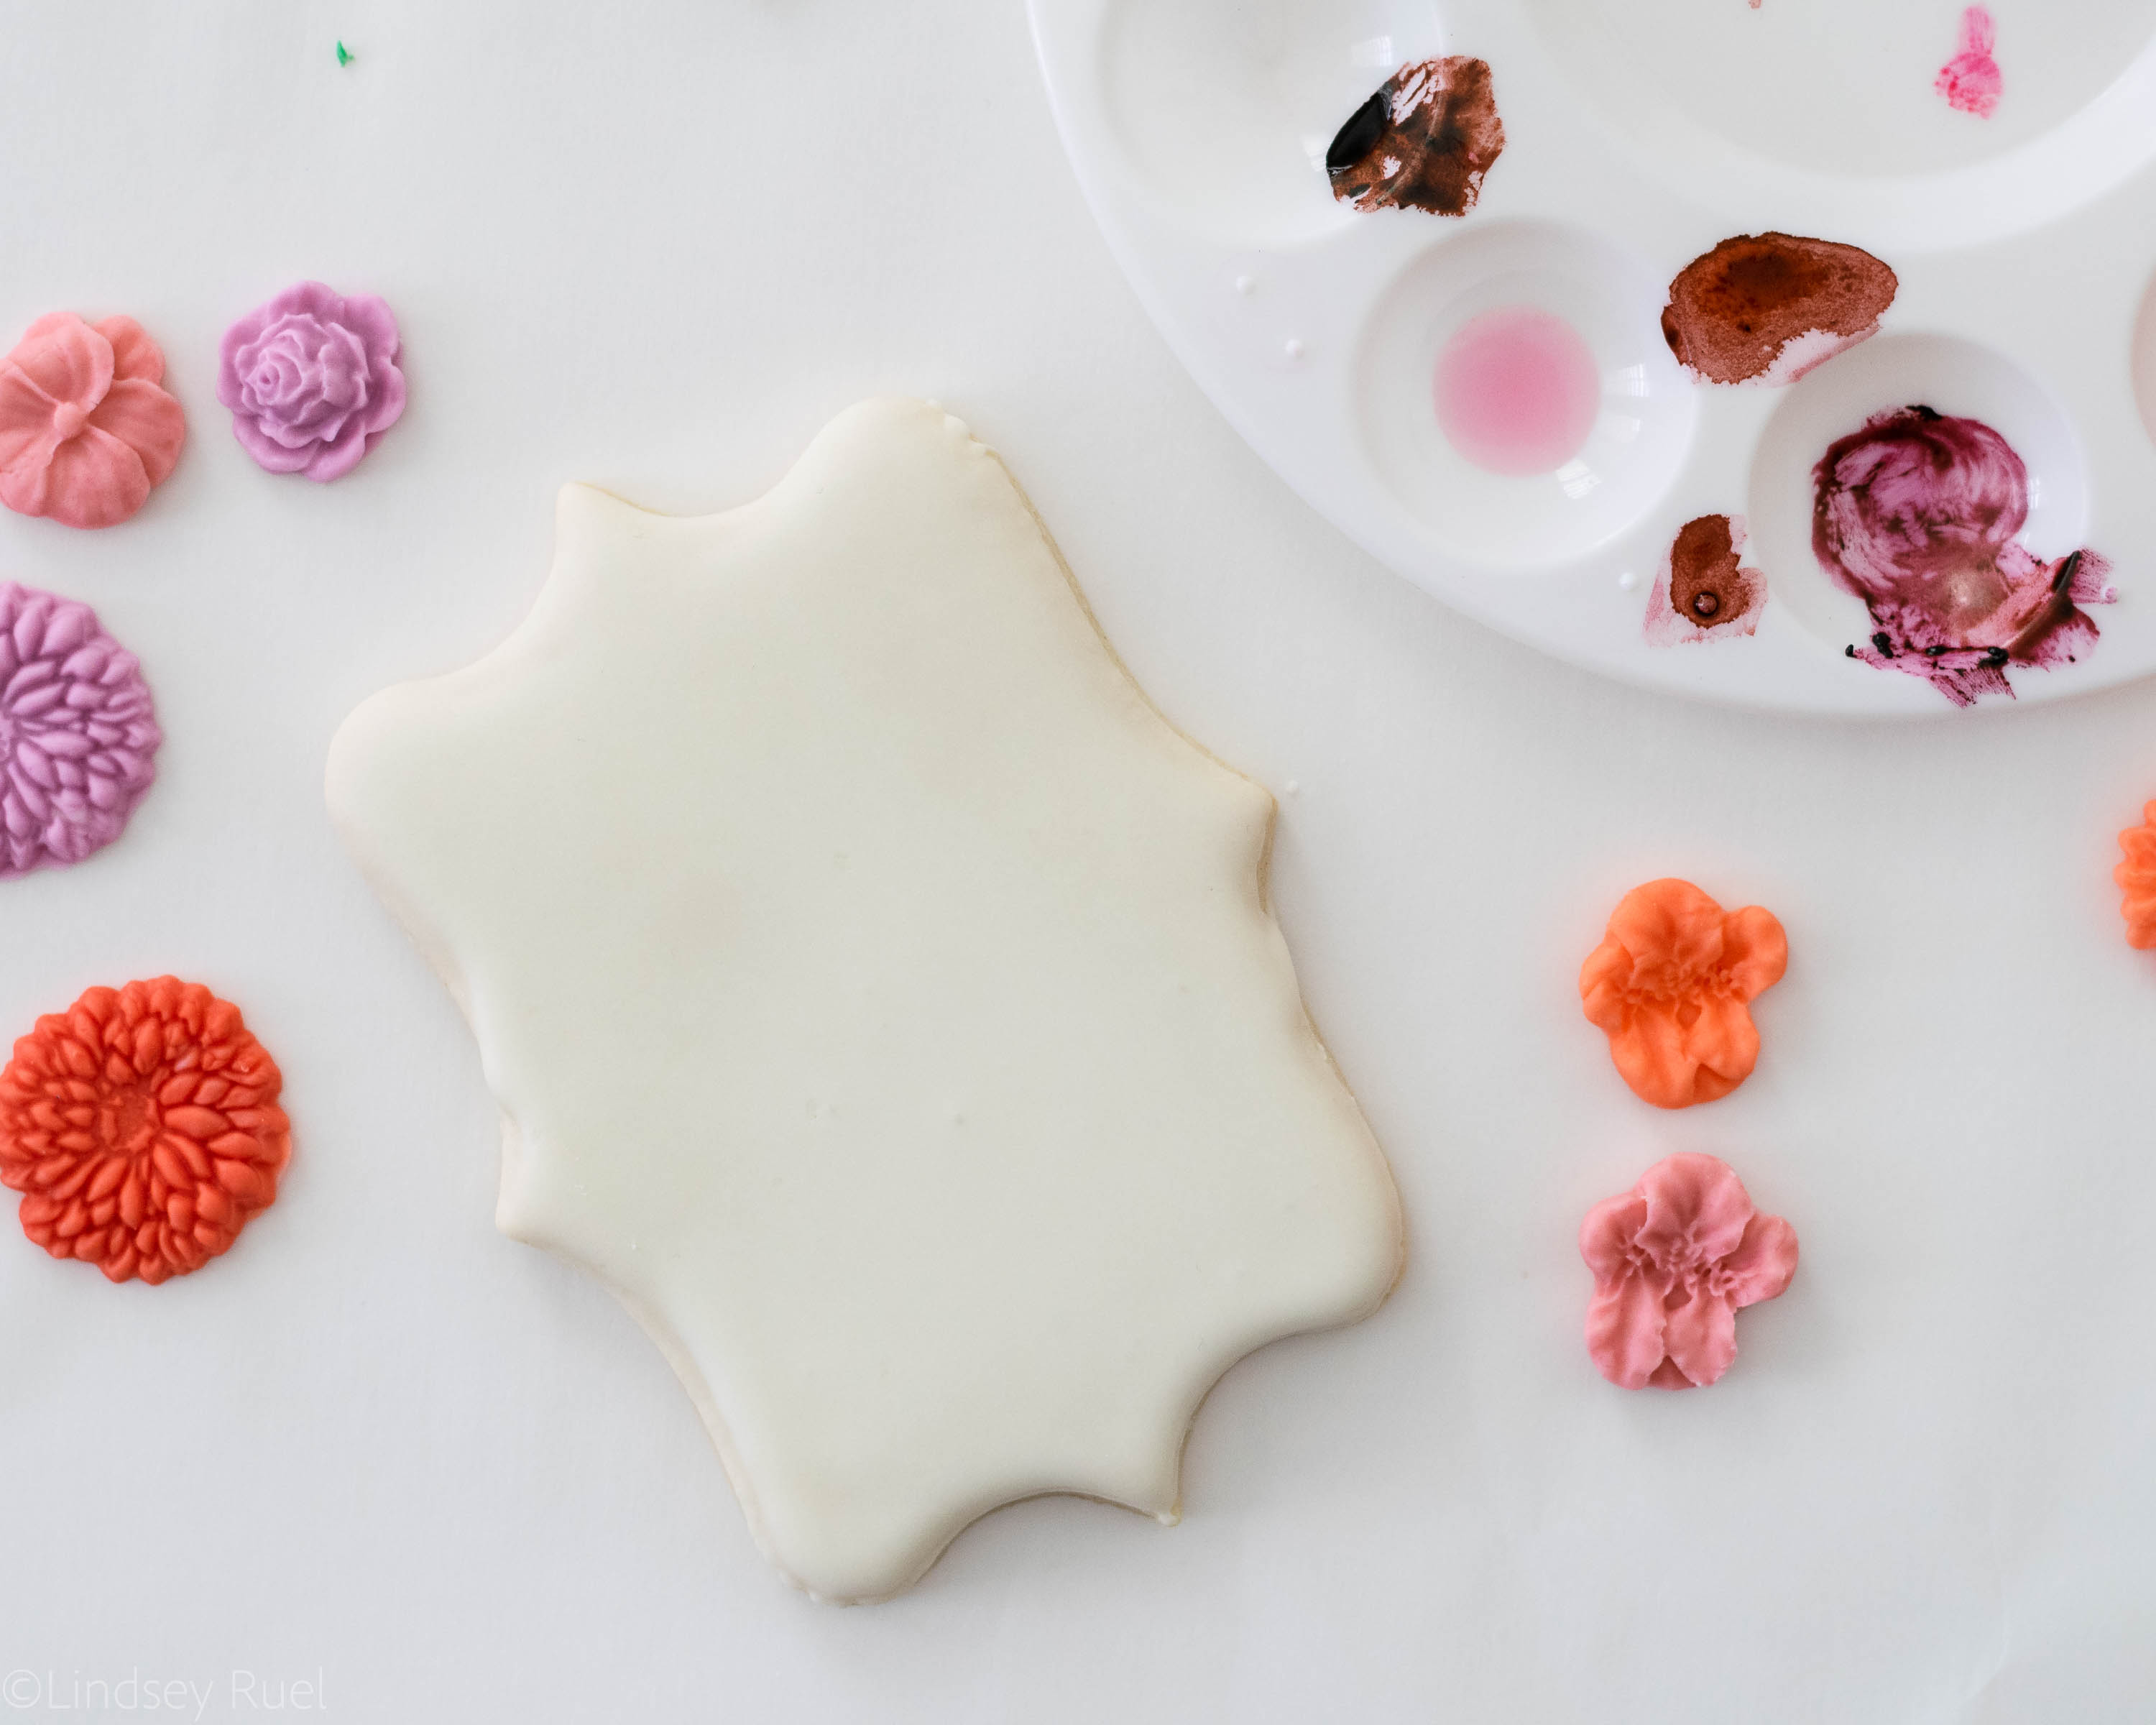
This was my first time using a fondant mold and it could not have been easier! Fondant is so similar to clay and is easy to shape using just about anything. I found one mold at the local craft store in the clay modeling aisle and I bought another one online that is specifically designed for fondant. Both worked the exact same way.

For the rest of the decorating, it would be helpful to have:

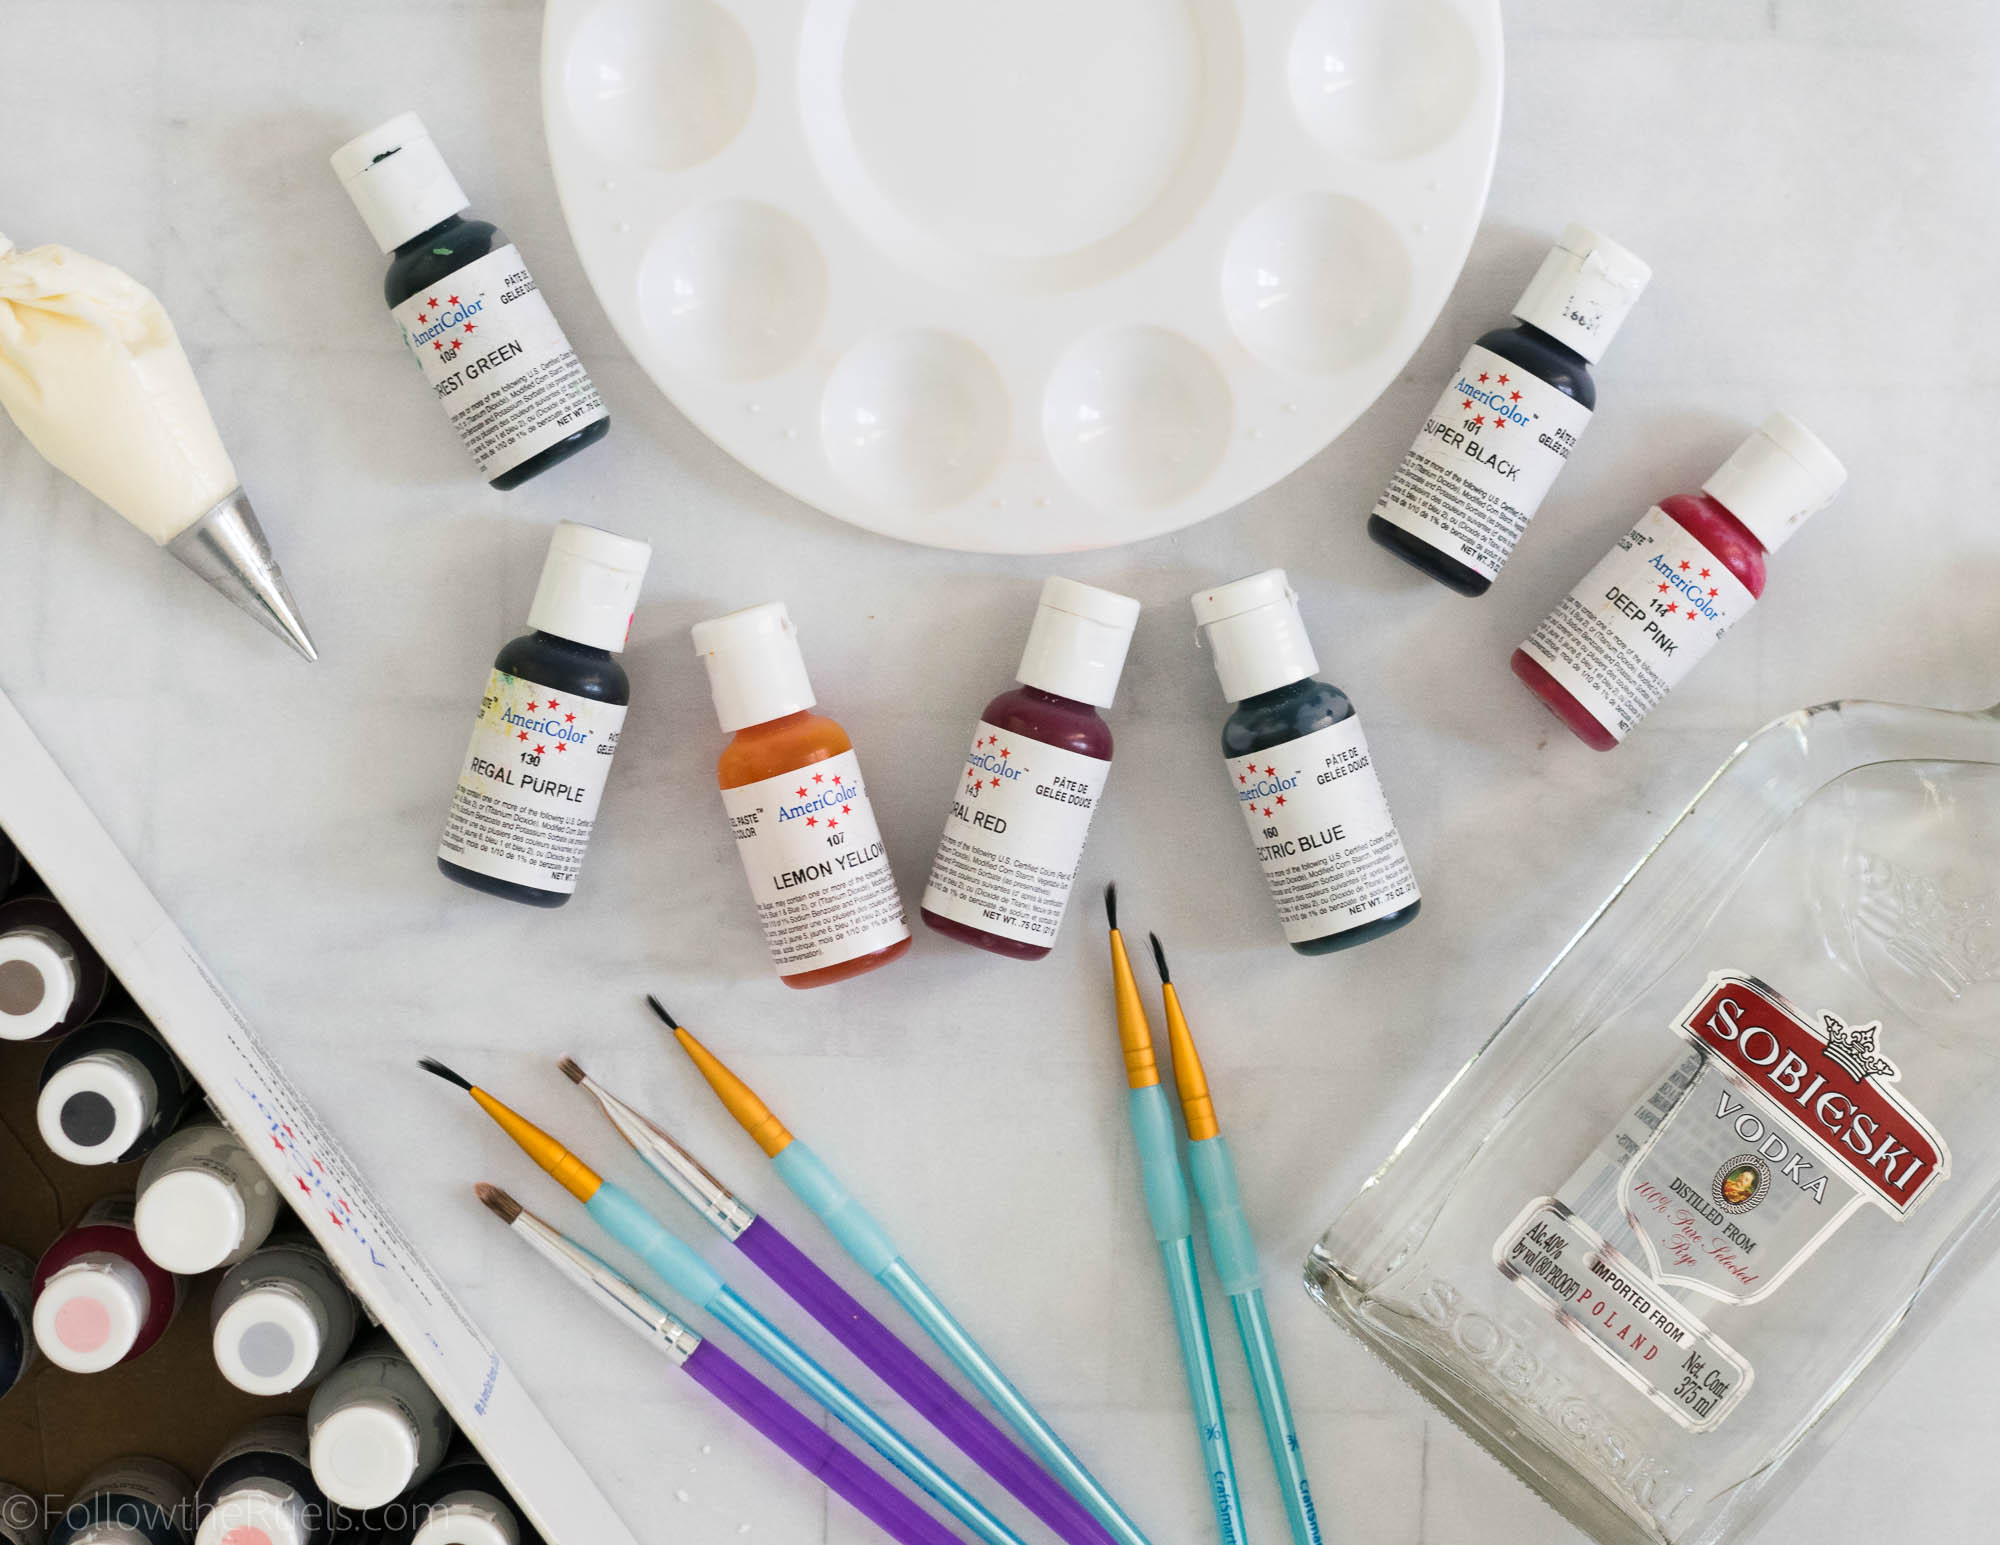
  • Clear alcohol (such as everclear or vodka)
  • Paint brushes
  • Piping bags
  • Piping tips in a #9 for the stems and #1 for the twine

[show_shopthepost_widget id=”3248381″]

How to Make Them

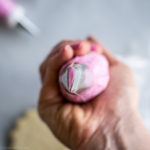
First, color your fondant in whatever shades you’d like. Then press small amounts of fondant into the cavity of your mold. 

Make sure to really press and pack the fondant into all the groves.

The fondant doesn’t need to be dry or hardened before you can press the newly formed fondant flower out of the mold. But I would recommend letting them harden a bit before attaching them to the cookie.

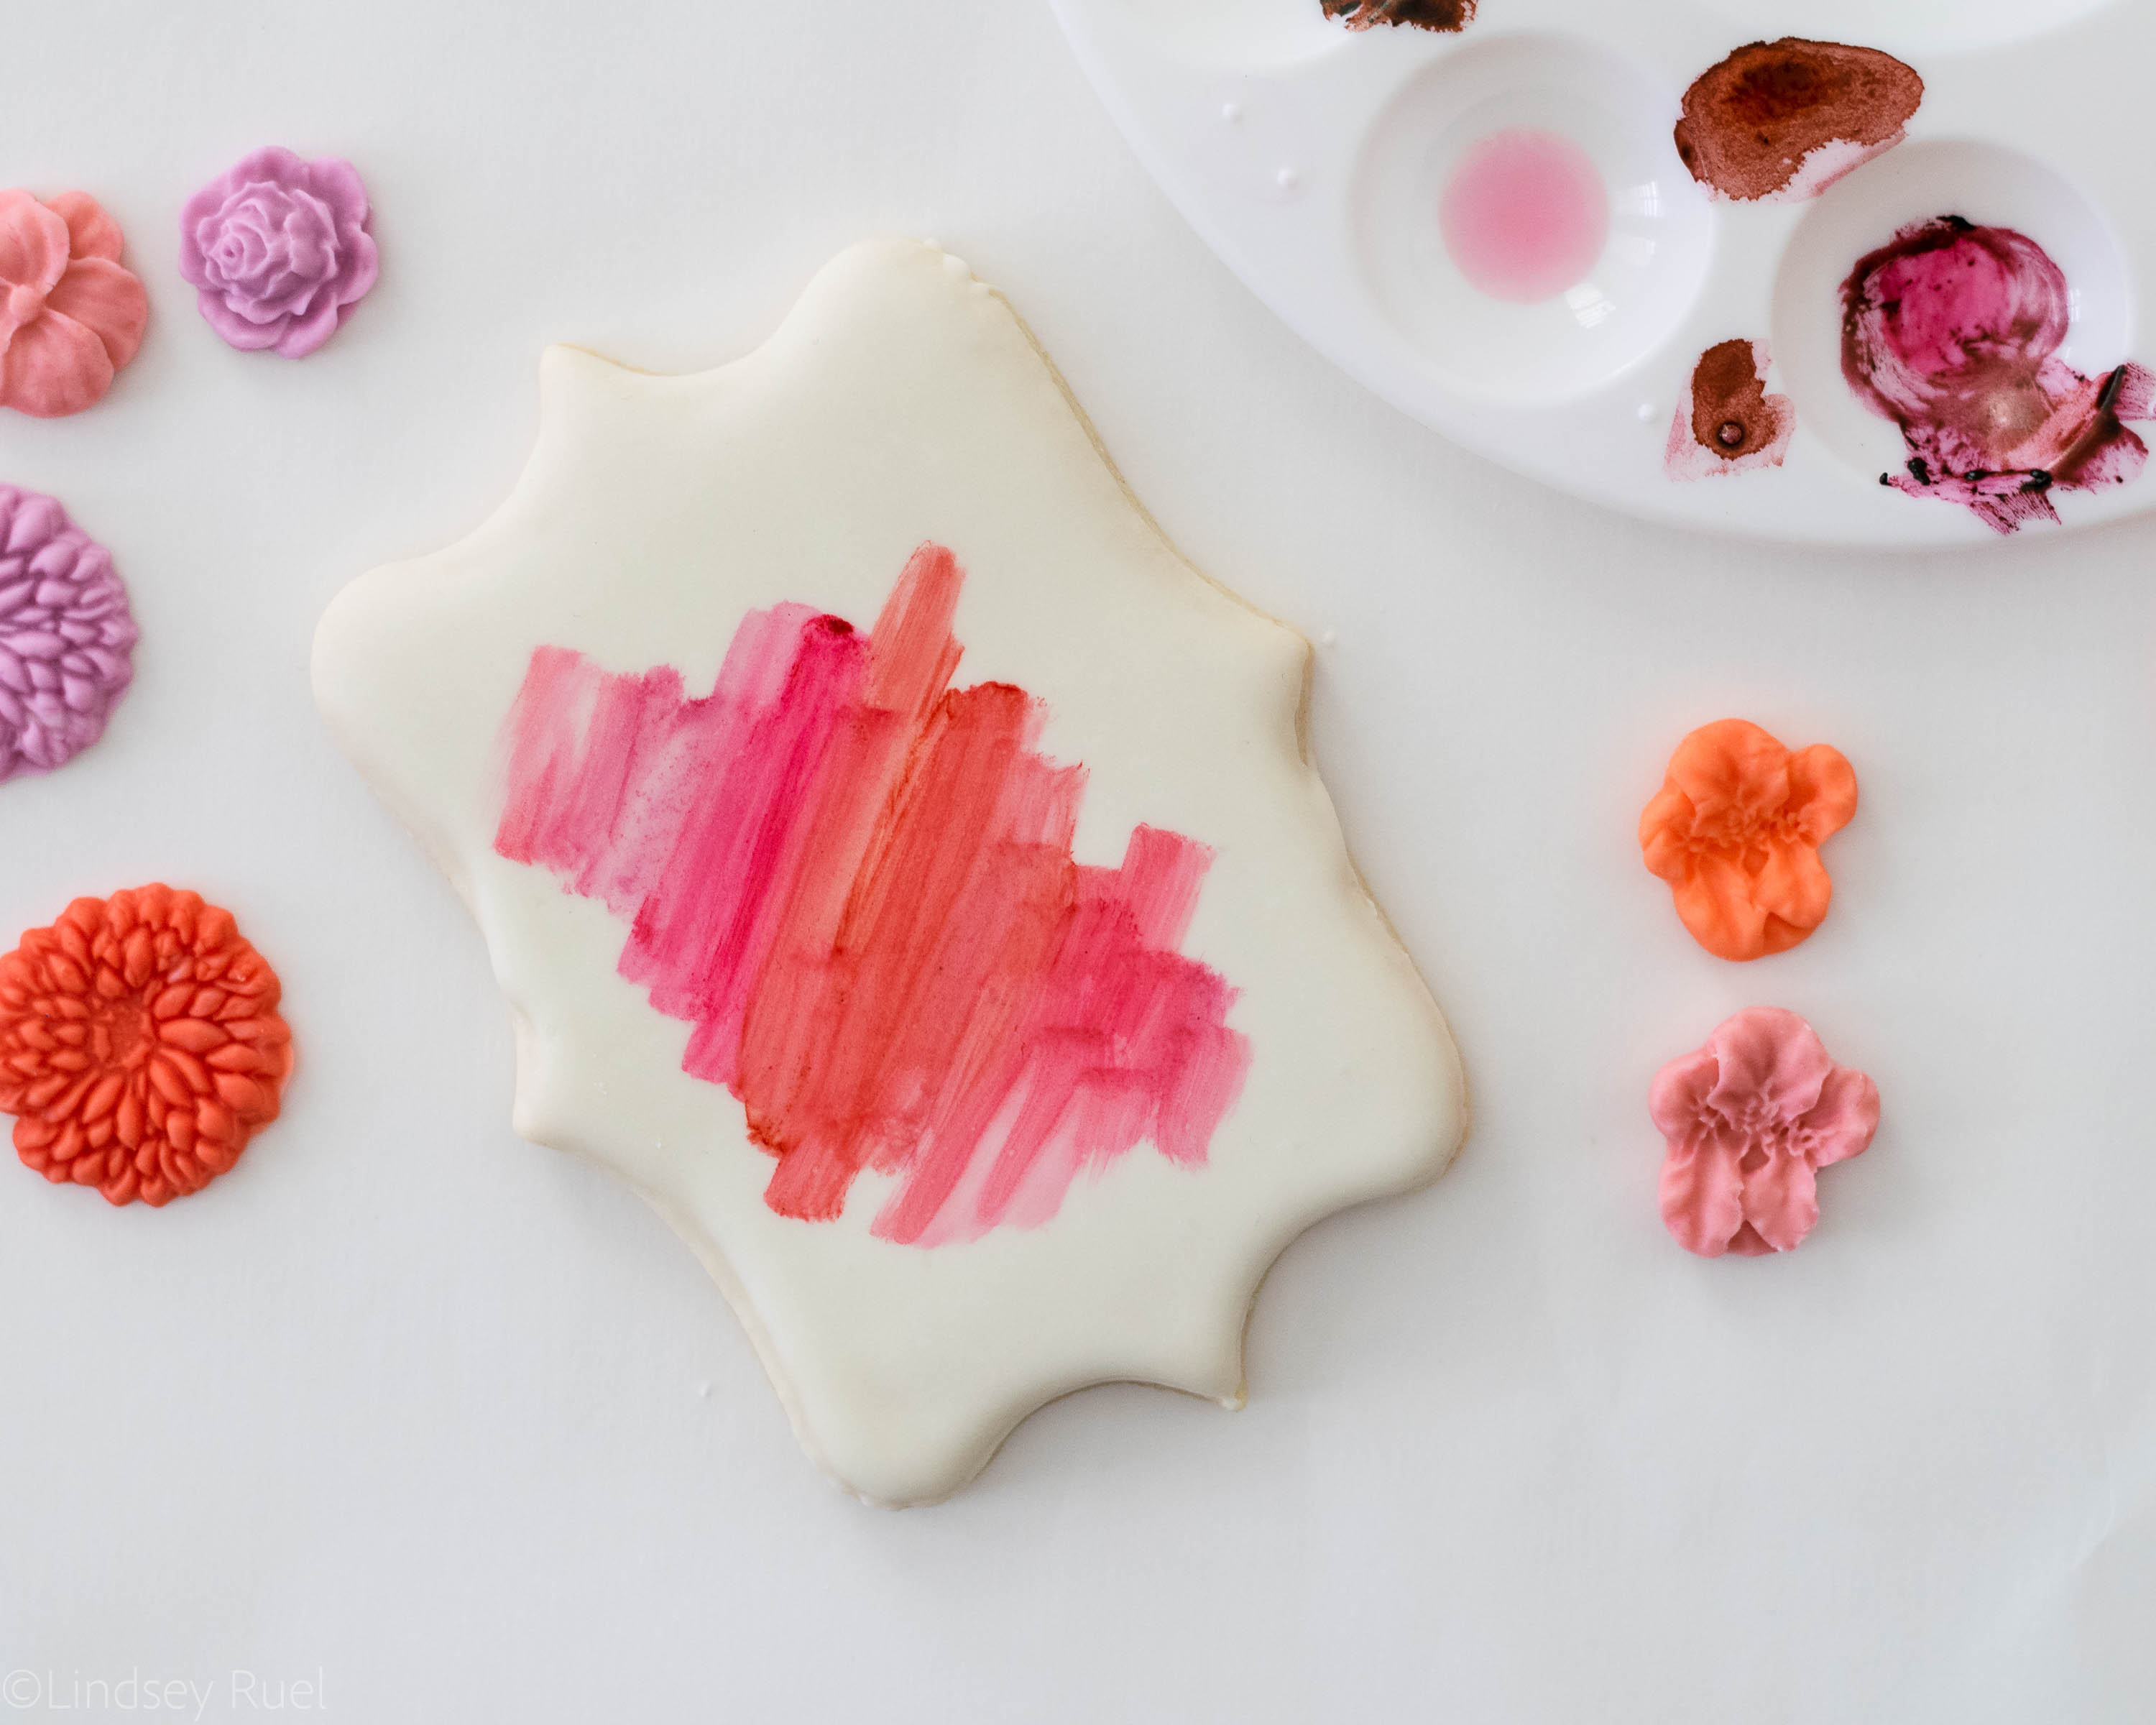
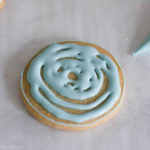
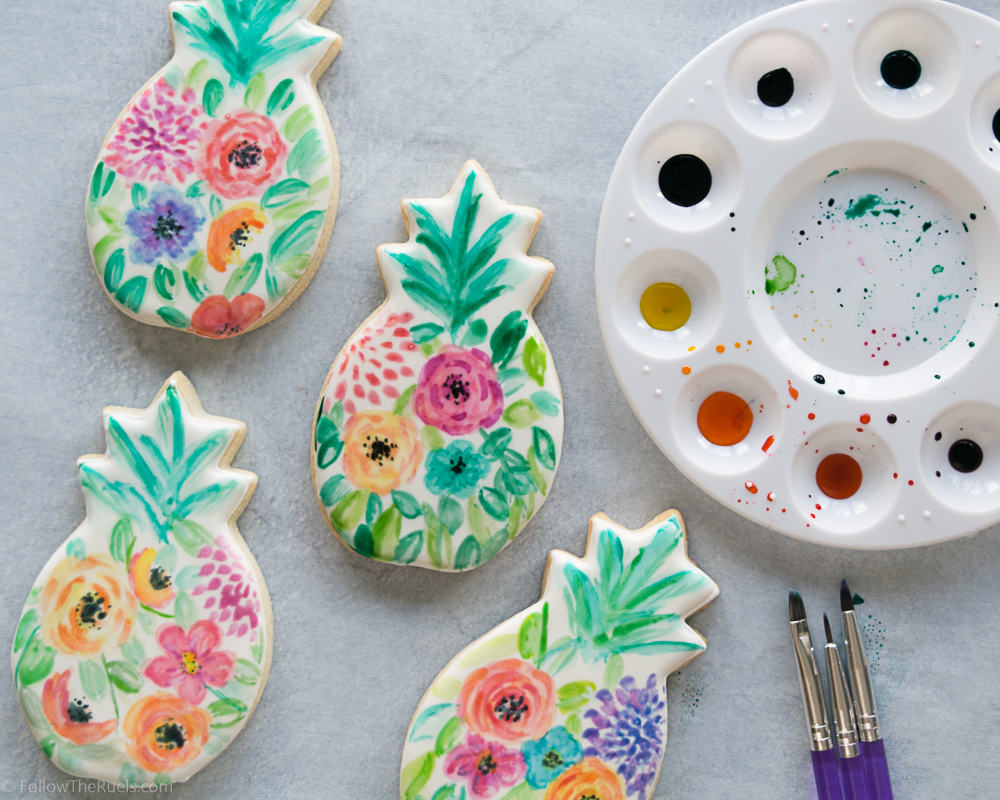
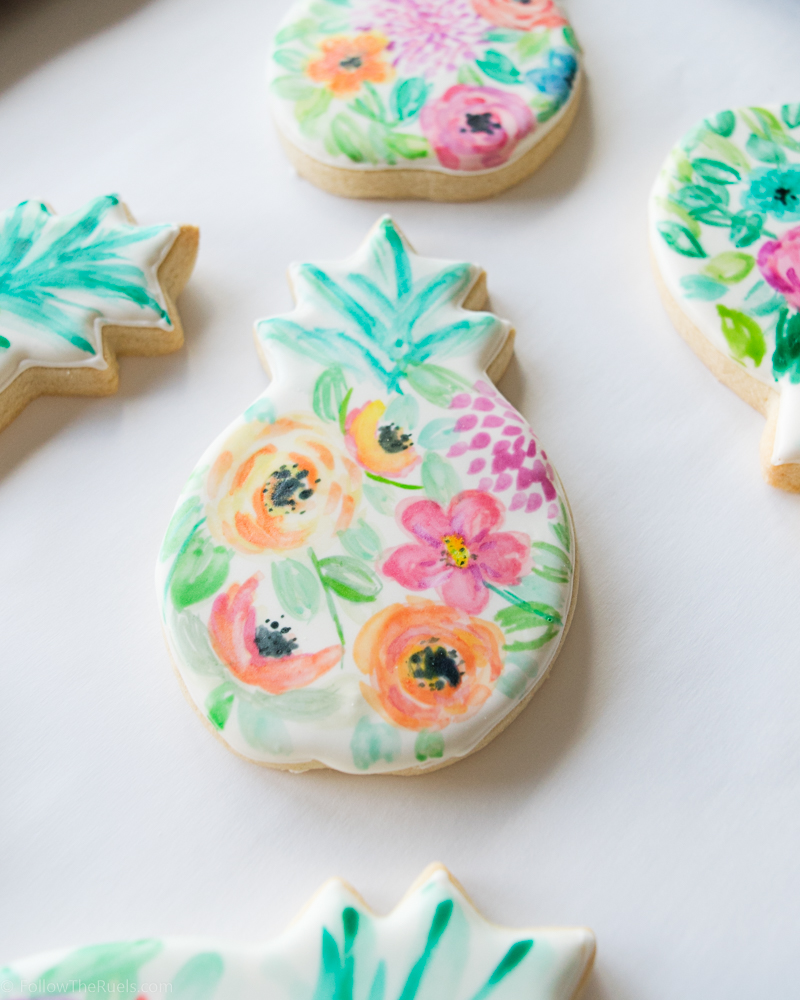
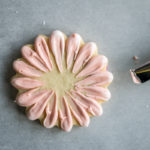
Once you are ready to assemble. Abstractly paint a few complimentary shades of diluted gel food coloring onto the iced cookie. 

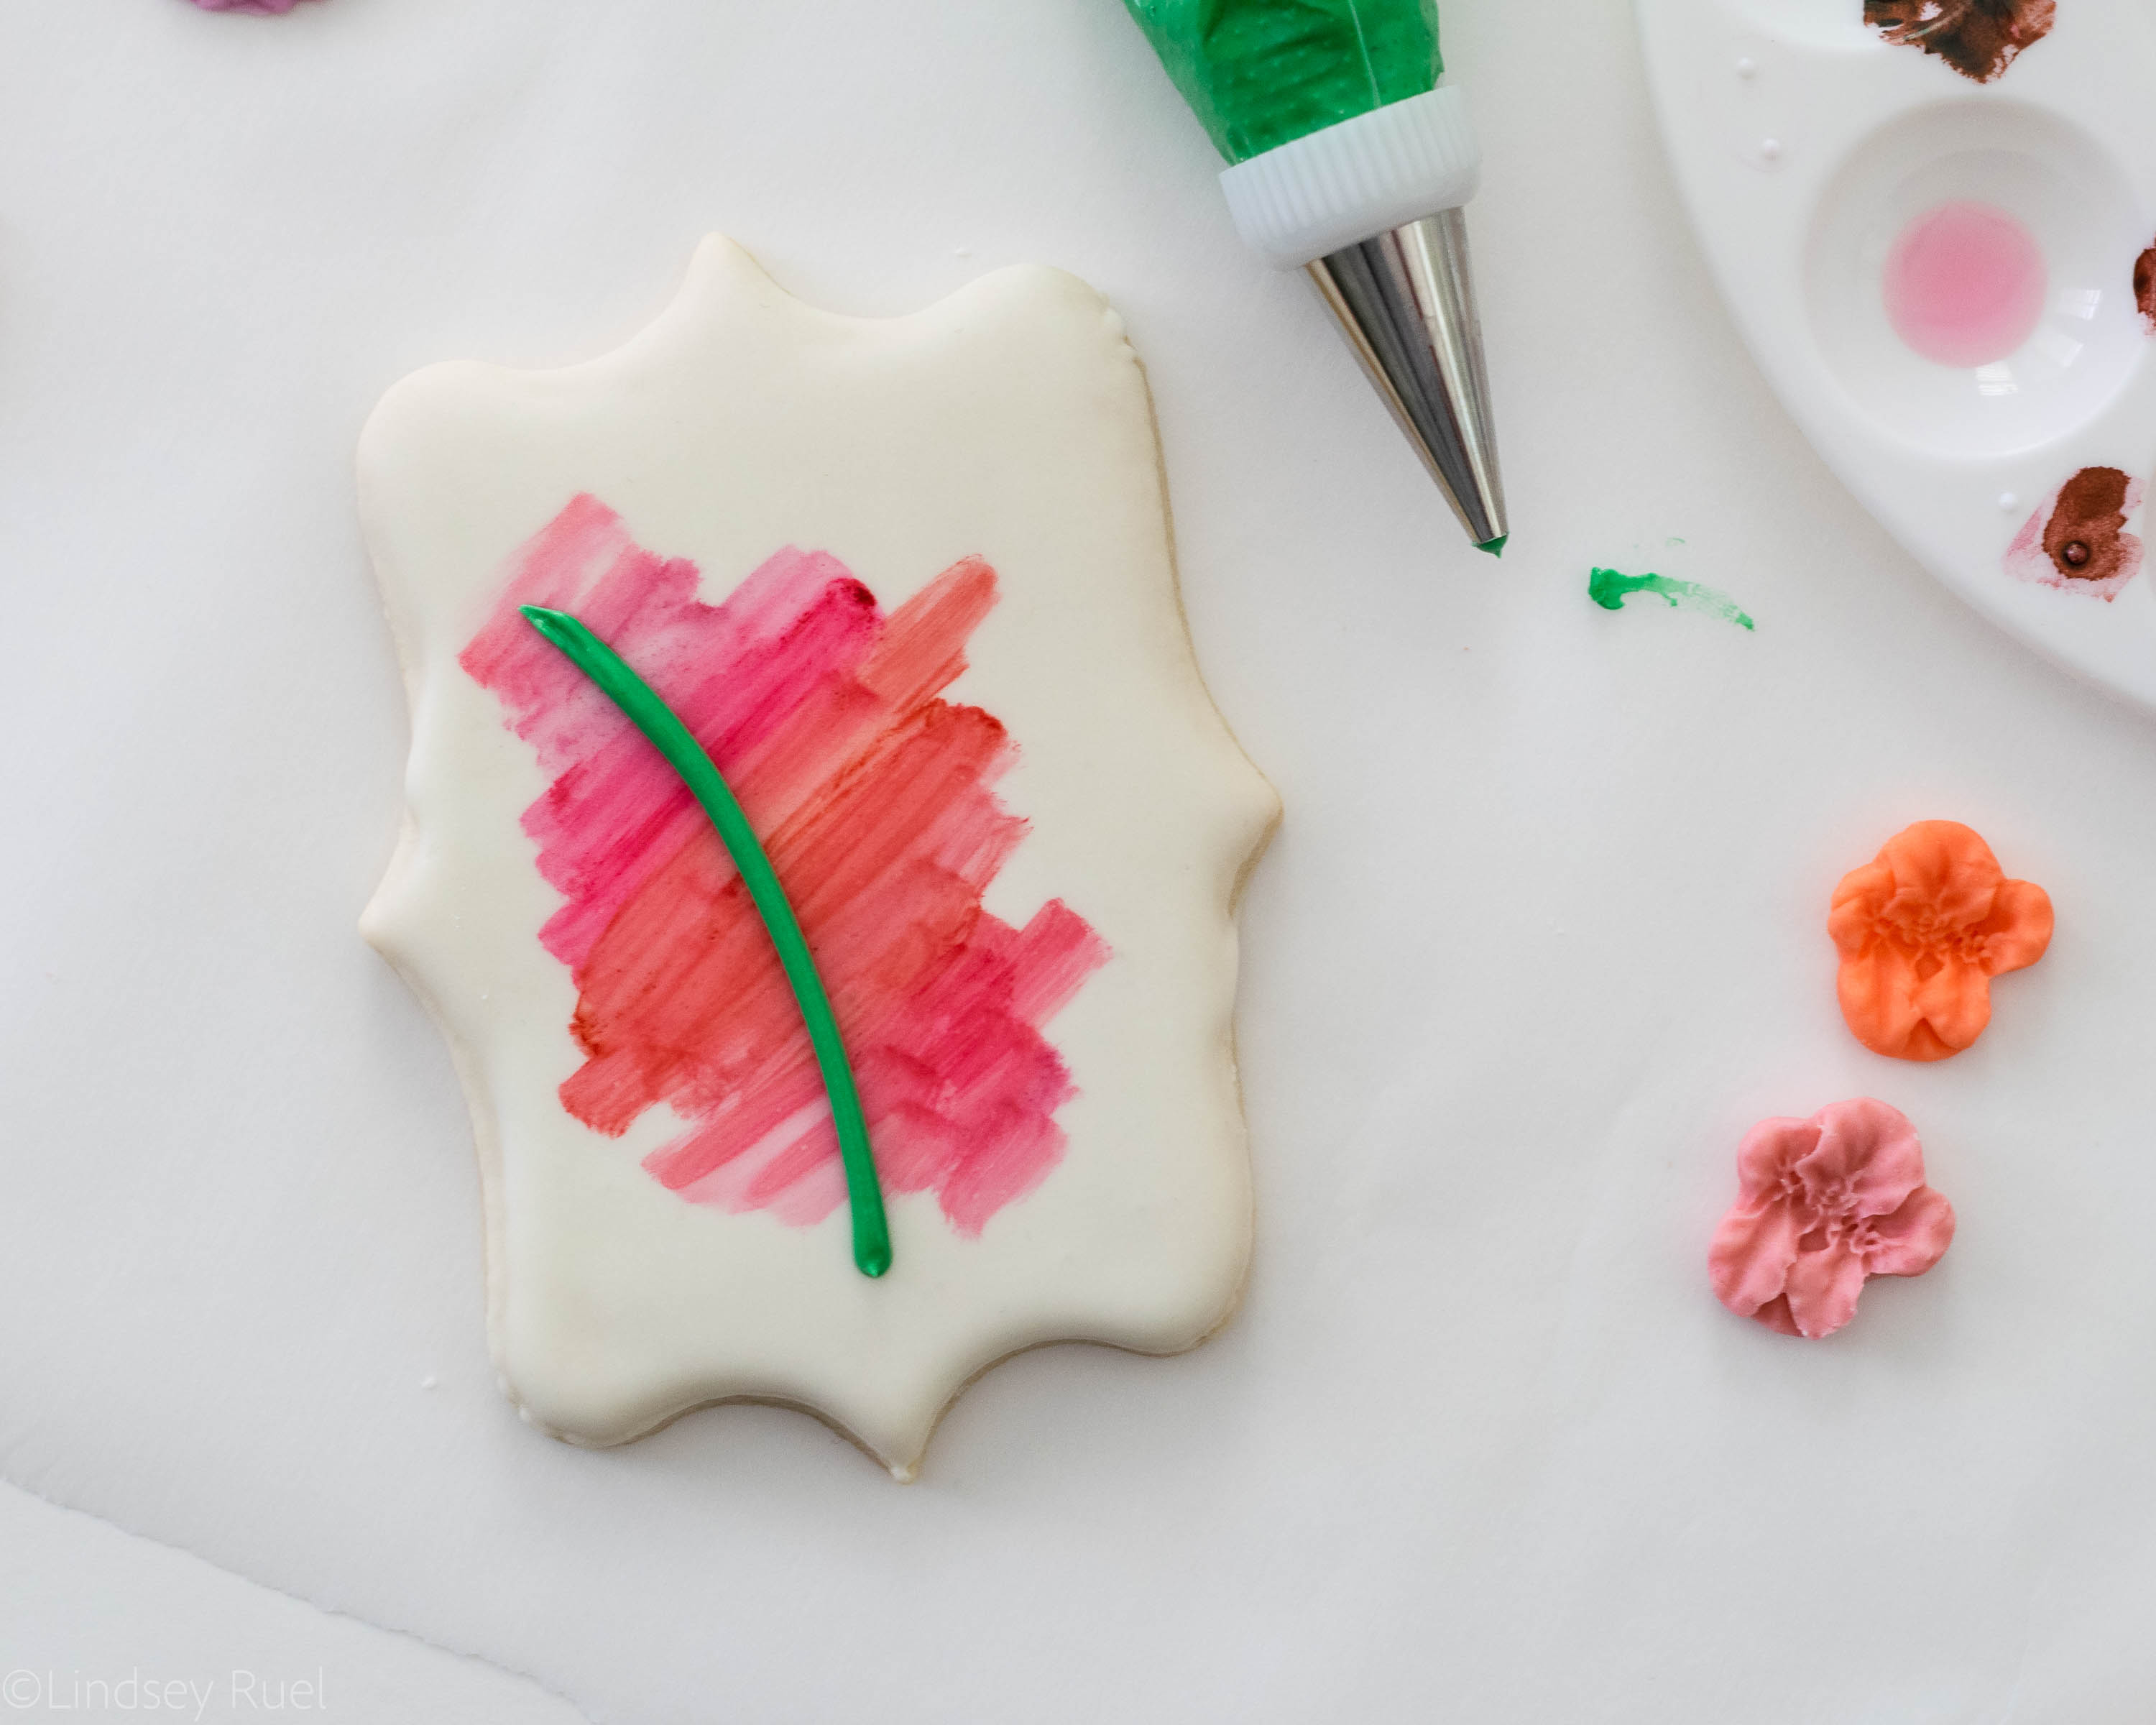
Pipe the stems of the flowers where you would like them with the green stiff consistency icing. 

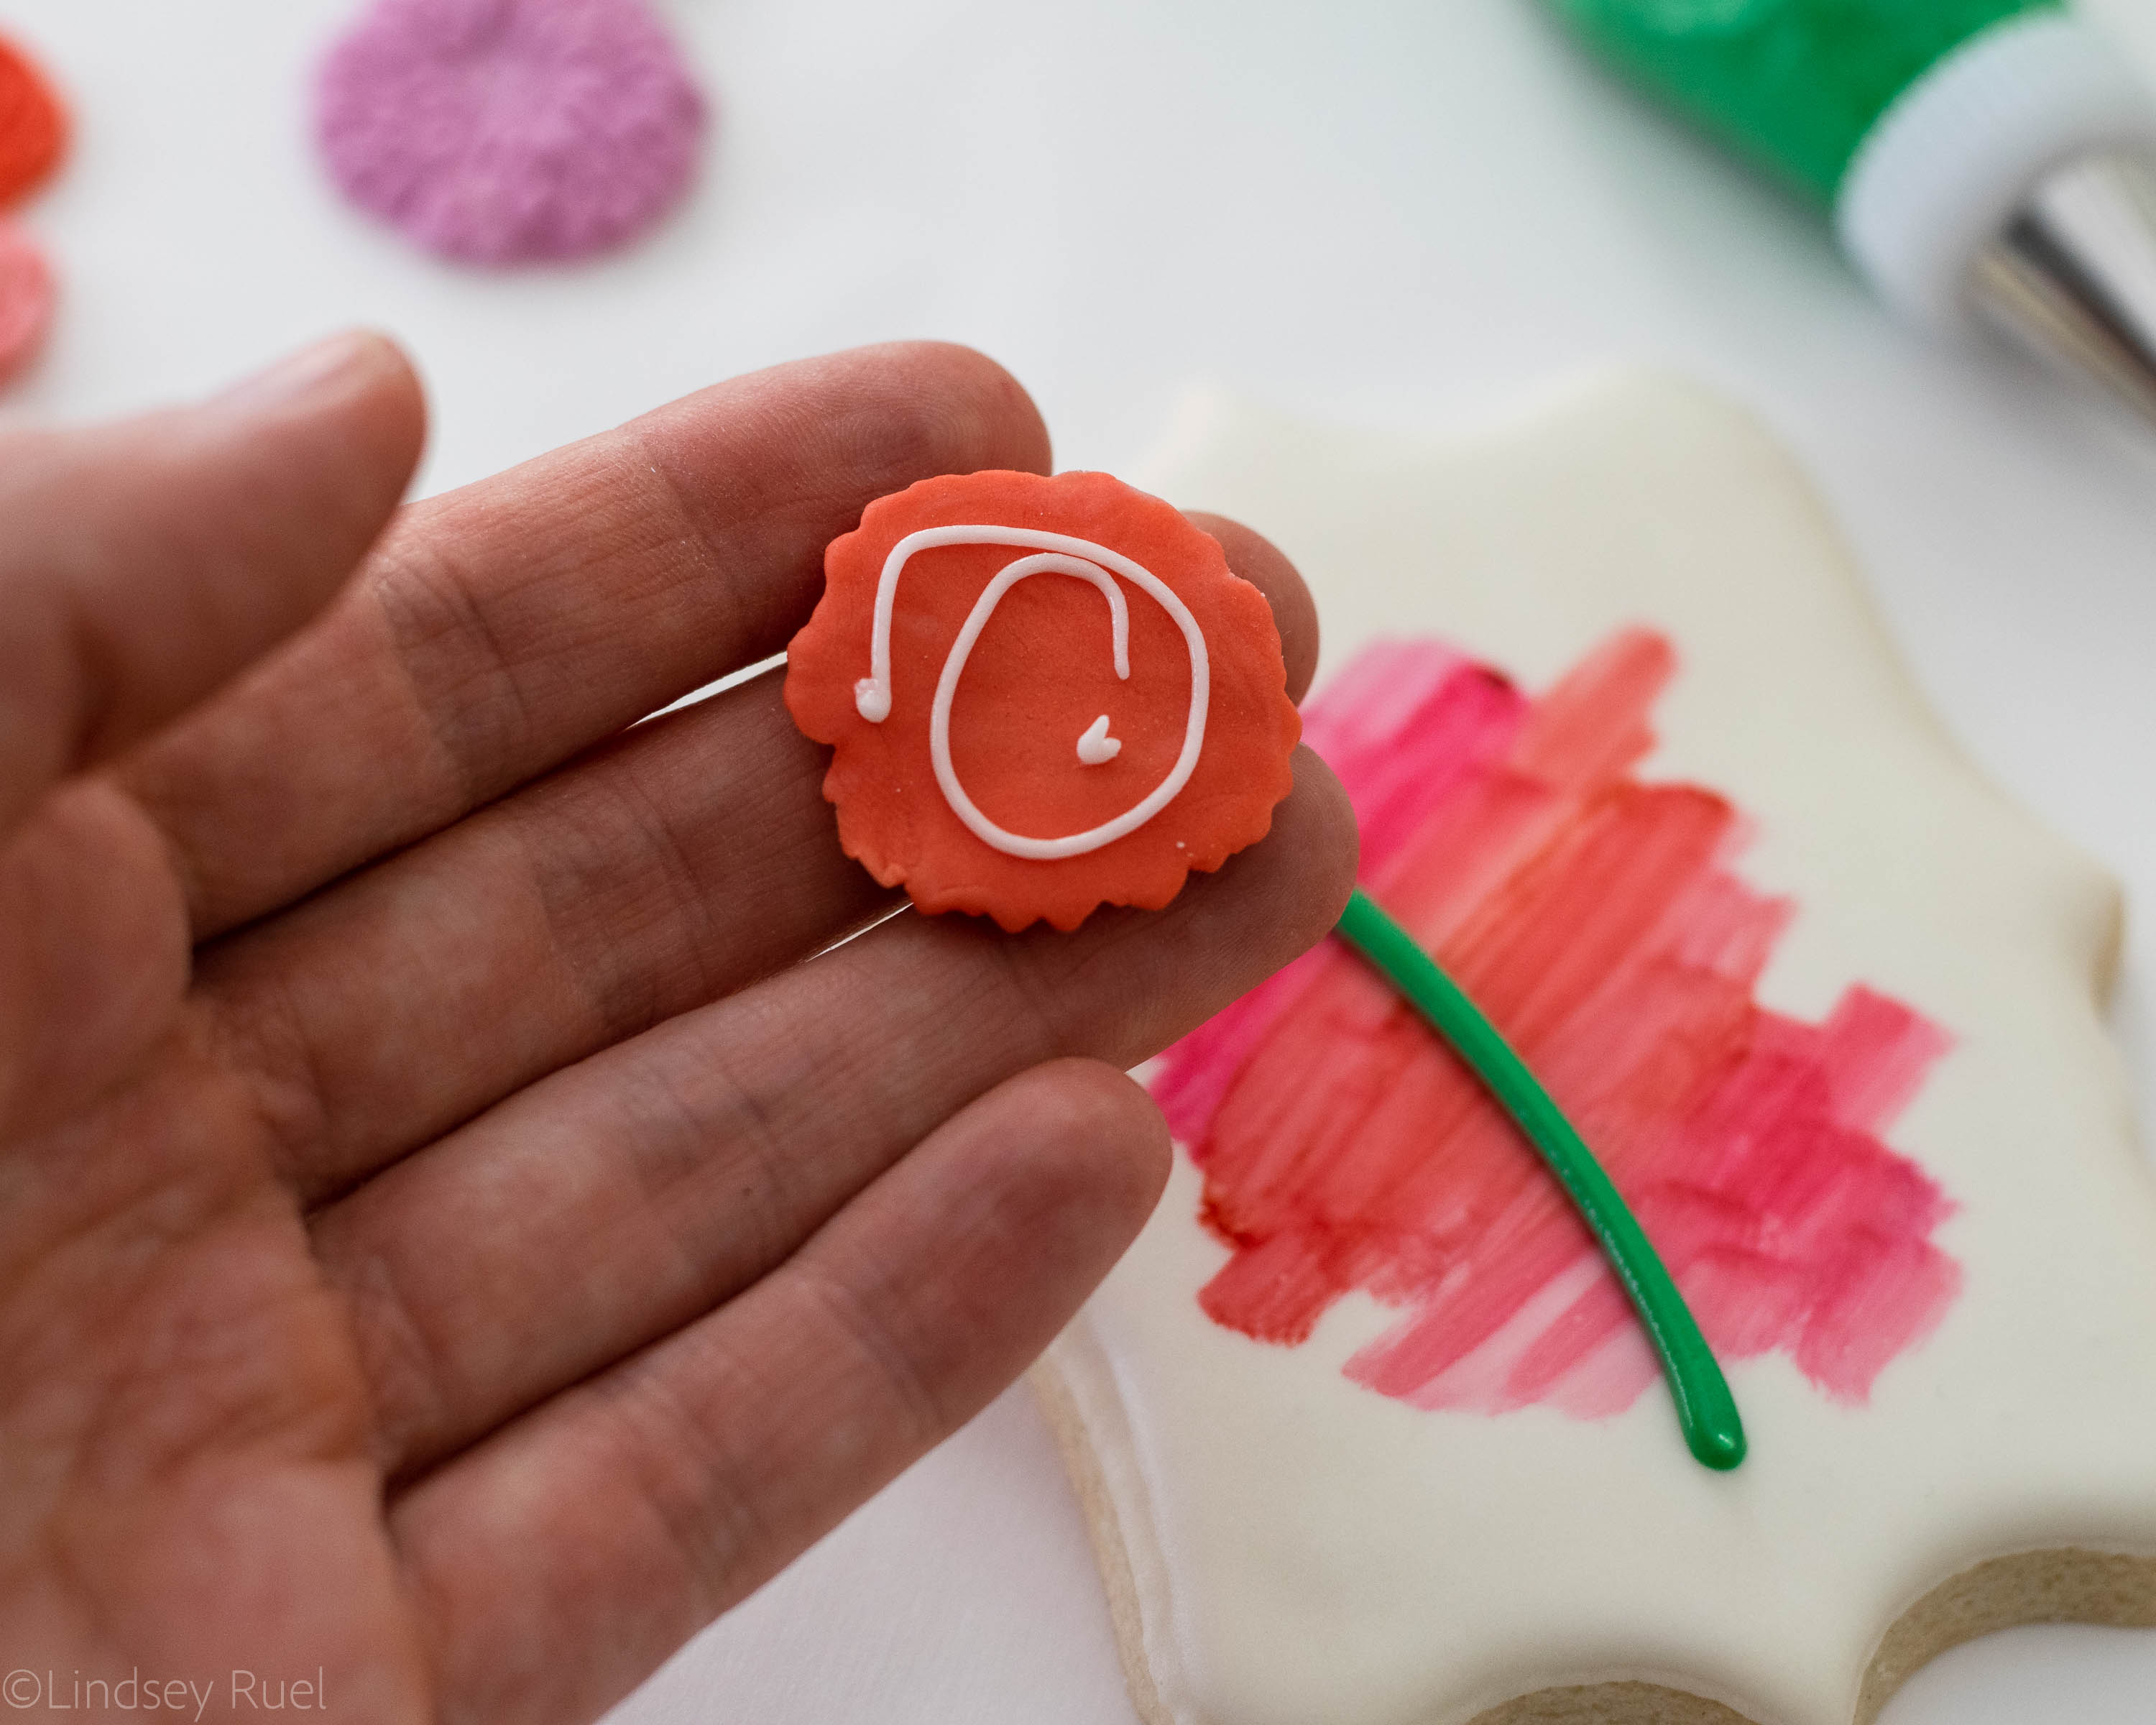
Then glue the flower onto the top of the stem with a little bit of extra icing. 


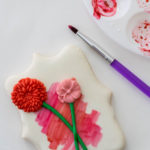
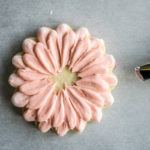
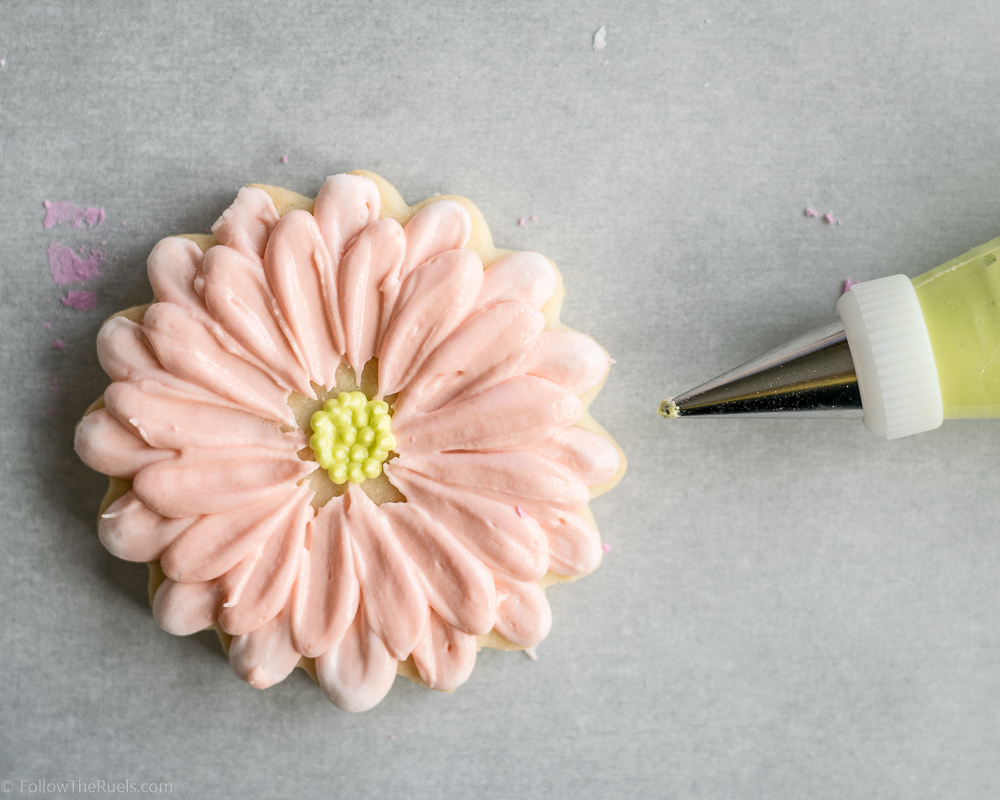
Create more dimension in the flower by painting it with gel food coloring diluted with a bit of alcohol until you have something resembling a watercolor paint. 

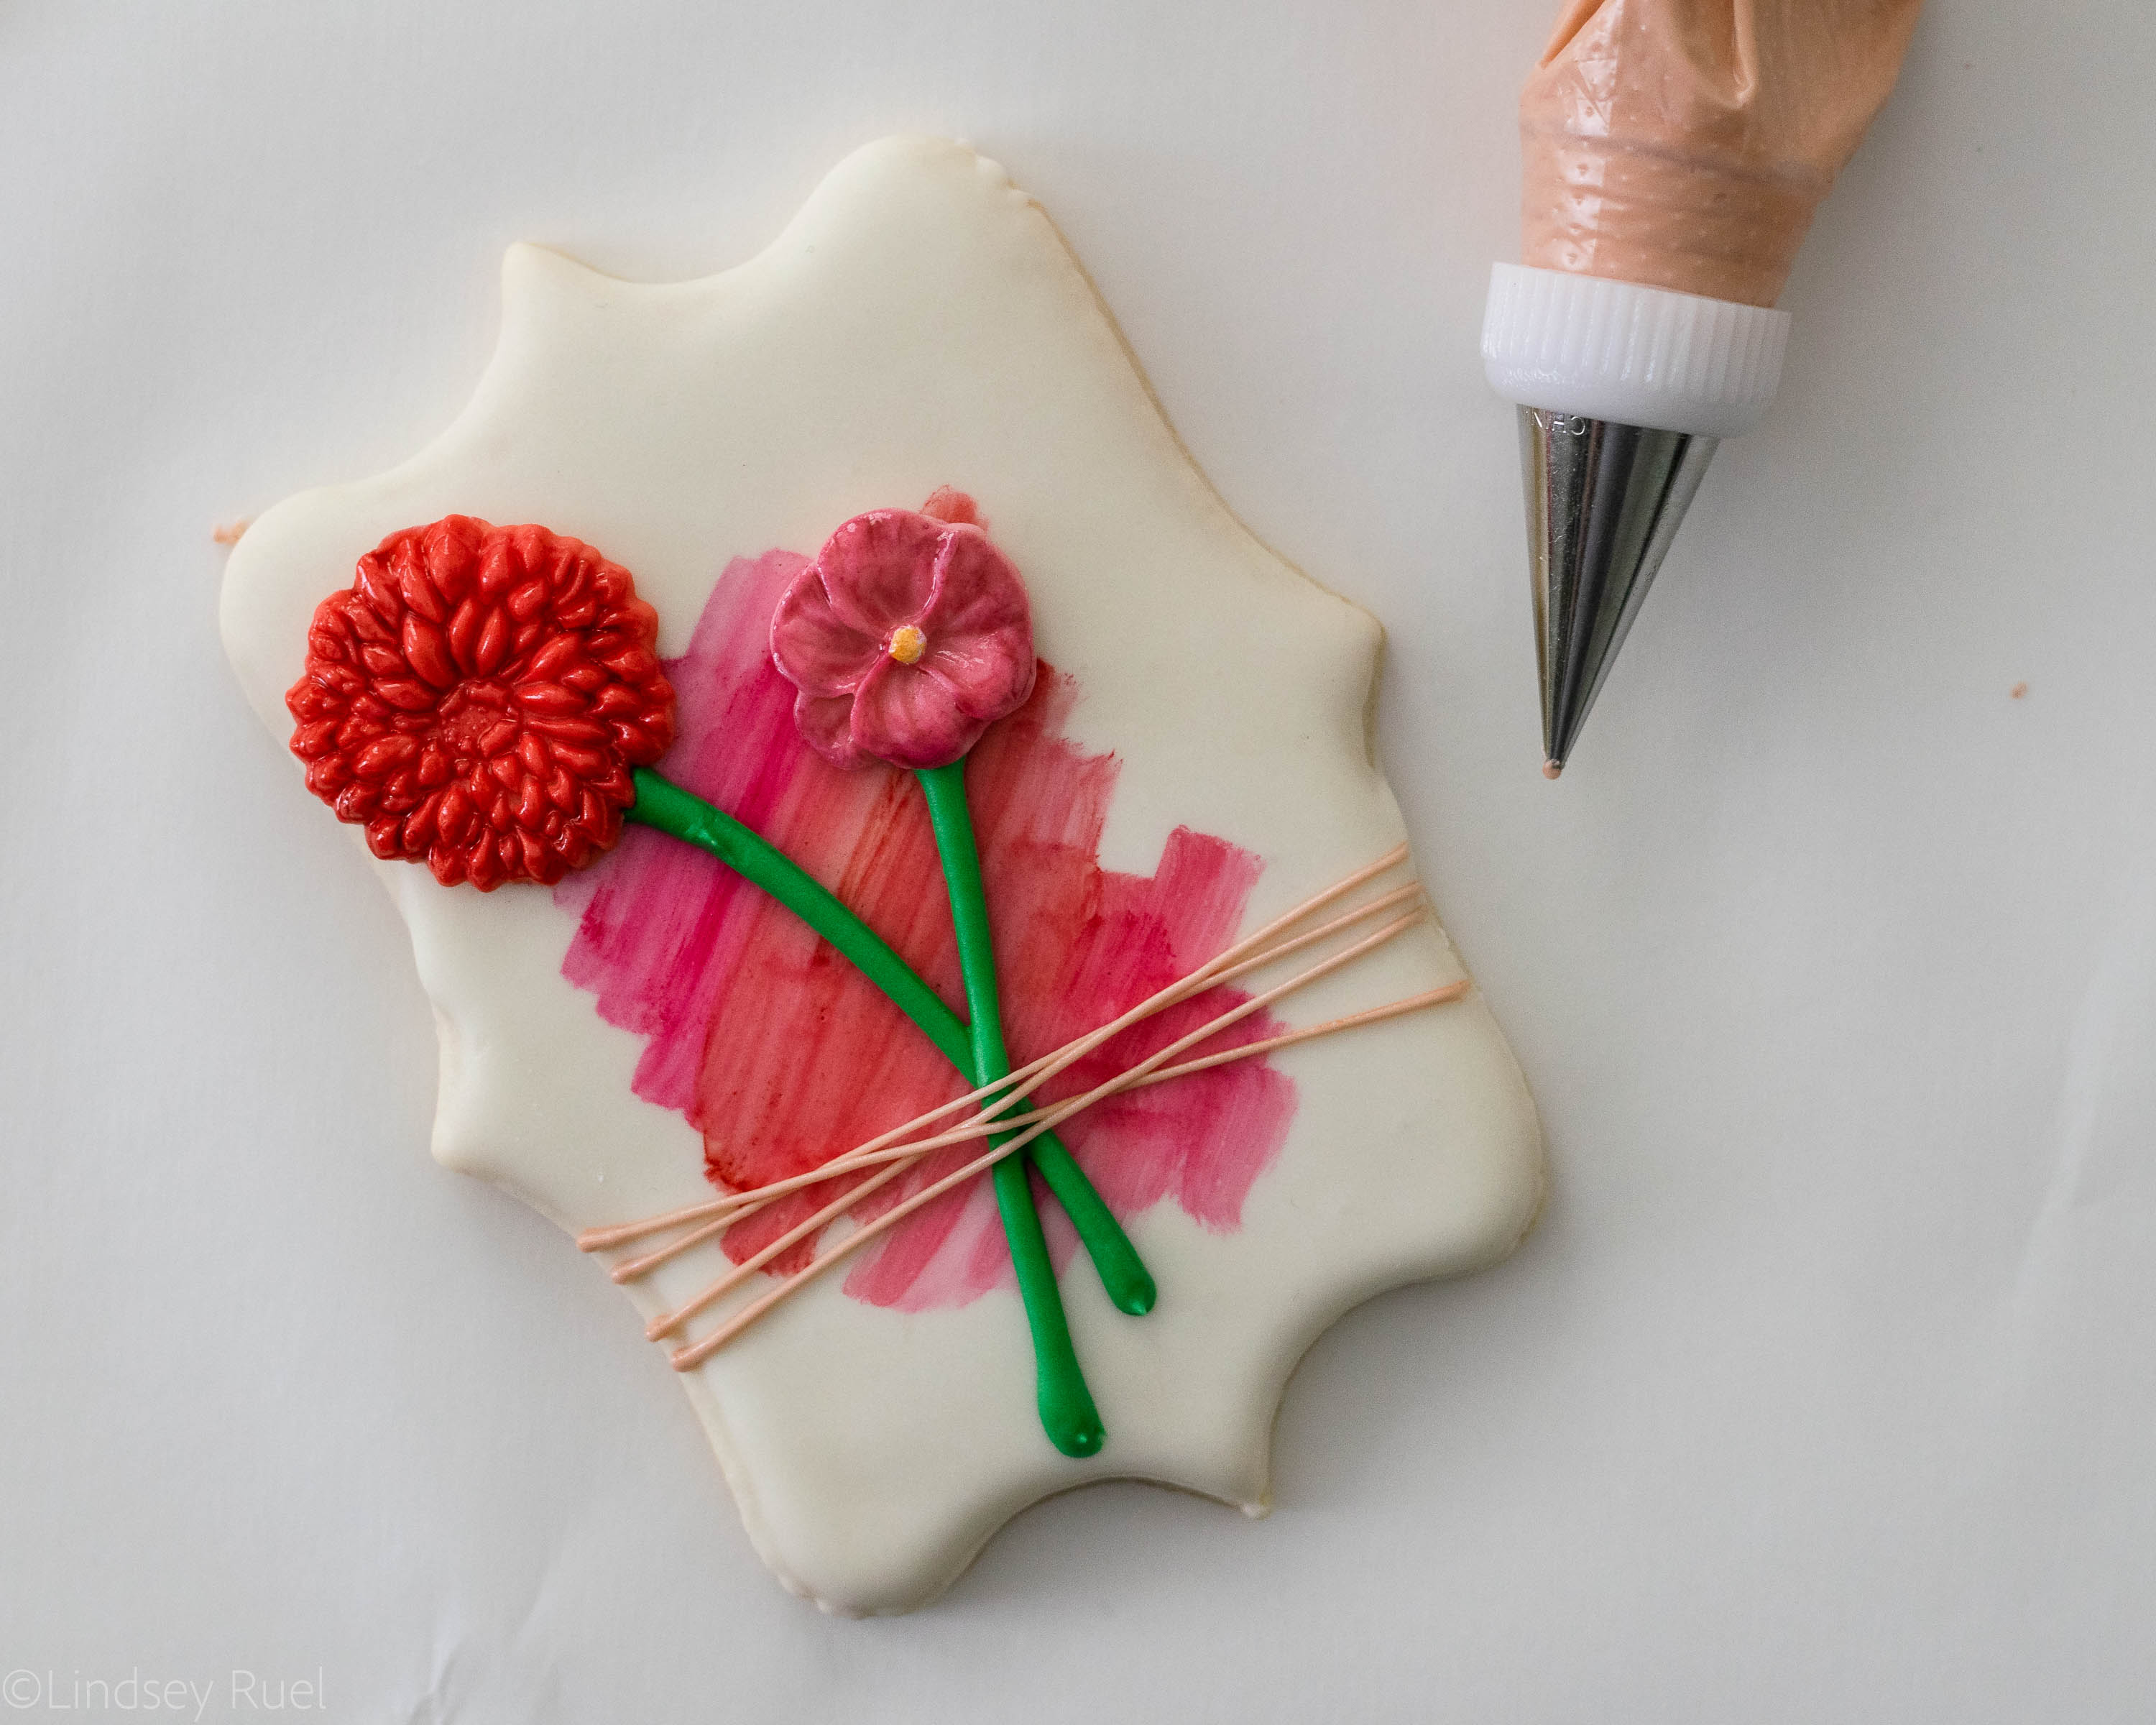
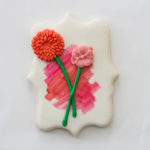
Finally, pipe the twine across the stems of the flowers. 

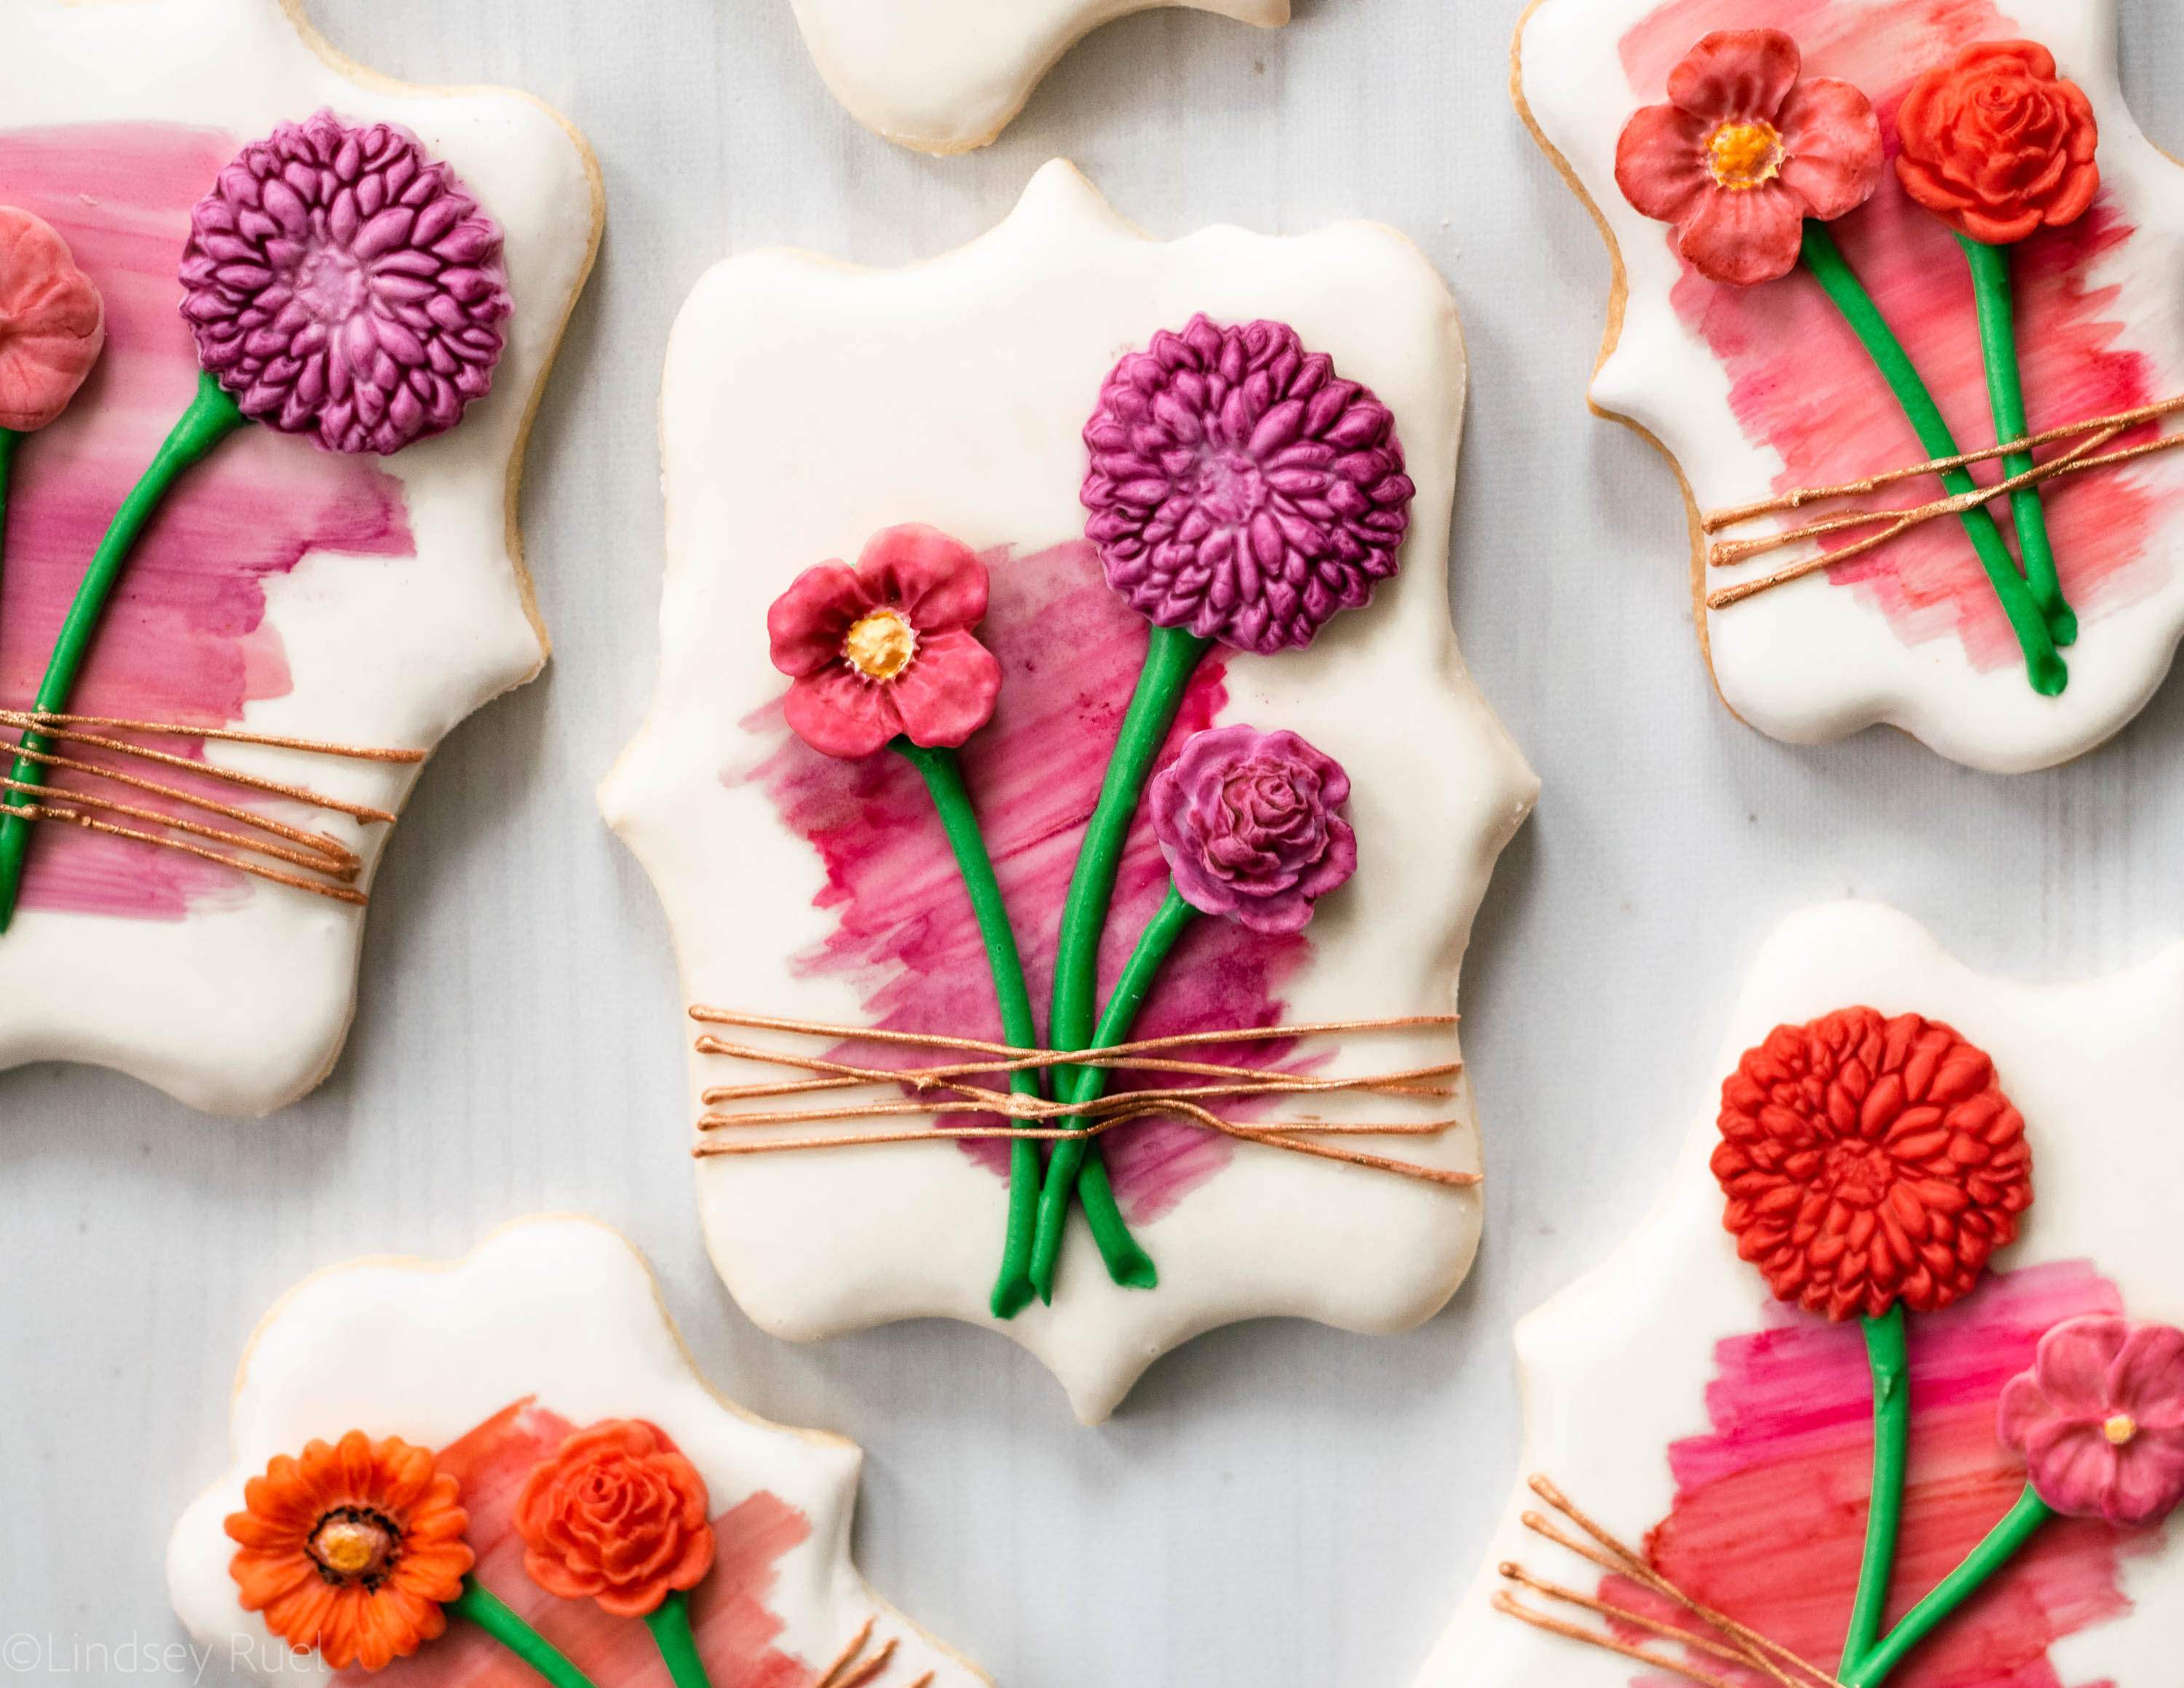
And voila! A beautiful bunch of fondant flower stems that look like that are tied to the cookie! So cute, right?


/ Filed In: Cookie Decorating 101, Cookies New, Decorated Cookies, Desserts, Eat
Tagged: cookie decorating, flowers, fondant, fondant flowers, fondant molds, painted cookies

Watercolor Seaside Cookies

August 10, 2018

I have been dying to make some cookies that combined both watercolor and metallic details. Various ideas floated around in my head. It wasn’t until I was organizing my cookie cutters and came across these long-lost seashell and starfish cookie cutters that I had never used that it hit me! All at once I had the idea to make these beautiful watercolor seaside cookies. 

But the set didn’t seem complete without a mermaid tail. Sadly, I didn’t have my own mermaid tail cookie cutter and was too impatient to order one. So I improvised! I printed out a mermaid tail shape and cut the dough around it.

With my three seaside shapes cut and baked, I was all set to make these watercolor cookies. I couldn’t be happier with how they turned out!

While painting on metallic details is not the most efficient process, the combination of the watercolor and metallic may be my new favorite cookie decoration. What do you think?

Tool and Recipes

Recipes:

  • Sugar Cookie Recipe
  • Royal Icing Recipe

Tools: 

  • Gel food coloring
  • Clear alcohol (Vodka or Everclear work great)
  • Paint brushes (for food only, please and thank you)
  • Metallic food paint
  • Scribe tool
  • Piping bags
  • Piping tips (#1 and #2)
  • Coupler
  • Cookie cutters

[show_shopthepost_widget id=”3238963″]

How to Make Them

What makes these cookies a little bit different than my usual cookies is that I dip them into the icing instead of piping them. I find that it’s a little bit easier to dip the cookies. And since you just need a plain, flat surface to paint on, it doesn’t matter how the icing gets there!


Use thin down icing until its slightly thinner than flood consistency. It should return to a flat surface within 10 seconds after “scraping” the surface. I find that this consistency of icing creates a nice even surface that covers the entire cookie. 

Let the icing dry completely (about 4 hours) before beginning to paint. 

Painting these cookies is the most fun and relaxing part. I could just do that for hours!

I can’t say the same for the piping. While I love the metallic accents, painting on the metallic paint can be a bit tiresome after a while. So maybe enlist a friend or break it up into batches if you are making lots of cookies!


All in all, I am totally enamored with these cookies. I can’t wait to put the watercolor-metallic combination to work again in another fun cookie set!


/ Filed In: Cookies New, Decorated Cookies, Desserts, Eat
Tagged: beach, cookie decorating, cookies, mermaid, metallic, painted cookies, seashell, seaside, starfish, watercolor

Preppy Onesie Baby Shower Cookies

August 3, 2018

This past weekend I was back in my hometown of San Diego for not one but two baby showers! One was for my oldest friend and the other was for ME! 

For my first baby shower, I couldn’t help but make cookies to take with me all the way to California. It definitely helped that the baby shower invitations were just so dang cute, it gave me lots of inspiration.

Recipes and Supplies

To make these cookies yourself, you will need:

  • One batch of my tried and true sugar cookie recipe
  • One batch of royal icing 

Both will be enough to make about 18 cookies (depending on size). If you plan on making any more, I would multiply the recipe accordingly. 

You will also need:

  • A baby onesie cookie cutter and a bow tie cookie cutter
  • Gel food coloring in blue, white, and black
  • A scribe tool or toothpick
  • A very fine paint brush (used only for food)
  • Piping bags or zip top bags
  • Piping tips (totally optional) in size #1 or #2.

For the icing, I recommend splitting the blue and the white icings into piping consistency and flood consistency. To ensure they are the same color, tint a large bowl of icing before thinning it down. Then thin it down to your desired piping consistency (it should fall off a spoon, but still hold a little bit of a peak) and portion part of the icing into a piping bag. Then thin the rest of the icing down to flood consistency (it falls off the spoon and settles back into the icing within 10-15 seconds) and spoon into a separate bag. 

I use the piping consistency to outline all the cookies and to add details. The flood consistency is used to fill the entire cookie.

[show_shopthepost_widget id=”3232596″]

How to Make Them

I just thought they were so adorable! Perfect for a little baby boy, don’t you think!?


/ Filed In: Cookies New, Decorated Cookies, Desserts
Tagged: baby boy, baby onesie, baby shower, cookie decorating, cookies, sugar cookies

World Cup Sugar Cookies

July 10, 2018

By the time this is posted, one team has already been eliminated from the tournament. 

I blame my poor time management on my husband (of course) who told me that the first game of the semifinals was on Wednesday, not Tuesday. 

(Let’s not focus on the fact that there are plenty of other, more credible, sources of World Cup scheduling information that are easy to come by.)

Regardless, I have been excited to make these cookies since the World Cup started. We are avid soccer football fans in this household, so we have watched just about every weekend game, and some of the weekday games. 

While our team (zie Germans) didn’t get very far this year, we have enjoyed watching some old and new favorites duke it out on the pitch. It’s also been fun for me to sit back and relentlessly mock the players who seem to get hurt so easily (<cough>Neymar). 

But I better not waste any more time or else another team will have been eliminated by the time I get around to showing you how I made these fun World Cup sugar cookies. 

Supplies and Recipes

For these cookies, you will need:

  • Cookies cut into circles, jerseys/shirts, and a speech bubble.
  • Royal icing in black (both piping and flood), white, red, blue (light and dark), and yellow
  • A print out image of a soccer ball approximately the same size as your cookie
  • Plain white tissue paper
  • Food marker
  • Piping bags or zip-top bags
  • Toothpick or scribe tool

[show_shopthepost_widget id=”3198532″]

How to Make Them

Oddly enough, the soccer balls were the hardest of the cookies to make. Something about the combination of pentagons and hexagons makes it really hard to draw freehand. 

Fortunately, I have a trick to getting the perfectly patterned soccer ball: tracing!

You can see in the video that I use a piece of tissue paper to trace over the image with a food marker. Then I trace the tracing (follow me?) onto the cookie through the tissue. 

I have better pictures to demonstrate the technique here. 

Other than the soccer balls, the rest of the cookies were pretty straightforward. The jerseys can be as simple or as detailed as you’d like. You can see I added some additional details to the emblems, but that certainly isn’t necessary. 

So, who do you think is going to win the whole thing? I don’t really want to jinx anything, but I think it will be one of these four teams.


/ Filed In: Cookies New, Decorated Cookies, Desserts, Eat
Tagged: cookie decorating, cookies, football, royal icing, Soccer, soccer balls, sports, sugar cookies, teams, tracing, World Cup

Surprise Announcement Cookies

June 26, 2018

EEEEEEKKKKK!!

I have been eagerly awaiting this post for months! It has been so hard to keep this secret, but I think it’s finally time…

And in true form, I figured the best way to do it would be in cookie form. 

So….

…there you have it!

We are pregnant! 

Was that the surprise you were expecting? Maybe not. But for those of you who were wondering why I have been a little absent from the blog and Instagram over the past couple months, or why I stopped posting about my half marathon training…you have your answer.

Okay, so where should I begin?

How about with the pregnancy test? We found out we were pregnant on Master’s Sunday, which is perfect for my golfer husband. He will never forget the day he found out he would become a dad. 

He knew I was going to take a pregnancy test, so when I returned with a blank stare on my face he asked “are you pregnant” and I responded with “maybe?”. 

Even though I was the one that thought I was mentally prepared to become pregnant, he was the one that seemed the most excited. He thought it was great news, whereas I was treating it like a nasty rumor I was trying not to believe. In fact, I didn’t really believe it until it was confirmed by the doctor.

The first couple of weeks went by with no issues and I thought I was going to have a super easy pregnancy. By week 6 or 7, I started feeling horrible. Just so tired and nauseated almost all the time. 

Billy knew I wasn’t feeling well when I would just stay in bed until after he left for work. Normally, I am up out of bed before him to get my day started. Some days I would just sit in bed and eat crackers until 9 am. 

Also, sweet foods sounded disgusting to me! (Hense why I barely posted anything between the end of April and mid-May.) 

Actually, anything that wasn’t super bland and beige sounded pretty horrible to me. 

By week 10 I started feeling a bit better. Still a bit low energy but the nausea had mostly dissipated. Week 10 also happened to coincide with Mother’s Day, which was perfect because I finally started to feel confident that we could tell people. So for Mother’s Day we told my mom, who was so excited. She has been bugging me for grandchildren since we got married, so “Happy Mother’s Day, mom!” You got your wish. 

Our trip to California was soon after, which is when we told my dad and stepmom. 

By the time we left for Italy, I was feeling pretty much back to normal. Thank you second trimester!

I felt really good during most of our trip and only had a couple bouts where I clearly overdid it the day before. I mean, we were averaging 20k steps a day. This coming off of 3 weeks where I barely got 5k a day!

But Italy isn’t a bad place to be for a pregnant lady who craves carbs! I ate all of the pasta and pizza I could get my hands on. I only had to be a little careful around certain cheeses and meats. And wine…dang baby!

Now I am about 16 weeks along. The baby is the size of an avocado if you are curious. 

That means that the baby is due in early December. Or whenever it decides to make its debut. If it’s anything like its parents, then it will be stubborn and come whenever the heck it wants. 

So that’s it! Were you surprised?

Be prepared for some more baby related baking posts in the near future. Like a gender reveal of some kind or another. What would you like to see, a cake, cookies, cupcakes? Something completely different? 

In the meantime, feel free to send me any of your favorite baby products. I am in the middle of setting up a registry and it’s a bit overwhelming. So any advice is welcome!


/ Filed In: Cookies, Cookies New, Desserts, Eat, Life
Tagged: announcement, baby, cookie decorating, cookies, pregnancy, sugar cookies, surprise

Watercolor Butterfly Cookies

May 15, 2018

Who doesn’t love a pretty little butterfly? Or better yet, butterfly cookie! 

I made these watercolor butterfly cookies for a couple of my best friends for Mother’s Day. I love any excuse to send them, their husbands, and their kiddos cookies. And what better way to say “you’re a totally awesome mom!” than with cookies!

Of course, I didn’t share these before Mother’s Day because I wanted my friends to see them first. But since there isn’t an overly “Mother’s Day” theme to these cookies, they would be perfect almost any time of year! Like a baby shower, bridal shower, birthday, graduation, or just to celebrate Spring!

How to Make Them

Of course, start by making your cookie dough. For these cookies, I actually flavored the dough with some orange zest and cardamom. Oh my were they heavenly. I actually share the exact recipe in my Christmas Cookie guide, even though this flavor is good year-round. 

Cut out the cookies into your desired shape, in this case a butterfly, plaque, or any other standard shape (circles always work!), then bake them until they are barely golden brown around the edges. 

Once the cookies have cooled, you can start to decorate!

First, outline and fill the entire cookie with flood consistency icing and leave it uncolored. Let the icing dry completely (overnight is preferred) so that they will be at their best for painting. 

To prepare for the painting, dilute 1-2 drops of gel food coloring with a clear alcohol, like vodka, then paint on top of the cookie. The more vodka added the more diluted the color will be. I like to leave one well very pigmented, then add another little well of plain alcohol which I can use to create a more diluted shade of the color. 

Finally, you are ready to paint away! There isn’t a lot of rhyme or reason for painting, other than make sure you aren’t painting with a water-soaked brush. Between colors, clean your brush off in a glass of water, but then brush off all excess water before dipping back into the paint. The water will degrade the icing leaving little craters all across your cookie. Not cute!

The paint only takes a few minutes to dry, so once you are done you can pack the cookies into bags or set out to eat! 

Supplies

Like all my watercolor and painted cookies, the supplies for these cookies are pretty standard: food coloring, alcohol, and paint brushes. 

For the gel food coloring, I used all the bright colors in my collection: purple, pink, orange, yellow, and blue. I diluted the food coloring with some cheap vodka that I picked up at the liquor store. If you don’t keep vodka in your house or don’t have access to it, you can also use a clear extract, like almond extract.

Now for the paint brushes. I stress this in every post, but it is important to use clean (i.e. never used with paint) brushes. Wilton makes paint brushes specifically for baking, but I use normal craft brushes that I clean with dish soap before using. 

[show_shopthepost_widget id=”3136059″]

/ Filed In: Cookies New, Decorated Cookies, Desserts, Eat
Tagged: butterfly, cookie decorating, cookies, Mother's Day, painted cookies, Spring, watercolor

How to Pipe Perfect Icing

February 26, 2018

I have taught dozens of cookie decorating classes. Even before teaching strangers, I was teaching my friends how to decorate cookies. And from all of those experiences, there is one thing I see people struggle with most. And, not to mention, something that I struggled with for a long time. 

How to pipe perfect icing.

What do I mean by that?

A perfectly iced cookie is one with a flat, even layer of icing that perfectly covers every single inch of the surface of the cookie. If you go to a bakery where they sell decorated cookies, follow cookie decorators on Instagram, or pin decorated cookies on Pinterest, then you are probably familiar with what I am talking about. 

Actually, in order to describe what I mean, maybe it’s best to show you what a perfectly iced cookie IS NOT.


The three images above all demonstrate that lumpy, bumpy, uneven icing that I am referring to. The bumps are pretty obvious in the pumpkin cookies, but I promise they are there in the star cookie, also! 


And these three cookies demonstrate that flat, even, and thick layer of icing that now comes naturally thanks to my four tips below. 

How to Pipe Perfect Icing

Tip No. One:

Outline your entire cookie with either piping consistency icing or flood consistency icing. 

THEN WAIT!

Yes, waiting is trick numero uno. You want your outline to harden slightly before filling it with the cookie (you only need to wait about 1 minute for piping consistency icing and 2-3 minutes for flood consistency icing). This creates a barrier for your fill icing so that you don’t have to worry as much about over filling and icing dripping down the sides. Also, by filling with more icing, you are ensuring that you have a perfectly flat surface. 

Tip No. Two: 

Fill the outline you have just created with flood consistency icing so that almost no cookie is showing underneath.

As you will know from my Royal Icing post, flood consistency icing is icing that flows back into itself in about 10 to 15 seconds after running a knife over the surface. To achieve a perfectly flat surface, I tend towards 10 seconds. 

10-second icing will be so fluid that the icing will just start to run together and fill the entire surface area you created with your outline without you even having to touch it. 

Which leads me to tip number three…

Tip No. Three:

Touch the icing sparingly. 

When you watch my videos, you will see me use a scribe tool (that yellow thing in the top right corner) to move the icing around to help fill the outline. I try to do this as little and as quickly as possible. 

If you have done trick number two correctly, you will need to do very little work at this point. The icing should be almost completely covering the cookie with little help from you.

You may wonder why this is such a problem. Well, let me tell you!

The icing starts to dry immediately when it’s exposed to the air. After about a minute, the icing will start to develop a skin. If you continue to move the icing around after this point, it will no longer flow back into an even surface. You will start to get drag marks and bumps. Definitely not the look you are going for. 

Tip No. Four:

Pop the bubbles.

Inevitably, the icing will have a few air bubbles in it. Tapping or shaking the cookie will expose the bubbles on the surface. Use a sharp object to pop them, otherwise, they will look like blemishes on the top of your cookie once the icing has dried. 

Not cute. 

What Not to Do

Most of the tricks are pretty easy to understand. But it’s trick number two that holds people up. No matter how many times I tell people, “fill the cookie so that no cookie is showing underneath”, they tend to under-fill the cookie which results in a lumpy bumpy mess. 

What happened in the cookie above is that 1) I didn’t add enough icing. Because of that, 2) I spent too much time messing with the icing to fill in the outline.

In the last picture, you can see the drag marks that I made in the cookie just trying to move the icing towards the edge.

Okay, I also have one other “what not to do” and that is to not use a knife or spatula to fill the cookie. This is not a technique that I use and I don’t want to use someone else’s picture and call them out, so you will just have to picture it yourself. 

What I have seen some cookie decorators do is outline their entire cookie like in trick number one, above. Then they pour/spread the flood icing with an offset spatula. Sure, it’s fast and easy. And it may even work if you just have one large area like a circle, square, etc. But once you start adding in other smaller areas (the pumpkins are a good example), you are asking for trouble. The spatula spreads the icing too thin that you will see every single imperfection in the cookie as well as any others created by the icing. 

Pros and Cons

There are some pros and cons to this technique. 

I think the pros are pretty obvious:

  • A flat, even surface
  • No lumps, bumps, or bubbles
  • It is faster because you can employ the assembly line method (outline all cookies, then fill all cookies)
  • A thicker layer of icing 

However, the cons may not be quite so obvious:

  • It’s not the best for beginners. This is because you can’t adjust the outline after you fill cookie. This is one of the main reasons I didn’t use this technique earlier, and why I don’t teach it to new students. If you are not used to piping royal icing, it may be very hard to pipe right on the edge of the cookie. By outlining and then filling right away, you can make corrections and adjustments to your outline if you don’t like it. 
  • You can see the outline. If you look at the second set of photos, you can actually see the outline of the cookie. Because the outline is either a different consistency or already dried icing, the fill icing won’t totally blend in. If this is something that bothers you, then this technique may not be for you. 
Summary

Well, that was lots of information for a fairly simple subject. I tend to do that sometimes. So in case you glossed over most of the content and just want the summary version, here are the highlights:

  • Outline the cookie and let it dry for 1-2 minutes.
  • Fill the cookie so that you can see almost no cookie underneath. Don’t underfill!
  • Spend less than 30 seconds spread the icing around.
  • Pop any bubbles on the surface.
  • Don’t use a spatula to spread icing onto the cookie. 

I can almost guarantee that these tips and tricks will help you pipe perfect icing. I have seen such an improvement in my own cookies because of them. Since I was pretty much self-taught, they took me a couple years to master, but now I am sharing them with you so you don’t have to waste your time!

[show_shopthepost_widget id=”3042062″] 

/ Filed In: Cookie Decorating 101, Cookies, Cookies New, Decorated Cookies
Tagged: cookie decorating, cookies, icing, royal icing

How to Make Marbled Cookies

February 14, 2018

Okay, guys, this has been a much requested and long awaited tutorial! I promised to show you how to make marbled cookies back when I made one of my first videos ever, the Laduree Macarons. But today is the day. Consider it my Valentine’s Day gift to you!

Marbling cookies is one of my absolute favorite decorating techniques because it’s just so gosh darn easy. Literally, anyone can do it. I know I say that a lot (because I believe anyone can really do anything) but I really mean it this time. 

There is absolutely no method, no skill, no nothing involved. If you can squeeze, stir, and dip you can make these marbled cookies

How to Make Them

You heard me. Squeeze, stir, and dip? Got it? 

Lesson over. 

Just kidding!! I figured a video of me making marbled cookies would probably help!

One thing I will mention because I didn’t make it clear in the video is that the white, grey, and black icings are all flood consistency icing. You want the icing to be very fluid so that it settles into a flat surface on top of the cookie. 

Tools Needed:

Another reason to love these cookies is that you don’t really need anything special to make them, as you can see in the video. Everything you will need I bet you already have at home.

  • A shallow bowl
  • Zip top bags or piping bags
  • Toothpicks or scribe tool
  • Food coloring

If you did want to get all fancy and paint some gold on top, this is my favorite gold paint. 

Alright, raise your hand if you think you can make these cookies. Everyone’s hand should be up!

But I highly encourage you to have fun with this technique and play with the colors and the amount of color. As I mentioned in the video, you can do lots of different things with this and just make it your own!

As usual, I made my favorite sugar cookie recipe and royal icing recipe. 

[show_shopthepost_widget id=”3029178″] 

/ Filed In: Cookie Decorating 101, Cookies New, Decorated Cookies, Desserts, Eat
Tagged: cookie decorating, marble, marble and gold, royal icing, sugar cookies

Fall Pumpkin Cookies

October 5, 2017

While Fall is one of my favorite seasons (who doesn’t love reprieve from the hot, humid Summer?), I still end September dragging my feet to get into the “Fall spirit”. But come October, and I am in the full Fall mode! In the last week alone, I have made four pumpkin spice recipes. This has got to be a new personal record. 

These cookies are actually one of those recipes. On Tuesday I shared my pumpkin spice sugar cookies which are freaking delicious. They only deserve the best Fall decoration!

I mean, you can’t make pumpkin spice sugar cookies and not make them into adorably decorated pumpkin cookies, right? 

You should know by now that I love throwing royal icing flowers on just about every cookie I make. They are fun way to really dress up a cookie. Plus people are generally pretty impressed with flowers on cookies (little do they know, it’s incredibly easy!). 

I also drew inspiration from my own Mother’s Day cookies and made some floral Fall letters, which I love. Again, they look so intricate and detailed, but really the piping tips do all the work. 

Speaking of which, these are the piping tips I used for the flowers and leaves (all are Wilton brand, most are included in this set):

  • #14 (Rosette)
  • #16 (Rosette)
  • #24 (Rosette)
  • #225 (Drop Flower)
  • #107 (Drop Flower)
  • #349 (Small Leaf)
  • #67 (Big Leaf)

I also used couplers along with my piping bags so that I could switch out my piping tips. For instance, on the pumpkins, I piped red rosettes, but on the letters, I switched to a drop flower tip. Couplers just make it easy to switch out colors and piping tips so you don’t have to have a million different tips. 

Wouldn’t these be so great for Thanksgiving!? I also made a bunch of letters to spell out “Thankful”, which would be a really pretty display on a Thanksgiving dessert table. 


Recipes:

  • Pumpkin Spice Sugar Cookies 
  • Classic Sugar Cookies
  • Royal Icing

Supplies Used:
[show_shopthepost_widget id=”2843280″]
 

/ Filed In: Cookies New, Decorated Cookies, Desserts, Eat
Tagged: cookie decorating, cookies, decorated cookies, Fall, pumpkin spice, royal icing

Watercolor Flower Pineapple Cookies

August 31, 2017

One of my favorite cookie decorating techniques lately has been watercolor on cookies. I really love the look of them, but I mostly rlove not having to make so much royal icing!

So with a good friends birthday around the corner, I knew I wanted to make some watercolor cookies for her. In looking for creative inspiration for her cookies, I came across a couple images that I absolutely adored! This sweet pineapple card and this beautiful pineapple print.

From there I was inspired to make these watercolor flower pineapple cookies!

To paint on cookies, you do need a few supplies you may not normally use during cookie decorating…mainly a big bottle of vodka (really any clear extract or alcohol will work, but I prefer vodka). It’s always amusing to my husband to see me painting cookies with a bottle of vodka next to me on the counter. 

Supplies you will need:

  • Sugar Cookies in pineapple form
  • Plain white royal icing
  • Gel food coloring
  • Clear extract or alcohol
  • Food safe paint brushes
  • Pallet tray

I absolutely love how these cookies turned out. I probably say this about every cookie, but these may be my favorite yet. 

I guess it’s like children, you can’t really pick your favorite. But in this case (at least for now) these are definitely my favorite!

And, you don’t have to be an artist to make these. I am by no means an artist (as you may or may not be able to tell). So painting cookies can really be fun for anyone, even the kids!

/ Filed In: Cookies New, Decorated Cookies, Eat
Tagged: cookie decorating, cookies, decorated cookies, painting, pineapple, royal icing, watercolor

Water Color Fruit Cookies (+ NEW Sugar Cookie Recipes!)

June 23, 2017

I am really excited about this post for a couple of reasons. First of all, I love these cookies. They are some of my favorites to date! I have been loving this painting on cookies technique that I picked up over the past couple of months. It’s actually somewhat therapeutic to sit and paint. Plus, with watercolor, you don’t have to be so precise and exact, which I certainly appreciate! 


The second reason I love this post is that each one of the watercolor fruit cookies represents the flavor of the cookie! I have been playing around with different flavors for a couple months and settled on four that will be my (actually, you have already seen them in the rotation) my go-to cookie flavors for Summer (and probably beyond). 

But I will get to the flavors in a second. First let me show you how I painted the cookies! (P.S. It’s super easy!)

So the trick is to “water down” your food coloring with a bit of a clear alcohol or extract, like almond extract. You don’t want the color to be TOO pigmented, or else it won’t look like water color. Then I just mixed my colors until I found a shade I liked and painted directly on the dried icing. There is no science to it at all! I did have pictures of water color fruit up in front of me while I did this so I had something to work off of. But after a while, I just did what I thought looked good. 

Now back to these cookie flavors. 

I know I share a lot of sugar cookie recipes. So instead of posting all the recipes here, or sharing them one by one over the course of the Summer, I decided to put together a little mini recipe e-book with all four recipes which you can get here. Each recipe is not only delicious, but I spent a lot of time in Photoshop making them pretty, too! That way you can print them out and save them for the next time you want to make some wonderful cookies. 

The lemon cookie is lemon-mint flavored and is absolutely refreshing and delicious! The raspberry cookie is a raspberry lemonade flavor, which reminds me of my all time favorite summer drink. The strawberry is strawberry and honey flavor which is subtle and sweet. And finally the lime cookie is lime and sea salt flavored which almost tastes like a margarita! (As I was decorating, I couldn’t help but think of the Willy Wonka line “the snozeberries tastes like snozeberries!”)

Also, I should mention that these recipes are not my normal sugar cookie recipe with a couple extracts thrown in. I re-developed my sugar cookie recipe just for Summer! It’s lighter and softer than normal. Plus the flavors are all natural! They are not engineered for a flavor extract, which makes the cookies that much more wonderful and delicious! 

If you do end up downloading the e-book and trying out the recipes, I would love to know what you think. Also, if you like this idea, I already have some thoughts on another e-book for the Holidays!

 
[show_shopthepost_widget id=”2717110″]

/ Filed In: Cookie Decorating 101, Cookies New, Decorated Cookies, Eat
Tagged: cookie decorating, cookies, lemon, lime, raspberry, strawberry, sugar cookies, Summer, water color

Red White and Blue Fringe Cookies

June 16, 2017

These cookies are a little bit different than what I normally make. For starters, there are no royal icing flowers anywhere! Actually, there was little to no piping done on these cookies at all (who am I?). What makes these cookies so different is the fondant! Those fringes you see are actually made with colored strips of fondant that have been expertly and delicately haphazardly cut into a fringe. 

I forget how much I like working with fondant! It’s a lot like working with that molding clay or play-doh as a kid. If you mess up, you can just roll it back into a ball and start over again!

I do have a couple tips for working with fondant, however. 

  1. Keep unused fondant wrapped in plastic wrap and in a zip top bag. It will dry out quickly. As you will see in the video below, I also kept the balls of fondant that were waiting to be rolled out under a damp cloth.
  2. Buy white fondant and color it whatever color you want. Sure they sell lots of colors of fondant, but sometimes you want a particular shade of blue or pink. Which leads me to…
  3. When coloring fondant, it’s best to use food-safe gloves. Something I clearly didn’t take to heart as evidenced by the food coloring stains on my hands. 

See how easy fondant is? When I just don’t feel like making royal icing or piping tons of cookies, I turn to fondant. I didn’t even pipe the bottom layer of white royal icing you see on the cookie. Nope! I dipped the cookie into the icing. All of those cookies you see in the pictures above were dipped. Yeah, I was feeling extra lazy that day! But they still turned out really cute!

Recipes and items used:

  • Royal Icing Recipe
  • Sugar Cookie Recipe
  • Fondant dyed with red and blue food coloring
  • Fondant roller
  • Brushes
  • Cookie cutters

 
[show_shopthepost_widget id=”2709655″]
 

/ Filed In: Cookies New, Decorated Cookies, Eat
Tagged: 4th of July, cookie decorating, cookies, fondant

Gerber Daisy Cookie Flower Bouquet

May 24, 2017

I’ve been sitting on these cookies for a while. Not literally of course. I made these well before Mother’s Day and fully intended on sharing them before hand, but then these happened and they became my first priority. And flower cookies are good for any occasion! Especially this cute Gerber daisy flower cookie bouquet. 


These Gerber daisy flowers are actually really easy to make with a petal piping tip. The piping tip just does all the work for you. Make sure you have the wide end of the tip out.


To make the petals, press firmly on the piping bag and pipe the icing out on the edge of the cookie then drag in towards the center. Do that all the way around the cookie. Then pipe another layer of petals the exact same way.

For the center, pipe a circle of dots in stiff consistency icing. You want them to form small peaks. First pipe dots in one color, then pipe more dots around the center in another color.  

My favorite part is putting all the cookies together into a fun flower bouquet! I have to admit, it actually wasn’t easy. It took me about a dozen attempts to get the cookies in the place I wanted them. In the video I’m actually playing it in reverse order, taking cookies away instead of putting them in place. 

I just love this cookie flower bouquet so much! I can see myself making this again for a baby shower for a little girl. Or a bridal shower. Or maybe for next Mother’s Day! Any occasion you may want to give someone a bouquet of flowers, instead give them a bouquet of flower cookies!! Which I think is even better because you can eat the cookies! 

Piping Tips Used:

  • Petals – #104 tip or any large petal tip
  • Center – #2 tip or any small round tip
  • Stems – #10 tip or any medium round tip
  • Filler flowers – #224 tip 

Recipes Used:

  • Royal Icing in stiff consistency
  • Sugar Cookie

 
[show_shopthepost_widget id=”2683611″]

/ Filed In: Cookies New, Decorated Cookies, Eat
Tagged: cookie bouquet, cookie decorating, flower cookies, Gerber daisy, petals, royal icing, sugar cookies

How to Trace onto Cookies (Mother’s Day Cookies)

May 12, 2017

This is part two of my Mother’s Day cookie post. There was just too much to fit all in one post! Floral monogram cookies AND lean how to trace on to a cookie?! I think we would have all been overwhelmed. Plus, I think this technique deserves it’s very own post since it can be used for so many different things: fonts, images, designs, patterns, etc. Anything you don’t feel comfortable drawing freehand with icing, you can do using this technique to trace onto cookies!

But before you can decorate, you need some cookies! For these Mother’s Day cookies I flavored my favorite sugar cookie recipe with a touch of lavender and a whole lot of vanilla bean.


The resulting cookie was this subtly floral vanilla cookie that was so good. I was so afraid of going overboard with the lavender, that I just added a touch to the sugar before I mixed the sugar into the butter. I blended the sugar and lavender together so that each bite would have a very subtle hint of it. 

I didn’t feel the need to hold back on the vanilla, however. I went all out! You can see all the lovely vanilla beans sprinkled throughout the dough. If you look closely, you can sort of make out pieces of lavender, too!

Okay, so now let’s get to the reason you are here: learning to trace onto cookies!

It’s simple and requires only a couple special tools that you may already have around your house or kitchen: tissue paper and a edible food marker. 

First find an image or text that you like and print it out onto normal paper. (I found this one on Google Images and thought it would fit perfectly on my plaque cookies.) 

Top your printed image with a sheet of clean tissue paper. Then trace the image with an edible food marker.

Take the sheet of tissue paper with your image or font traced on it and place it onto of the cookie, making sure that it’s perfectly situated. 

Trace over it again with the edible food marker. Don’t press too hard because you will risk tearing the tissue paper. You should be able to trace two to three times with the same tissue paper. 

Viola! The text or image has now transferred onto the cookie! From here you can just trace over the ink with your icing. 

I say that like it’s no big deal. Tracing the image with the icing is probably the hardest part. I still have yet to master writing cursive letters with icing. 


Since the original image had some flowers on the bottom, I added some flowers to my cookies. 


Now they go perfectly with the other floral monogram cookies I shared on Wednesday. 

Wouldn’t you mom love these cookies? Well, even if you are reading this far from Mother’s Day I hope you have learned how to trace text or an image onto your cookies. I promise, this trick will come in really handy!

[amd-yrecipe-recipe:160]

/ Filed In: Cookie Decorating 101, Cookies, Cookies New, Decorated Cookies
Tagged: cookie decorating, cookies, lavender, Mother's Day, royal icing, tracing, vanilla

Floral Monogram Mother’s Day Cookies

May 10, 2017

If you know me, then you know that I can’t let a holiday, no matter how big or small, pass without making some cookies (all my friends are probably nodding their head in agreement right about now). I definitely take advantage of all my friends’ sweet tooths (Sweet teeth? What is the plural of sweet tooth?) by making cookies and forcing them upon them every chance I get. 

These cookies are no exception. After making these cookies for a friends bridal shower, I couldn’t wait to try this floral monogram design again. I knew it would be perfect for Mother’s Day. And even better, I know lots of deserving mom’s out there who definitely a couple cookies to help them celebrate. 


For my mom, I made individual letters that spelled out mom and covered them in flowers. But for my friends who are not my mom I made them each individual initial cookies. 

How cute are they? And not just good for Mother’s Day, but they would be great cookies for a bridal shower, baby shower, birthday, wedding….you name it! I am obsessed. 

[Friends, expect to get cookies like these for every birthday from now until the end of time. Thanks.]

The best part is that these cookies are actually quite easy if you have the right piping tips! Just layer on flowers until you have a full letter. 


I like to start with my bigger flowers, like rosettes. I place the rosettes randomly around the cookie leaving space for other flowers. 


Then I go in with my smaller flowers, like drop flowers, and fill in some more space. 

There is obviously some space left, so I go back in and fill them in with some more dots of icing and then fill it in with the leaves. 

Really, there is no technique…just fill up the space!

To go with the monograms, I made some simple little hearts and circle cookies with a single flower and a couple leaves. (Oh, and see those mint “Happy Mother’s Day” plaque cookies? I will show you how I made those on Friday!!)

I am clearly obsessed with these cookies, as you can tell. I think I just like doing the floral designs because they are really impressive without actually being that hard to achieve. 

But that’s just a secret between you and me. If my mom asks, I slaved over these cookies for days just for her. K, thanks! 😉

Recipes Used:

  • 2 batches of my Royal Icing for 40 cookies in flood consistency (the base layer) and stiff consistency (the flowers).
  • 2 1/2 batched of my Sugar Cookie recipe 

Items Used:

  • White Rose – #18 piping tip
  • Light Pink Rose – #16 piping tip
  • Redish Pink Drop Flower/Rose – #225 piping tip
  • Medium Pink Drop flower – #14 piping tip
  • Leaves – #349 piping tip
  • Dots – #2 piping tip
  • Piping Bags
  • Scribe Tool
  • Gel Food Coloring in light pink, watermelon, and forest green

 
[show_shopthepost_widget id=”2668939″]


/ Filed In: Cookies New, Decorated Cookies, Eat
Tagged: cookie decorating, floral, flowers, Mother's Day, piping tips, royal icing, sugar cookies

Sweet 16 College Logo Cookies

March 22, 2017

I love this time of year! Not only is it my birthday week and month it’s also March Madness! 

This may be somewhat surprising for those who don’t know me personally, but I love me some college basketball. I played as a kid and through high school. And despite not being all that good, I still have love for the sport. My dad used to take me to the tournament when they held games in Los Angeles. Now my husband and I try to go to at least one round whenever it’s hosted here in Charlotte. 

This year I am particularly excited because my team (the Baylor Bears) have advanced to the Sweet 16. Not only that, but they are playing South Carolina in the Sweet 16 game, where a lot of our friends went to school. To mark the occasion, I thought it would be fun to make some cookies with the Baylor and USC logos.(That’s University of South Carolina for those of you out West. It has taken a long time for me to think of USC as South Carolina and not Southern Cal.)

But why stop there? There are 14 other well deserving teams that should also get cookies, right? I know a few Tar Heel friends that would be very upset if I left them out. 

So I did all 16. It was a hell of an afternoon, but it was a lot of fun. And it gives me a chance to demonstrate how you can make your very own college logo cookies! It’s actually not as hard as you may think! 

Can you trace a picture using tracing paper? Then you can trace a logo on parchment with royal icing!


First, start with a print out of your favorite team logo that’s a little smaller than your actual cookie. For reference, my cookies were about 3″ in diameter and I printed out my logos to be 1.5″ to 2″ inches at their widest/tallest (with the exception of Purdue’s P, which is much wider than I expected). 

Cover the logo with a small piece of parchment, then outline the logo in piping consistency royal icing and fill in with flood consistency and use a toothpick to spread out the flood icing to fill in all the corners.

This particular logo (and most logos) has a contrasting border, so I almost always use piping consistency for the border and flood for the interior. If it is a large single color logo (see Wisconsin’s W), I used red flood for the entire thing, but it was harder to get the detail in the W. For thinner logos (Kansas), I used piping consistency for the whole letter. 


Transfer the parchment with the logo to a flat counter or board and tape down all the sides. Parchment has a tendency to “roll” which will cause your logo to be misshapen, so that it won’t lay flat on the cookie. 

Allow the logo to dry for at least 2 hours. You will know the logo is ready when it easily slides off the parchment. If you are met with any resistance when peeling off your logo….continue at your own risk!


Getting your logo onto the cookie is the easy part! When you know your logo is dry, outline and fill your cookie. Immediately drop the logo (or royal icing transfer) onto the wet icing. Use a toothpick, scribe tool, or your finger to press the logo down into the icing. If you have any gaps, you can pipe in some additional icing to fill them in. 

Once your cookies are dry (or dry-ish), you can go back in and add a border! My favorite is to just pipe dots around the side. Just make sure to pipe ever other dot if you are using flood consistency icing. They will run together if you pipe two dots right next to one another without letting one crust over (about 5 minutes) in between. 

As much fun as these cookies were, some of these logos were a pain in the butt. About 10 cookies in, I was creating a bracket in my head with which cookies would advance based on how much I liked making their logo. Ranked from 1 to 16 they are….

  1. Michigan. Straight edges and a nice big solid color was basically everything I could ask for in a logo. 
  2. West Virginia. Samezies ^^
  3. North Carolina. It’s just a fun logo with pretty colors. 
  4. Oregon. You would think with it being so easy that I would have done a better job. 
  5. Baylor. Interlocking letters is challenging, but I am ranking this higher because I am biased. 
  6. Xavier. It’s a little uppity with it’s 3 color logo (you can’t see one of the colors). 
  7. Wisconsin. It looks like it should be simple, but my brain had trouble with the drop shadow.
  8. Kansas. Simple, but also super delicate. I was afraid I was going to break it!
  9. UCLA. This one was tricky, but I was proud of myself for getting something that resembled the letters ‘U’, ‘C’, ‘L’, and ‘A’.
  10. Arizona. Three colors is one color too many. 
  11. Kentucky. This one was only two colors, but it acts like a three color logo, and you already know how I feel about those. 
  12. Purdue. I didn’t like the colors and the logo came out too big. None of this is Purdue’s fault. The actual logo was pretty easy to make. 
  13. South Carolina. Interlocking three letters?! Ugh, might as well have three colors while your at it. 
  14. Florida. It’s like the UCLA logo, but with two more letters, which really just made it impossible for me. 
  15. Gonzaga. I had to alter their normal logo, because there was no way in hell I was going to try to pipe a tiny bull dog.
  16. Butler. I had to MAKE UP a logo for them because their only logo is a freaking bull dog. What is it with bull dogs? Why do they have to be a part of your logo!?

Just kidding, I love bull dogs (all dogs, really), but I did not want to attempt to make one with royal icing. 

So as far as I am concerned, Michigan is the real winner this March Madness. I know at least one Wolverine who will be happy about that! Go Blue!

(…and go Bears!)

Royal Icing recipe 

Sugar Cookie recipe

/ Filed In: Cookies New, Decorated Cookies, Eat
Tagged: college, college logos, cookie decorating, game day, March Madness, sugar cookies

  • 1
  • 2
  • Previous Entries

Follow

Hey There!

Hey there, I'm Lindsey. I'm a number cruncher by day and a home cook and baker by night. While I love to eat healthy and find fresh and healthy alternatives for my favorite foods, I will never turn down dessert! Life is all about moderation, right?

Recipes

  • All Recipes
  • Breakfast
  • Appetizers
  • Salads
  • Main Dishes
  • Side Dishes
  • Desserts
  • Drinks

Favorite Finds

[show_lookbook_widget id=”388783″]

Theme by 17th Avenue · Powered by WordPress & Genesis