• Home
  • Eat
    • Breakfast
    • Appetizers
    • Main Dishes
      • Chicken
      • Beef
      • Seafood
      • Healthy Dishes
      • Paleo Dishes
      • Salads
    • Desserts
      • Decorated Cookies
      • Cookies
      • Bars and Brownies
      • Cakes and Cupcakes
  • Shop
    • Cookie Decorating Supplies
    • Bakeware
    • Cookware
    • Kitchen Gadgets
    • House
  • About
    • Contact
    • Bucket List
  • Cookie Decorating 101

Follow the Ruels

Five Chicken Salad Recipes

November 9, 2015

Chicken Soup-6

After discovering that you can easily substitute Greek yogurt for mayonnaise in a chicken salad recipe, chicken salad has become one of my favorite things to make with left over chicken. It is so easy and you can make so many different variations of it. Lately, my husband and I have been randomly coming up with chicken salad flavors we wanted to try. For instance, after ordering buffalo wings at bar the other day, I asked him, “do you think a Buffalo chicken salad would be good?”. From there the wheels kept turning until we had a list of five flavors to try. 

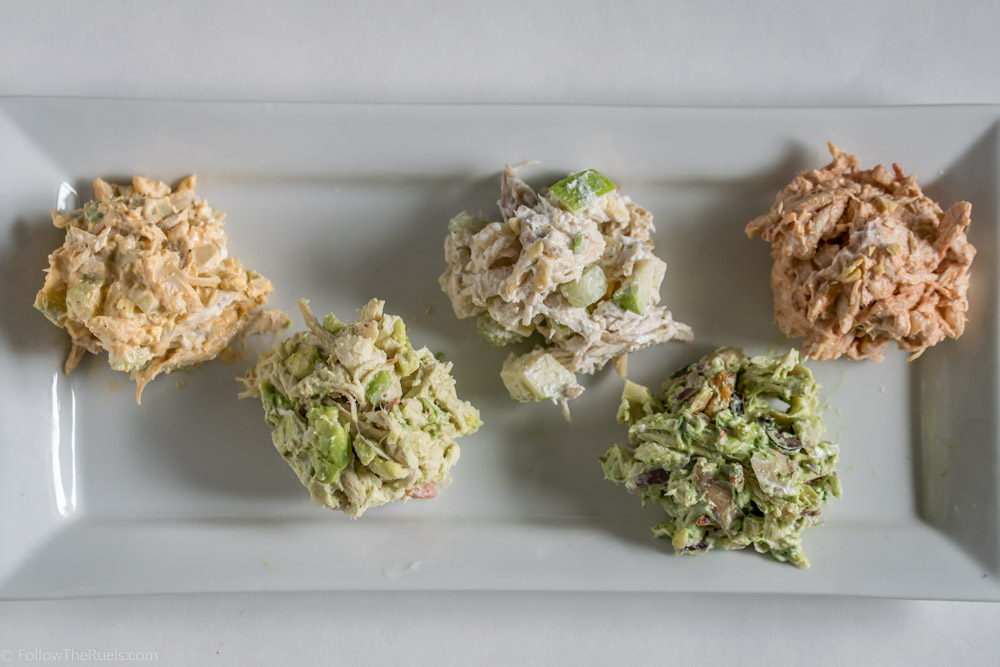
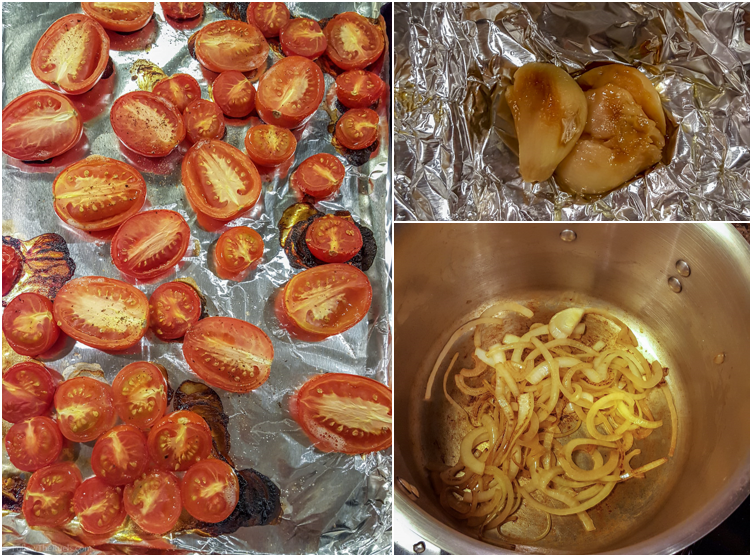
For each of the chicken salads, we started with a rotisserie chicken and Greek yogurt. But that is were the similarities ended. Each recipe used different ingredients and spices.

Buffalo Chicken Salad

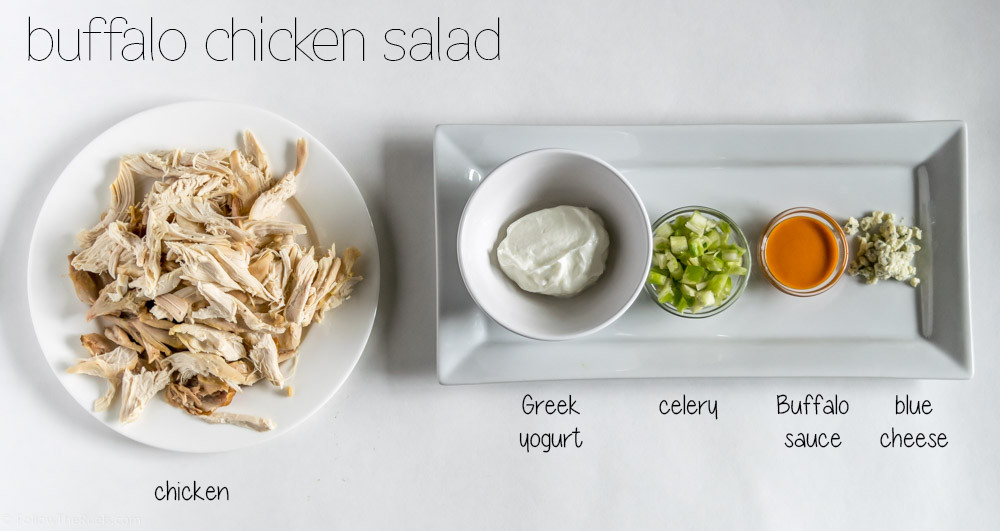
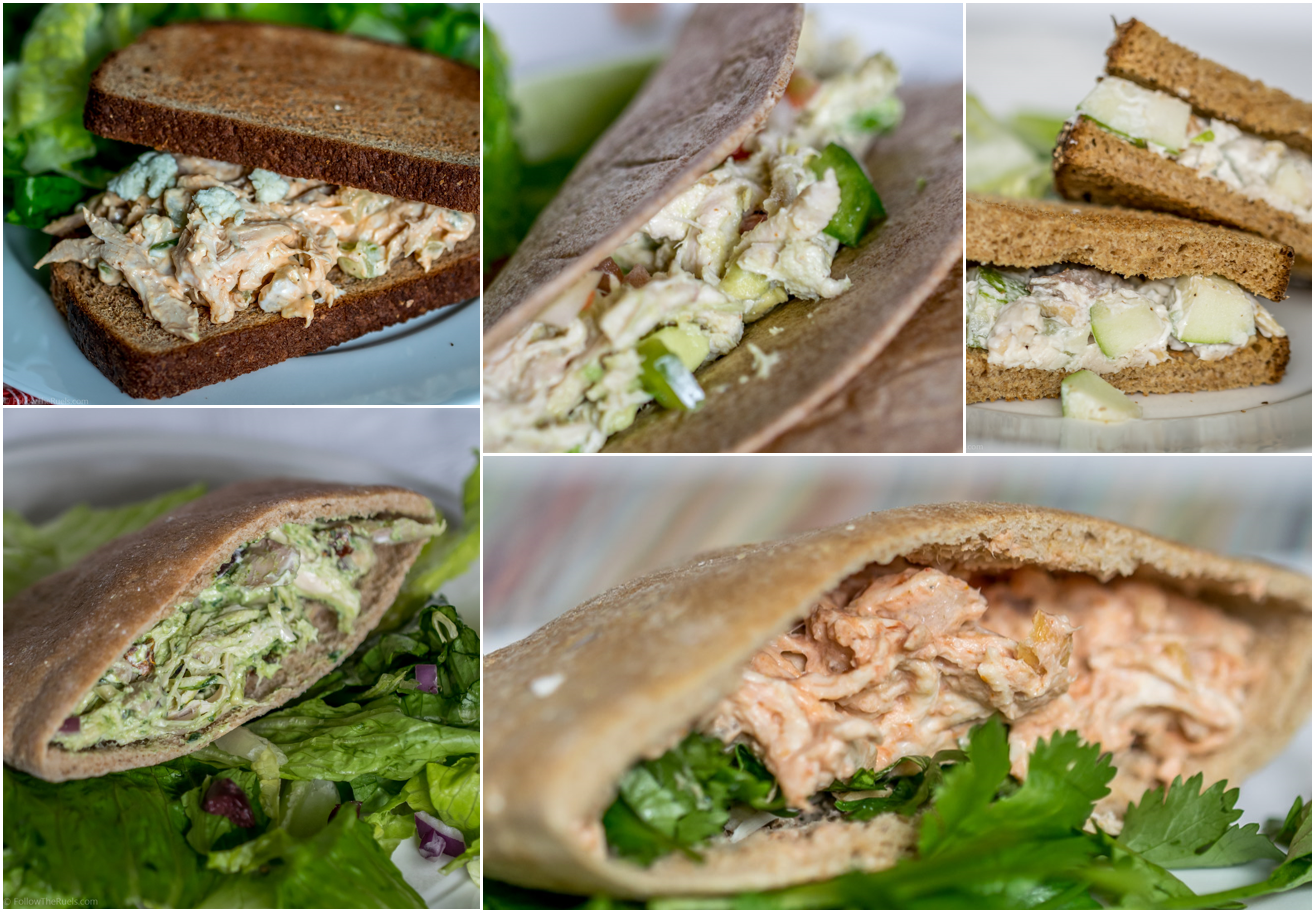
The first one we tried was the aforementioned Buffalo chicken salad. This one was really easy! To the chicken and yogurt, we added chopped celery, buffalo sauce, and a little blue cheese. If you like really spicy Buffalo wings, you can also add in some extra hot sauce. I would also recommend mixing in a bit of the skin from the chicken, if you use a rotisserie chicken. That is sort of the best part of a chicken wing, right?

Mexican Chicken Salad

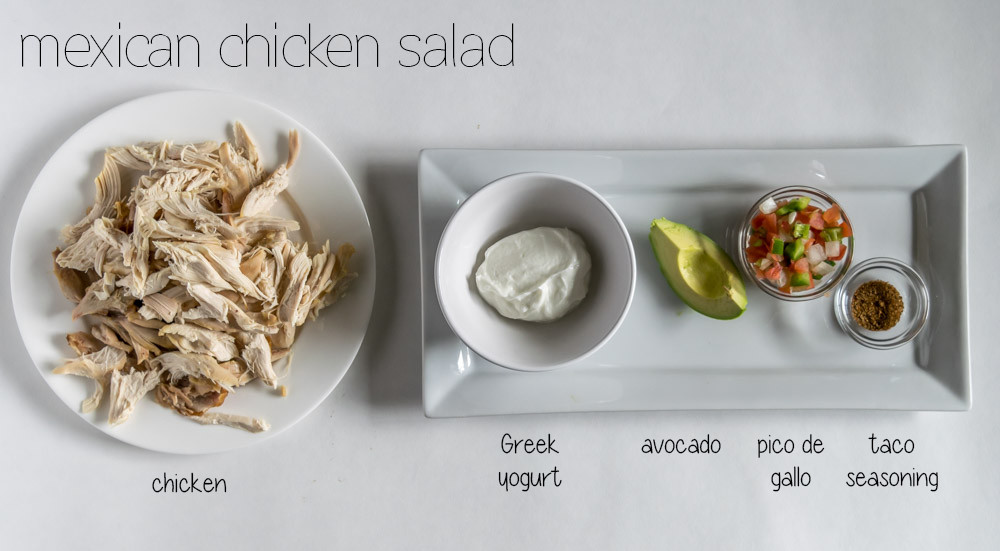
The next flavor we tried was one we had made before, so we kind of cheated. But it is one of our favorites! We substituted part of the yogurt with a mashed avocado and added pico de gallo (drained) and taco seasoning. We served this one like a taco in a tortilla. It would also be excellent to be served on top of tortilla chips. 

Harvest Chicken Salad

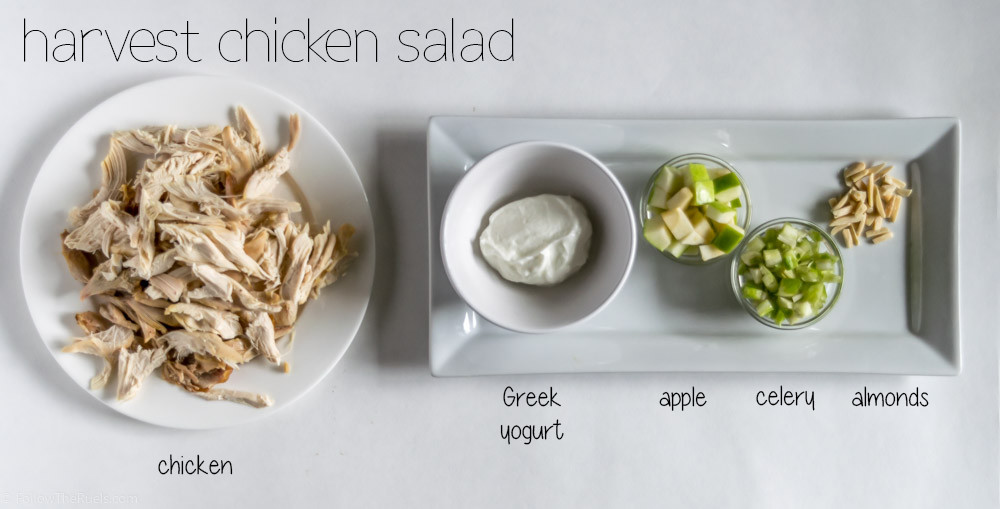
This harvest chicken salad is as close to a classic chicken salad as you will get. Instead of grapes we used apples for the sweetness and the crunch. We also added in chopped celery (partly because we already had it on hand) and some almonds. We just seasoned this with a little bit of salt and pepper and it was delicious. Possibly my husbands favorite. 

Pesto Chicken Salad

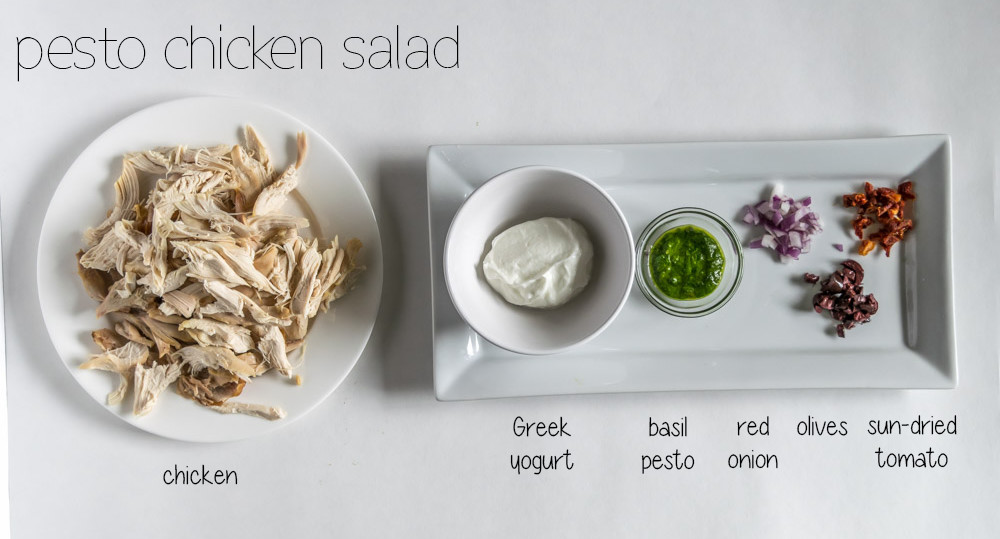
One of our favorite restaurants in town is a place that serves, almost exclusively, chicken salad. This is a flavor that they have on their menu and it might be my favorite of theirs. In addition to the pesto sauce, I mixed in a little red onion for crunch, olives for saltiness, and sun-dried tomatoes for tang. We served this flavor in a pita pocket to keep the Mediterranean theme going. I also love this salad served on a bed of lettuce. 

Tikka Masala Chicken Salad

This last flavor was really out there for me, since I don’t eat a lot of Indian food, but I can honest say that is might have been my favorite of the 5. I made a big batch of tikka masala seasoning to be used later and just used a small portion of it. I also mixed in a bit of tomato paste into the Greek yogurt to get the creamy tomato taste that chicken tikka masala has. For some extra crunch I mixed in some chopped cashews and served it with some chopped cilantro. 

Chicken Salad 2

We also realized after we made all of these recipes that we really represented a lot of different cuisines. We have American, Mexican, Italian, and Indian. Who knew chicken salad could be so International. 

[yumprint-recipe id=’75’][yumprint-recipe id=’76’][yumprint-recipe id=’77’][yumprint-recipe id=’78’][yumprint-recipe id=’79’]

/ Filed In: Eat, Healthy Dishes
Tagged: chicken salad, healthy, sandwich

Healthy Creamy Tomato Soup

October 30, 2015

Tomato Soup-1

I continue my soup obsession (see here, here, and here) with this delicious bowl of tomato soup. This obsession is real, people. Vegetables need to be on alert…I may roast you and puree you and make you into a yummy soup. I’m looking at you Sweet Potato!

But really, to me tomato soup is one of the most comforting dishes during the Fall and Winter. Pair it with a cheesy grilled cheese sandwich and I’m in heaven. I prefer my tomato soup on the creamier side, which in most cases means adding heavy cream. Tasty, but not super healthy. To lighten this soup up but keep the creamy texture, I added in Greek yogurt before I pureed the soup. It added richness, balanced the tartness, all without adding fat. 

Tomato Soup-3

To make this tomato soup extra flavorful, I roasted the tomatoes and garlic in the oven before adding them to the pot with sauteed onions. I love the flavor of roasted garlic! It takes away some of the bite that raw garlic can have. 

Tomato Soup Prep 1

Once everything gets added to the pot, the immersion blender makes it easy to puree. If you don’t have an immersion blender, you can blend everything in a blender first then add it back to the pot to boil. 

Tomato Soup Prep 2

It’s that easy. Roast. Blend. Boil. Serve. Okay, there might be a few more steps in there, but not many!

For the sake of being healthy, I did forgo the aforementioned grilled cheese. But I did’t want to skip the cheese altogether. Instead I made little Parmesan crisps to serve on the side. These were so easy to make! Make little piles of shredded Parmesan on a baking sheet. Bake at 400 degrees for 5 minutes. Boom. Done!

Hope you make this recipe next time the weather just makes you want to stay inside and watch Netflix all day.

[yumprint-recipe id=’73’] 

/ Filed In: Eat, Healthy Dishes, Main Dishes, Other Savories New
Tagged: Fall, healthy, soup, tomato

Lightened Up Kale Artichoke Dip

October 14, 2015

Kale Artichoke Dip-1

I personally love spinach artichoke dip, but have you seen some of  the ingredients in it? Mayonnaise, sour cream, and tons of cheese. No wonder it is so delicious.It is terrible for you! But that is what inspired me to make something a bit healthier for our college football watch parties (Sic ‘Em Bears!). I decided to make a kale artichoke dip that is lightened up with Greek yogurt and ricotta cheese. 

Kale Artichoke Dip-5

I was fully prepared to make this dip with spinach, but I had a lot of left over kale so I thought I would give that a shot (but this recipe can easily be used with spinach instead). I sauteed the kale in a bit of olive oil with some garlic and salt. I added the kale and artichokes to a food processor to chop up a bit. I then used the food processor to help me mix in the Greek yogurt, ricotta cheese, Parmesan cheese, and spices. That way I don’t have to dirty another bowl. 
Kale Artichoke Dip 3

I transferred the mix to a small cast iron skillet (or you can use any baking dish) and topped with a bit of cheese just for the cheesiness that makes spinach artichoke dip so wonderful. 

Kale Artichoke Dip-9

After baking just long enough to get all the flavors to meld together and the cheese to get ooey and gooey (about 20 minutes), I served it to my eager husband (after taking pictures, of course) with some pretzel chips. My husband LOVED this dip and could not tell that it was “healthy” or lightened up. He was not excited about the substitution of kale, but in the end, he could barely tell the difference. Honestly, if I didn’t tell you there was kale in it, you would never know. It tastes just like your favorite spinach artichoke dip, but with a thicker consistency. 

Kale Artichoke Dip 1

I hope you try this and love it as much as we do!

[yumprint-recipe id=’68’]

/ Filed In: Appetizers, Eat, Other Savories New
Tagged: artichoke, dip, healthy, kale, spinach

Healthy Snack: Toasted Chickpeas

August 17, 2015

Toasted Chickpeas-9

There are a couple things I miss about working from home. One of those is day-time television. On slow days or when my day ended early I would just take my computer to the couch and catch up on some day-time TV.

Recently, I was working from home for the afternoon and got to catch on one of my favorites: Doctor Oz. On this particular episode he was raving about all sorts of healthy snacks. One of them being toasted chickpeas. 

I had a can of chickpeas and some free time, so I thought I would take Doctor Oz’s recommendation and whip up a batch.

Toasted Chickpeas-2

I tossed the chickpeas in olive oil and homemade taco seasoning and spread them out over a baking sheet.

Toasted Chickpeas-6

I then baked them until they got nice and crunchy. My test to make sure they were just the right amount of crunchy was tapping them on the counter and listening for the sharp “tap tap” that you might hear if you did the same to a corn nut. 

Toasted Chickpeas-7

They shrink up quite a bit and darken in color, which just gives them even more flavor. They really do become a lot like a corn nut. Really crunchy, super flavorful, but actually healthy for you!

Toasted Chickpeas-10

These were really nice to snack on throughout the day. You don’t need to eat a lot (you’re teeth will not like you if you do), but they are just the right amount of satisfying if you need that salty treat.

[yumprint-recipe id=’57’]

/ Filed In: Appetizers, Eat
Tagged: Chickpeas, healthy, snack

Homemade Almond Milk

August 13, 2015

Almond Milk-7Y’all. I am about to say something you may not believe. But please believe me when I say, homemade almond milk is REALLY easy to make. It may seem complicated, because how can you really extract “milk” out of a tiny nut. But seriously, trust me. It can be boiled down to 3 easy steps:

1. Soak almonds

2. Blend almonds and water

3. Strain mixture

See how easy easy that was?

Okay, there is a little bit more too it than that, but not much! First, I soaked my almonds in water over night. 

Almond Milk-1

You want them to be nice and plump so that they blend more easily and release their “milk”. [Side note: There will be many sentences and phrases throughout this post where the middle-schooler in me can’t help but giggle. This is the first of many.]

Almond Milk-3

I kept the soaked almonds in the fridge overnight. I put a cinnamon stick in there with them thinking that it might impart some of its flavor, but sadly, that did not work. 

In the morning, I rinsed the almonds then combined them with about 2 parts water (I had about 3 cups of almonds, so I used 6 cups of water), a vanilla bean, a touch of stevia and blended until there weren’t any big chunks left.

Almond Milk-5

I then poured the mixture into a nut bag fitted over a bowl and let the milk drain out. When it stopped pouring out on its own, I gave it a little squeeze to get out any excess. 

Almond Milk-6

Now, you can find your very own nut milk bag at a health food store like Whole Foods. I found this one in the same aisle as the almonds (seems logical enough, but of course I had to ask someone). They are only about $2.50 a piece and I used this bag twice before it tore. 

Almond Milk-8

So that was it! Told you it was easy! Sure you have to plan ahead to soak the almonds, but once that is done, you can have a fresh glass of almond milk in less than 30 minutes.

And how does it compare to the store bought stuff?

Almond Milk-9

Store bought is on the left and homemade is on the right. They look almost identical except you can see some vanilla bean seeds in the homemade one. Also, the store bought stuff is a bit more beige in color.

Almond Milk-10

Taste-wise there is also a difference. Homemade almond milk tastes like…..almonds. Shocking, I know. In comparison, the store-bought stuff tastes like it has been processed to taste like cows milk, which is what most of us are used to. When added to coffee or milk, you can’t really taste a difference. 

Plus its just nice knowing (and being able to pronounce) exactly what goes into my almond milk. Wouldn’t you agree?

[yumprint-recipe id=’56’] 


/ Filed In: Drinks, Eat, Paleo Dishes
Tagged: almond milk, healthy, whole 30

Lite and Healthy Pad Thai

September 23, 2014

Lite and Healthy Pad ThaiAt the end of a long week, there is nothing that I want more than some take-out food and a large glass of wine. But the last time my husband and I got take out from our local Chinese food place, we felt pretty disgusting afterwards. Everything was fried and greasy (albeit…delicious). So this past Friday I set out to make a more healthy version of one of out take-out favorites: pad thai!

Zucchini Noodles with a mandolineI started by making some zucchini noodles with a mandolin to supplement the rice noodles that are traditional in pad thai.

Veggie Noodles for Pad ThaiI also added lots of julienned carrots and bell peppers to boost up the veggie factor. I tossed all the veggies and thinly sliced chicken breast in a hot pan and sauteed them in a bit of vegetable and sesame oil and seasoned with garlic, red pepper flakes, and ginger. In the meantime, I cooked about half the normal amount of rice noodles in a pot of boiling water.

Once the chicken was cooked, I added in the rice noodles and poured the sauce over the top and tossed it all together.

Healthy Chicken Pad ThaiI served up a healthy portion of the noodles into bowls, and topped them with some bean sprouts, peanuts, and a squeeze of lime. Our craving for take-out was totally satisfied and we didn’t feel like we had just ingested a cup of grease. And just like your favorite take-out, this pad thai is almost better eaten cold the next day. Oh you don’t do that?? Well, try it…it’s awesome!

Whats your favorite take out food?

[Sorry – Yum Prints wasn’t working…will try adding the recipe again later. For now, it’s included below]

Ingredients:

  • 1 chicken breast, thinly sliced
  • 1 zucchini, julienned
  • 1 bell pepper, julienned
  • 2 carrots, julienned
  • 2 cloves garlic, minced
  • 1 tsp garlic, minced or grated
  • 1 tsp red pepper flakes
  • 5 oz rice noodles
  • 2 tbsp light soy sauce
  • juice of 1 lime
  • 1 tbsp honey
  • 1 tsp fish sauce
  • 1/4 cup bean sprouts
  • 2 tbsp peanuts, chopped

Directions:

  1. Place a large skillet over medium high heat and coat with 1 tsp with vegetable oil. Toss in chicken and cook for about 2 minutes.
  2. Add in vegetables, 1/2 tsp sesame oil, garlic, ginger, and red pepper flakes. Stir every couple minutes to cook evenly. Cook another 5-7 minutes.
  3. Meanwhile, cook rice noodles in boiling water according to package directions.
  4. In a small bowl, mix together soy sauce, lime juice, fish sauce, and honey. Pour over vegetable and chicken mixture. Add in noodles and toss to coat.
  5. Spoon pad thai into bowls, and top with bean sprouts and peanuts. Serve and enjoy.

/ Filed In: Eat
Tagged: chicken, dinner, healthy, pad thai, take-out, Thai

Korean Beef Lettuce Wraps

September 10, 2014

DSC06353I have recently gotten back on the diet wagon which means that we have been doing lots of chicken and vegetables for dinner. Needless to say, that can get old quickly. Especially for my husband. So for the sake of the my marriage as well as my figure, I wanted to try something that was tasty and healthy.DSC06346
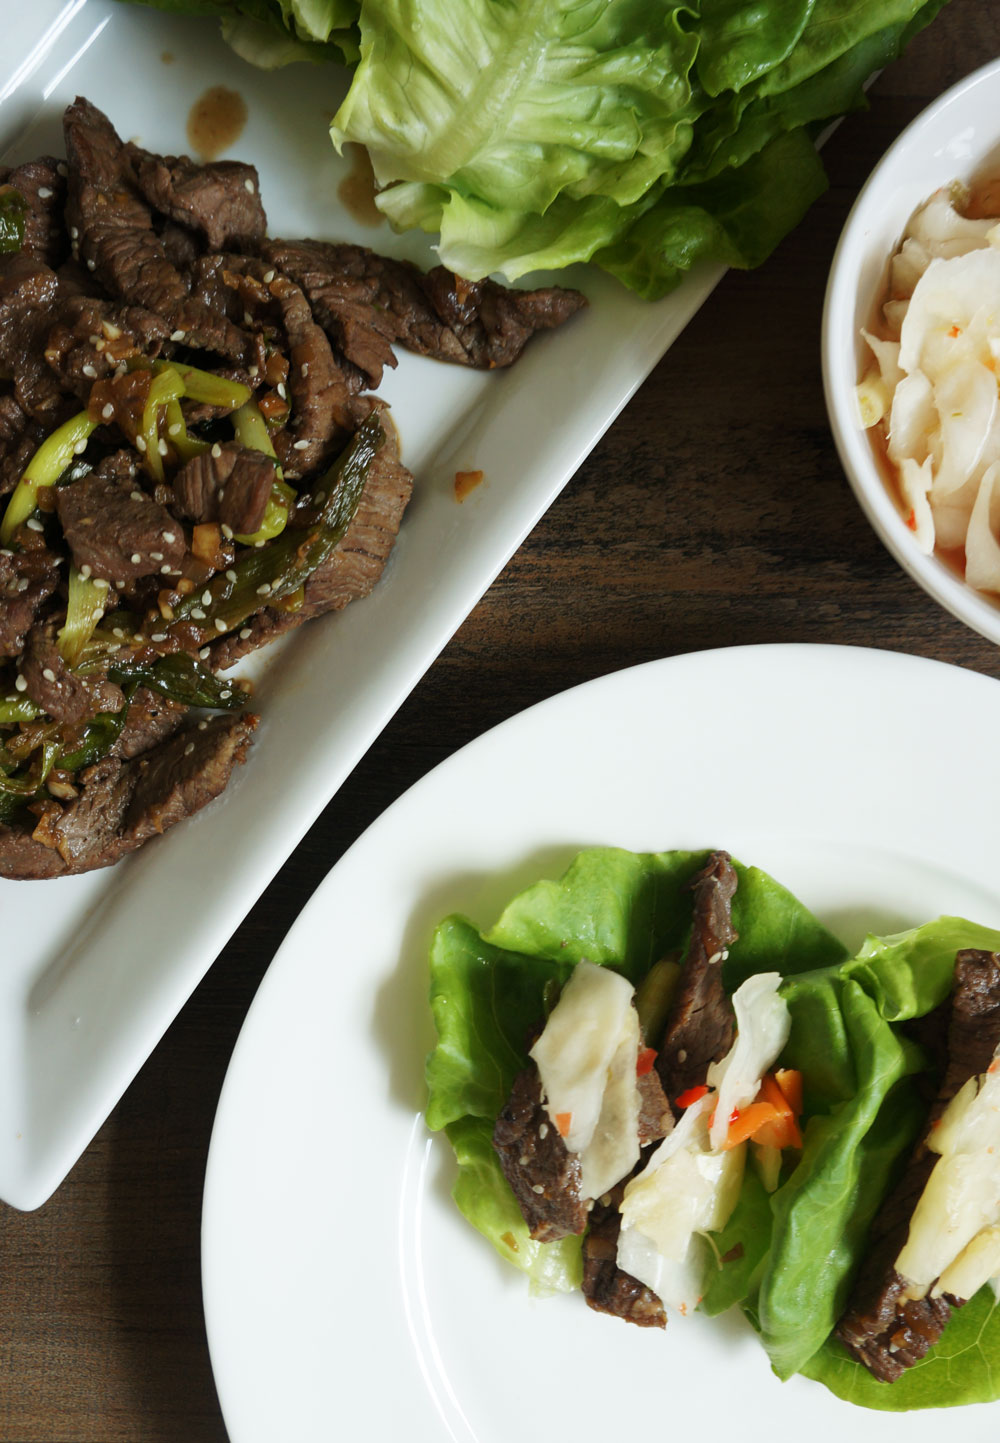
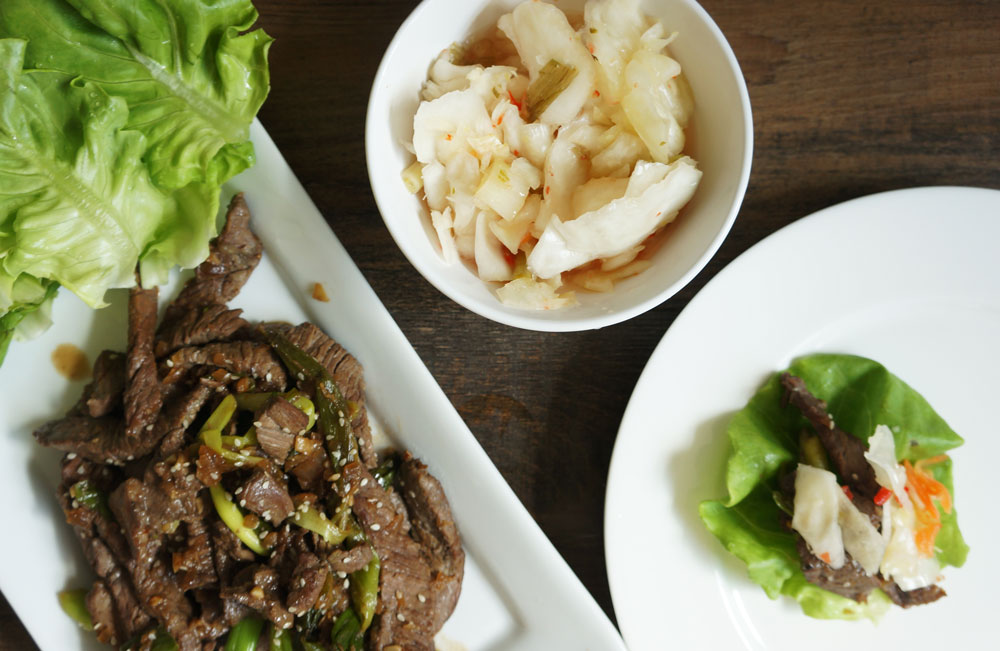
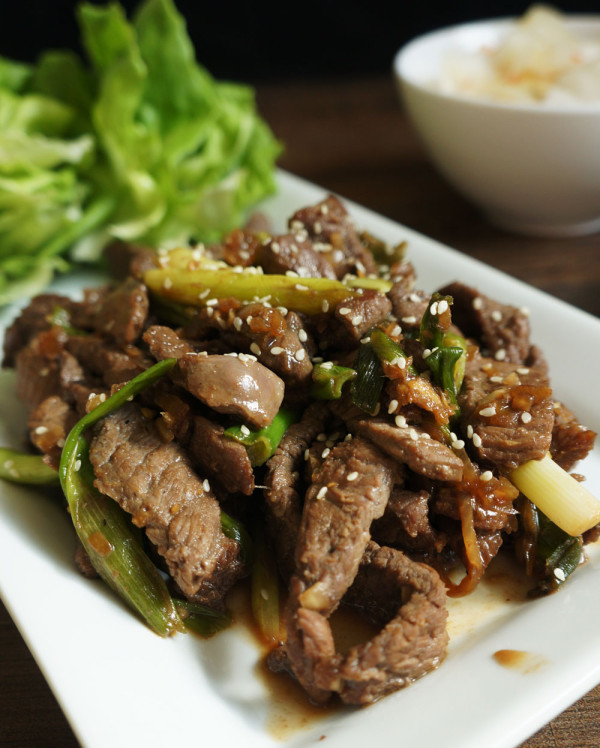
Inspired by the trendy Asian-fusion taco trend, Korean beef tacos, I decided to ditch the tortillas for lettuce, resulting in Korean beef lettuce wraps. I found a recipe for Bulgogi, traditional Korean beef, and altered it to fit what I had in our pantry.

I marinaded a thin cut sirloin steak over night then cut into strips and sauteed the beef in a smoking hot pan with chopped up scallions.

DSC06352From there, we just put a couple strips of beef in a lettuce cup and topped it with kimchi. Since both my husband and I are wusses when it comes to spicy foods, we opted for mild kimchi, which doesn’t have as much chili paste in it like traditional kimchi.

DSC06347Both my husband and I were happy with our food-truck inspired healthy meal. We both were satisfied and neither of us (especially me) felt guilty about it.

[yumprint-recipe id=’48’] 


/ Filed In: Eat
Tagged: Asian, beef, dinner, healthy, Korean, lettuce wraps

Mini Protein Blueberry Muffins

September 4, 2014

Mini Protein Blue Berry MuffinsI have made more than a few muffin recipes. Okay ten. Not including this one.

I like muffins, okay?! They can as healthy or as unhealthy as you want. They are fairly fool proof. And who doesn’t like a good muffin. Definitely a crowd pleaser, which means they are great to take into work or to your friend who just became a new mom. Which is who these muffins were made for.

A friend of mine ended up having her baby this past weekend (Labor Day weekend, how fitting), so I wanted to make her something healthy, yummy, and no-fuss to eat this week since she will have her hands full!

Toss blueberries in flour so they don't sinkI won’t go into the muffin basics, since I have done that plenty of times in other posts. But one trick I wanted to share with you, was to toss your berries in flour before mixing them into the batter.

Blueberries tossed in flour so they don't sinkDoing that will ensure that they don’t sink to the bottom of the muffin tin. Nothing is worse than getting a muffin and all the berries are all stuck to the bottom.

Mini-Protein-Packed-Blueberry-Muffins4This recipe is a bit different than my basic muffin batter in that I added protein powder to it and used even more Greek yogurt to bump up that protein factor. I also used substituted half the flour for whole wheat flour.

A healthy and filling mini muffinI have never had a baby or been a mom, so I can’t tell you what to eat after giving birth. But I would think that a new mom would want to be eating healthy, and if they are breastfeeding, they need to keep their energy up. I think these muffins will be perfect for my friend, since she can just nibble on one of these minis whenever she has a hand free.

 What other food items or meals would be great to make for a new-mom?

[yumprint-recipe id=’45’]

/ Filed In: Eat
Tagged: blueberry, breakfast, healthy, muffin, protein

Gluten-Free Sugar-Free Peanut Butter Cookies

August 28, 2014

GF-SF-Peanut-Butter-Cookies

This gluten-free sugar-free peanut butter cookie was inspired by the book, Year of No Sugar, which is essentially this woman’s diary of her (and her family’s) year trying to eat no added fructose. Part of the book details her adventures in satisfying her sweet tooth by baking with sugar substitutes that do not have fructose (the bad sugar). After some trial and error (and some research), she determined that brown rice syrup was her best option.

Taking her lead, I decided to do my own experimenting with baking with brown rice syrup. Clearly I have a weakness for baked goods, so if I can find away to reduce or completely eliminate the amount of fructose in those baked goods I’m all for it!

GF-SF-Peanut-Butter-Cookies2I also wanted to experiment with gluten-free flours as well, and why not mix the two for an even healthier combination, right?!

To make these cookies gluten free, I used a mixture of coconut flour (purchased at Trader Joe’s) and buckwheat flour (found at my local supermarket). To make these sugar-free, I obviously used the brown rice syrup, which I found at Whole Foods (it was in the same aisle as the honey). You could also replace part of the brown rice syrup with a half of a banana if you like that banana taste (I do not).

GF-SF-Peanut-Butter-Cookies3The resulting cookies are full of peanut butter flavor with a hint of coconut from the flour and oil. They also have a hint of sweetness that is highlighted by the sea salt sprinkled on top of the cookie.

But if we are being totally honest here, these do not compete with normal gluten-full and sugar-full peanut butter cookies. You just can’t get the same taste with the coconut flour and brown rice syrup. I’m sorry, but you can’t. HOWEVER, if you are on a very restricted diet and cannot consume gluten and/or sugar, these cookies are pretty dang good.

How do I know? I made these right before a friend came in town. Over the course of the weekend I saw her sneak a couple cookies from the container, and by the end of the weekend, they were gone.

I mean, if that doesn’t tell you they are good, I don’t know what will.

Have you ever made gluten-free or sugar-free baked goods? What ingredients did you use?c

[yumprint-recipe id=’42’] 

/ Filed In: Eat
Tagged: cookies, diet, gluten free, healthy, peanut butter, sugar free

Healthy Lunch Ideas for the Work Week

August 20, 2014

Health-Lunch-Ideas-for-WorkNow that I have gone back to working in an office one of the biggest adjustments I have had to make is making my lunch ahead of time. When working from home it was so easy to whip up a sandwich or salad or anything my little heart desired at the moment. But these days I need to be a little more organized which means I need to plan ahead to come up with some healthy lunch ideas for the work week.

Health-Lunch-Ideas-for-Work1My favorite lunch to make is this Asian cabbage salad, which is packed full of lots of veggies including carrots, bell peppers, sprouts, and edamame. I also toss on some peanuts for a little extra crunch. Why I love this salad so much is that I can chop up all the veggies on Sunday night, store them in a big container, then each night before work, parse out a little bit of the mixture in a separate container (I love these nice take out boxes we got from a local restaurant).  I do the same with this great Walden Farms zero calorie dressing, pouring a few tablespoons into a separate small sealable cup.

Health-Lunch-Ideas-for-Work2“Can’t I do this with any salad?”, you may ask.

Well, sure. But by Thursday or Friday that lettuce that you used is going to be soggy and/or wilted. The cabbage in this salad stays relatively fresh and doesn’t get all mushy by day 5 which makes it ideal for making 1 lunch to last all week.

Health-Lunch-Ideas-for-Work3To round out my lunches, because even this salad isn’t quite enough for me, I add in a cup of yogurt, some string cheese, and sometimes a piece of fruit. And I always keep almonds at my desk just in case I get a little hungry between meals. By the end of the day I feel great because I have eaten healthy and gotten plenty of veggies and protein (if I have any chicken left over from the night before, I always add it to my salad).

What is your favorite lunch to make for work?

[yumprint-recipe id=’38’] 

/ Filed In: Eat
Tagged: healthy, lunch, prepared, work

Strawberry Caprese Salad

July 29, 2014

Strawberry-Caprese6I love salads, but I am actually a little intimidated to make them at home. Restaurant salads include a variety of ingredients that 1) I normally wouldn’t pair together, or, 2) don’t keep on hand. If you told me to go make a salad right now all I could throw together is lettuce, cherry tomatoes, and baby carrots.

Which is why whenever I make a salad at home I default to a classic: the caprese. A traditional caprese salad is usually just fresh mozzarella, tomato slices, and basil. For a little jazzed up version I added fresh strawberries and crispy pancetta.

Strawberry-Caprese2I started with a few strawberries I had left over from the farmers market, a plump tomato, and some freshly picked basil.

Strawberry-Caprese1I also cubed up some left over bread, tossed them in a bit of olive oil and toasted them in the oven until they were crunchy and golden brown.

Strawberry-Caprese3And I threw in the meat so that my husband would think of this as a meal and not just a side. I browned a small package of pancetta that I picked up in the deli section of my grocery store. If you want to make this recipe and can’t find pancetta, bacon would be the prefect substitute.

Strawberry-Caprese4For the dressing I stuck with a simple homemade balsamic. There is so much flavor from the strawberries, tomatoes, and basil, you don’t really need anything too extravagant. To make the balsamic dressing I mixed 2 parts oil with 1 part balsamic, then added salt, pepper, and minced garlic to taste.

Strawberry-Caprese5Then mix it all up and you got yourself a beautiful, and filling, salad!

[yumprint-recipe id=’27’]

/ Filed In: Eat
Tagged: healthy, pancetta, salad, strawberries, Summer

Baked Mini Chimichangas

May 21, 2014

Biscuits Be Crazy - Mini Chimis3This little recipe has several different names in our house. Mini burritos, burritoitos (small burritos, if you will), and the most recent favorite, mini chimies (for mini chimichangas). We make a version of this recipe quite often. Then beauty of it, is that you can really play around with the filling and make it to fit your taste or whatever you have in your pantry. For this particular recipe, I just used lean ground turkey, onion, bell pepper, taco seasoning, and tomato paste.

Biscuits Be Crazy - Mini Chimis1The wrap is just an egg roll wrapper that you can get at your local super market near the refrigerated produce or dairy (look for the tofu or vegan foods and it is probably nearby). They are easy to work with if you work quickly, because they can dry out. First I place the filling in the center, fold in the sides, then roll it up. To make sure that the roll stays together, wet one end with water using your finger and press it together.

 Biscuits Be Crazy - Mini Chimis2

To ensure that they get egg roll wrapper gets nice and crispy, I like to bake them on a wire rack placed on top of a cookie sheet and brush them down with olive oil. And because the filling is already cooked, they only need to bake until the wrapper gets nice and golden brown.

Biscuits Be Crazy - Mini Chimis5As I mentioned, these can be filled with just about anything you want. Below are some of the combinations that I have tried that are always a big hit with my husband.

Bean & Cheese

Black Beans, Onion, Cheddar Cheese, Taco Seasoning, Tomato Paste

Pepperoni Pizza

Mozzarella Cheese, Pepperoni, Green Bell Pepper, Basil, Marinara Sauce

Apple Pie

Diced Apples, Lemon Juice, Cinnamon & Sugar

Biscuits Be Crazy - Mini Chimis6

[yumprint-recipe id=’20’]

/ Filed In: Eat
Tagged: baked, dinner, healthy, Mexican, turkey

Gluten Free and Sugar Free Pancakes

May 9, 2014

BBC Strawberry Pancakes4 I really like to reward myself with some little indulgences on weekends. But what I love even more is to indulge myself while still being healthy. One of my favorite indulgences to give a healthy makeover are pancakes because they offer a variety of ways to experiment and are relatively fool proof. To make these pancakes gluten free, I combined 3 different “flours”. Buckwheat flour, almond flour, quinoa flour (which is just dried quinoa processed until fine like a flour).

BBC Strawberry Pancakes1To make them sugar free, I just used a banana and a little stevia. You could also use apple sauce, honey, or brown rice syrup if you don’t like the banana flavor. I mashed up the banana and mixed it in with milk and eggs before adding it to the dry mixture. I like my batter on the thicker side, but you can always add more milk to make it thinner and thus result in thinner pancakes. After a quick flip on the griddle, I had myself a nice stack of healthy pancakes. The perfect fuel for my Saturday runs.

BBC Strawberry Pancakes2But I didn’t just stop with making the pancakes healthy. I also decided to make my own “syrup” using strawberries, water, and a little honey. Boy was that stuff delicious!

BBC Strawberry Pancakes3And I didn’t feel at all guilty about drenching my pancakes in it either.

BBC Strawberry Pancakes5

[yumprint-recipe id=’22’]

/ Filed In: Eat
Tagged: breakfast, gluten free, healthy, pancakes, strawberry, sugar free

Spinach Tortillas

May 5, 2014

BBC Spinach Tortillas1When I become I mother, I swear, I am going to be the best at sneaking vegetables into my kids food. I feel like I have mastered the art of “vegetable filler”. I will stick carrots and spinach in meatloaf or meatballs. I have even snuck (sneaked?) both into brownies before. Well, these tortillas are no different. Except that the spinach in these is very evident. But I feel like you could easily come up with a story about why these tortillas are green that doesn’t involve spinach. If Dr. Seuss can do it, so can I.BBC Spinach Tortillas4In truth, these tortillas are just as easy as normal tortillas. I just blended up the spinach with the water and oil, then added it to the flour mixture.

I was prepared to add more flour or water if necessary in case the spinach changed the consistency of the dough. Fortunately that was not the case. The dough should be slightly tacky. Since you will be rolling them out in flour (most likely), you don’t want them to be too dry or they will crack when you try to flatten them out.

BBC Spinach Tortillas3And I like that you can see some pieces of spinach in the tortillas along with their vibrant green color. It really makes you feel like you being more healthy than you actually are.BBC Spinach Tortillas2This recipe makes 16 “taco” size tortillas (about 6″ diameter) or 10-12 larger tortillas (about 8″ diameter). I just flatten out the dough ball into a disk then cut into equal size wedges before forming them into smaller balls. It doesn’t have to be an exact science, but if you are worried about them being the same size, you could use a kitchen scale to make sure they are all about 1-1.5 oz.

We recently invested in a tortilla press, which I find to be somewhat helpful. But because I like my tortillas to be pretty thin, I end up rolling out the pressed tortillas anyways. Before I had the tortilla press, I would just flatten the ball with my hand, then roll them out until almost paper thin (1/16th to 1/8th inch).

BBC Spinach TortillasI prefer cooking the tortillas on a cast iron skillet because the heat is disbursed pretty evenly. According to Alton Brown, the skillet should be about 400 degrees. You only need to cook them for about 25-30 seconds per side. Any longer, and they will dry out and become to rigid. So work quickly and keep the tortillas warm in a tortilla warmer or in the oven.

If you don’t need 16 tortillas, you can always halve the recipe. Or what I do, is make the whole recipe, roll out all 12-16 tortillas,  then only cook what I need. Whatever I don’t use, I freeze, placing a piece of parchment paper between each uncooked tortilla. They will keep for a while in the freezer, but I would recommend using them within the month.


[yumprint-recipe id=’25’]

/ Filed In: Eat
Tagged: healthy, spinach, tortilla, whole wheat

Honey Wheat Bread

May 2, 2014

BBC Honey Wheat Bread7I have heard it said before that there is truly no economic incentive for baking bread at home (I’m sure you can say that about a lot of things). It’s just as cheap to purchase a pre-sliced loaf at the store and a hell of a lot easier. While that might be true, I can think of one thing that makes baking bread at home worth it. 

The smell. 

Oh my heavens does the aroma of bread baking in the oven is just divine. Seriously. Someone bottle that up and sell it. I’ll be your first customer. 

I actually don’t think making bread is all that difficult. It takes time, yes, but it’s just to let the yeast proof and dough rise. Twice. The good folks at The Kitchn really break out the steps pretty nicely. 

From start to finish, the whole bread making process took about 4 hours. But only about 30 minutes of that was actual work. I mixed the dough then let is rise in the bowl for about 2 hours. Once it had risen, I punched it down and formed it into log and transferred it to the loaf pan and let it rise again. 

BBC Honey Wheat Bread1BBC Honey Wheat Bread2


Once it had filled up the loaf pan and formed a dome over the top, I scored it down the middle to give it that signature bread shape (and to let the steam out so that the crust wouldn’t crack all haphazardly).


BBC Honey Wheat Bread3

 Baking only took about 30 minutes. But man, that was the best smelling 30 minutes of my life. 

I let the bread cool for about an hour and I didn’t slice it until the next day. But I am sure you can dig in after about 30 minutes if you what a fresh and warm slice of bread. 

BBC Honey Wheat Bread6

 Actually, I can think of a second benefit for making bread at home: it taste’s amazing. Sure, that stuff from the store is easy to get and you don’t have to spend 4 hours making it, but homemade bread has so much more flavor too it. Plus you can be assured that it’s fresh and has zero preservatives. 

[yumprint-recipe id=’30’]

/ Filed In: Eat
Tagged: bread, healthy, homemade, honey, wheat

Veggie and Turkey Meatloaf

April 21, 2014

 BBC Turkey Meatloaf4

Meatloaf is having a bit of a renaissance. At least here in the South were “Down Home Cooking” is the latest trend. There are several high end restaurants around us that have their own (dressed up) version of mom’s go-to recipe. Even I have hopped on the bandwagon in the past couple years making a bison and a vegan version, both of which got rave reviews in our house. Today I am posting my latest experiment on the meatloaf front: veggie stuffed turkey meatloaf.

BBC Turkey Meatloaf1

What exactly is that? Well, I basically took a normal meatloaf recipe, exchanged the beef for turkey, the breadcrumbs for carrots, and added in some spinach for good measure. Sure, it’s not the sexiest dish on the planet, but it pretty tasty and healthy.

BBC Turkey Meatloaf2

Because I am limiting the fat in this recipe, it was pretty important to me to add in a lot of additional flavors. To the meatloaf mix I added cilantro (Yes, that is rosemary in the picture. Forget you ever saw that) and loads of garlic. Then to the ketchup basted on top, I added some paprika, garlic powder, and chipotle chili powder. If you like things spicey, you could also add in hot sauce to either the meat mixture or the ketchup or both. 

 BBC Turkey Meatloaf3

 I baked the meatloaf in the mini loaf tins because they are the perfect individual size. You could of course use a normal loaf tin and cut the meatloaf into slices. We served ours with a side of steamed veggies to complete the meal, but these little meatloaves would be great with some smashed cauliflower, too!

BBC Turkey Meatloaf5


[yumprint-recipe id=’10’]

/ Filed In: Eat
Tagged: healthy, meatloaf, turkey, vegetables

  • Newer Entries
  • 1
  • 2
  • 3
  • 4
  • Previous Entries

Follow

Hey There!

Hey there, I'm Lindsey. I'm a number cruncher by day and a home cook and baker by night. While I love to eat healthy and find fresh and healthy alternatives for my favorite foods, I will never turn down dessert! Life is all about moderation, right?

Recipes

  • All Recipes
  • Breakfast
  • Appetizers
  • Salads
  • Main Dishes
  • Side Dishes
  • Desserts
  • Drinks

Favorite Finds

[show_lookbook_widget id=”388783″]

Theme by 17th Avenue · Powered by WordPress & Genesis