• Home
  • Eat
    • Breakfast
    • Appetizers
    • Main Dishes
      • Chicken
      • Beef
      • Seafood
      • Healthy Dishes
      • Paleo Dishes
      • Salads
    • Desserts
      • Decorated Cookies
      • Cookies
      • Bars and Brownies
      • Cakes and Cupcakes
  • Shop
    • Cookie Decorating Supplies
    • Bakeware
    • Cookware
    • Kitchen Gadgets
    • House
  • About
    • Contact
    • Bucket List
  • Cookie Decorating 101

Follow the Ruels

Gerber Daisy Cookie Flower Bouquet

May 24, 2017

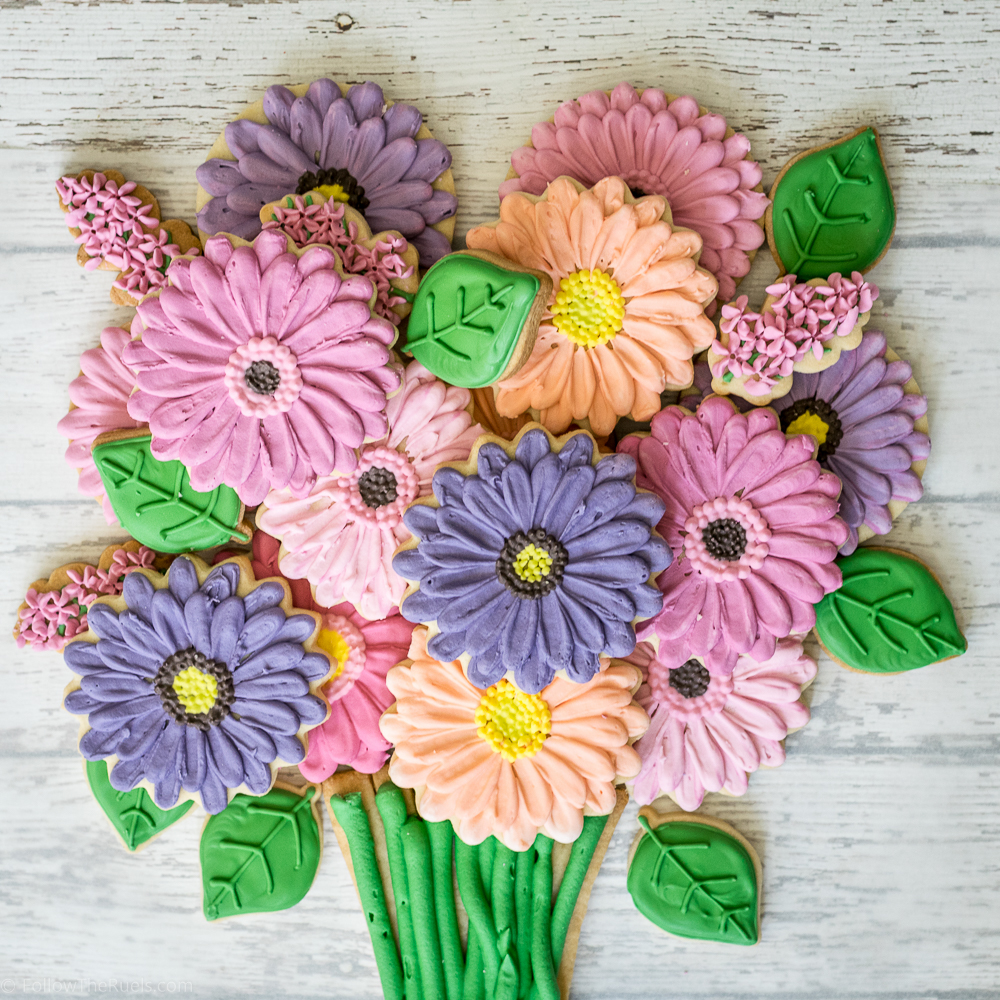
I’ve been sitting on these cookies for a while. Not literally of course. I made these well before Mother’s Day and fully intended on sharing them before hand, but then these happened and they became my first priority. And flower cookies are good for any occasion! Especially this cute Gerber daisy flower cookie bouquet. 


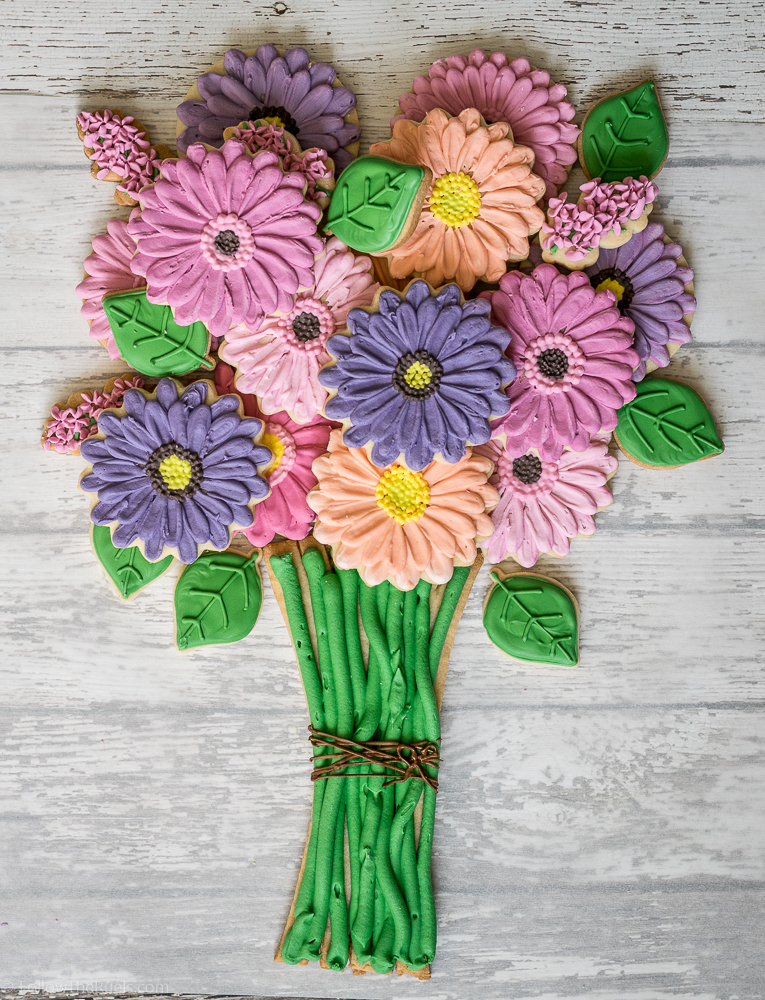
These Gerber daisy flowers are actually really easy to make with a petal piping tip. The piping tip just does all the work for you. Make sure you have the wide end of the tip out.


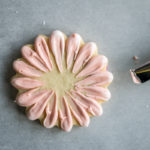
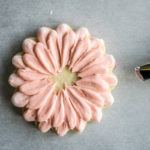
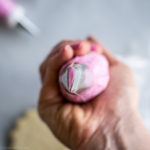
To make the petals, press firmly on the piping bag and pipe the icing out on the edge of the cookie then drag in towards the center. Do that all the way around the cookie. Then pipe another layer of petals the exact same way.

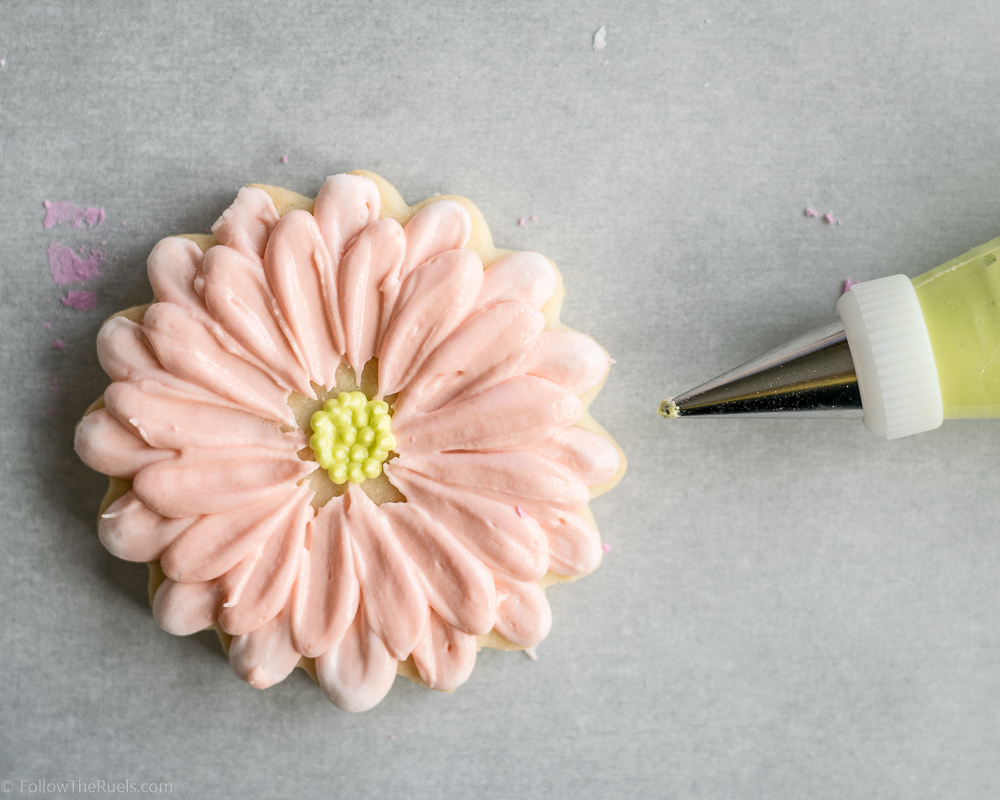
For the center, pipe a circle of dots in stiff consistency icing. You want them to form small peaks. First pipe dots in one color, then pipe more dots around the center in another color.  

My favorite part is putting all the cookies together into a fun flower bouquet! I have to admit, it actually wasn’t easy. It took me about a dozen attempts to get the cookies in the place I wanted them. In the video I’m actually playing it in reverse order, taking cookies away instead of putting them in place. 

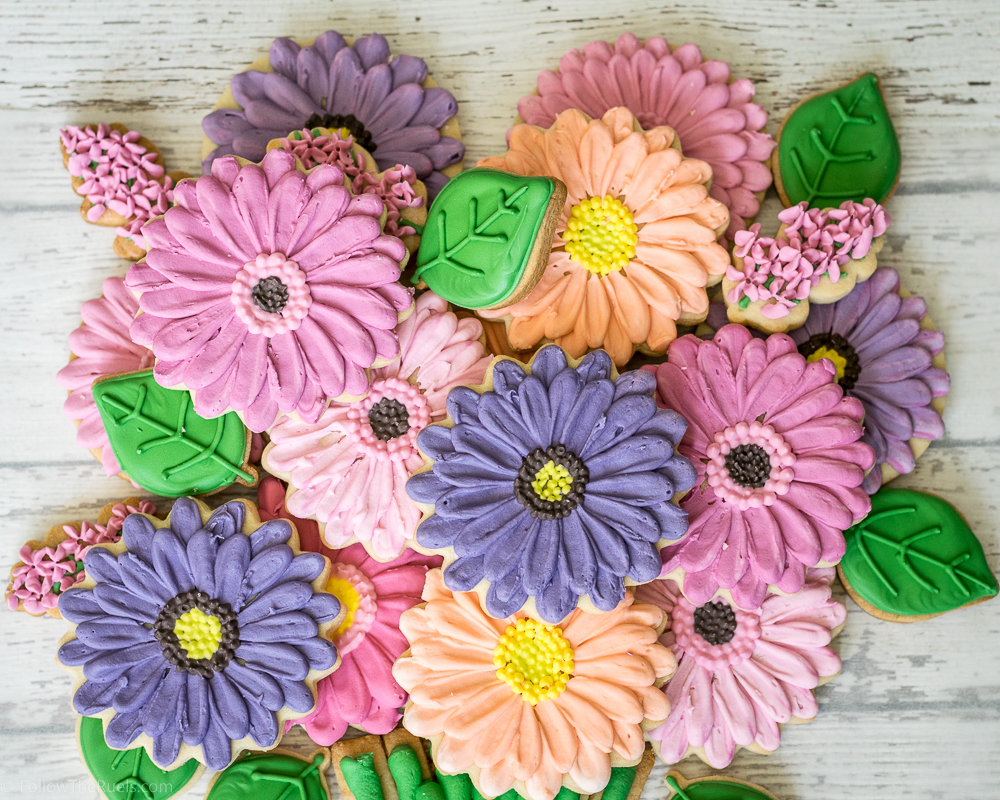
I just love this cookie flower bouquet so much! I can see myself making this again for a baby shower for a little girl. Or a bridal shower. Or maybe for next Mother’s Day! Any occasion you may want to give someone a bouquet of flowers, instead give them a bouquet of flower cookies!! Which I think is even better because you can eat the cookies! 

Piping Tips Used:

  • Petals – #104 tip or any large petal tip
  • Center – #2 tip or any small round tip
  • Stems – #10 tip or any medium round tip
  • Filler flowers – #224 tip 

Recipes Used:

  • Royal Icing in stiff consistency
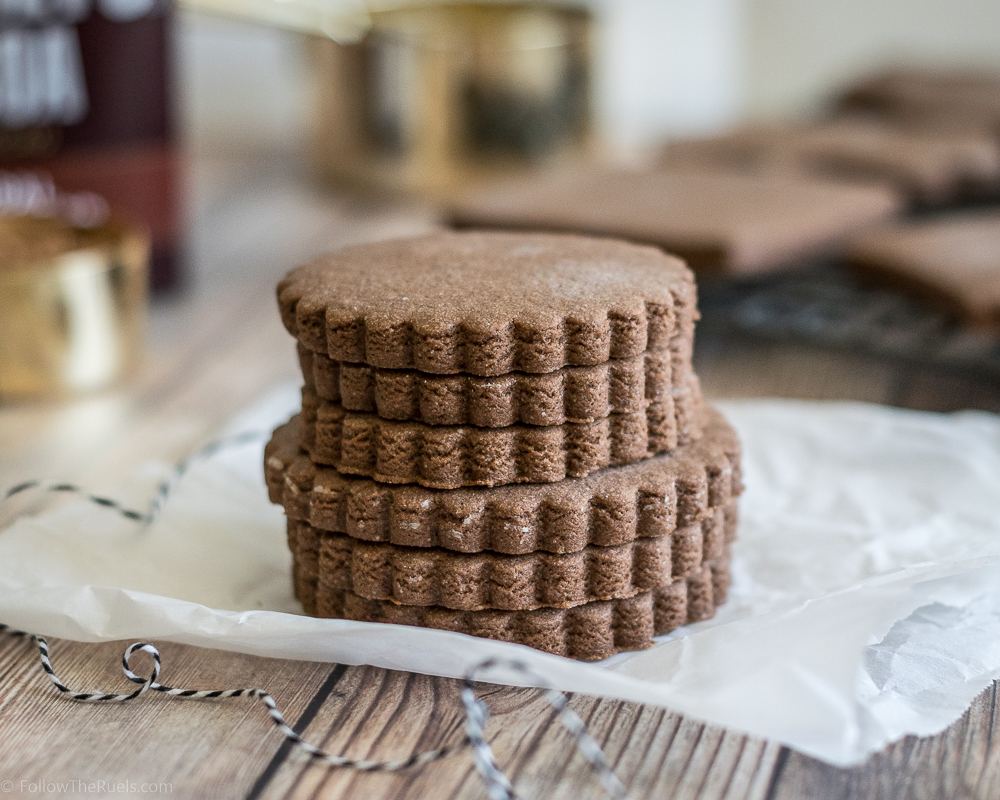
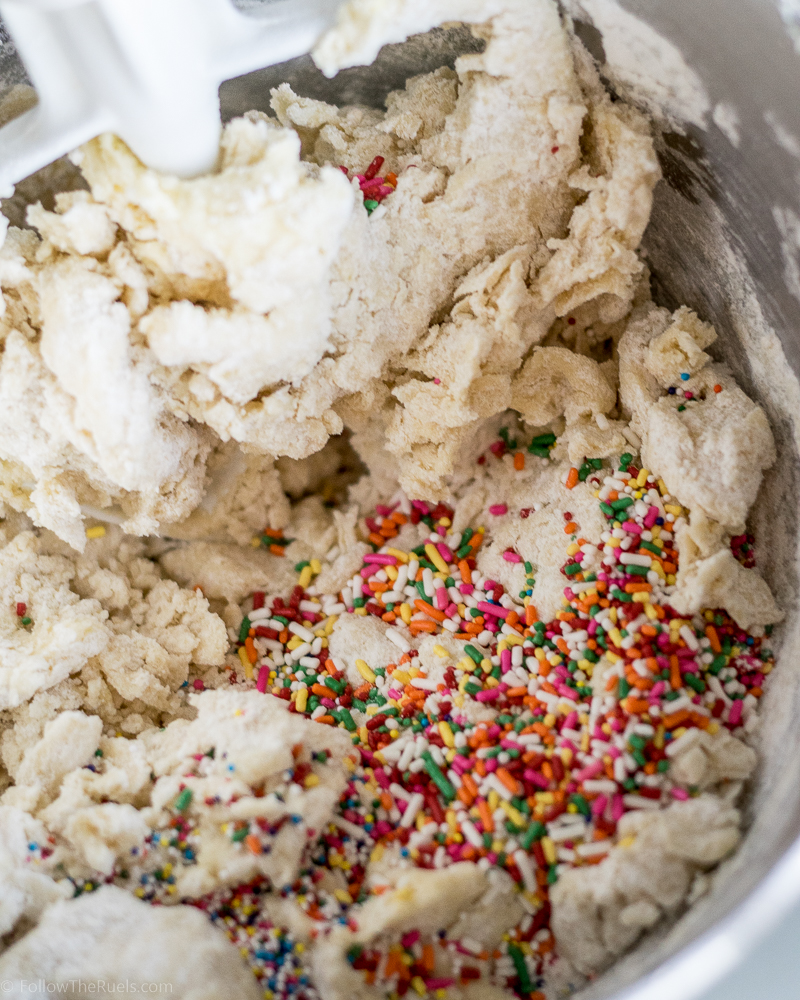
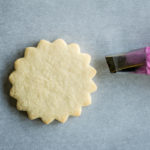
  • Sugar Cookie

 
[show_shopthepost_widget id=”2683611″]

/ Filed In: Cookies New, Decorated Cookies, Eat
Tagged: cookie bouquet, cookie decorating, flower cookies, Gerber daisy, petals, royal icing, sugar cookies

Floral Monogram Mother’s Day Cookies

May 10, 2017

If you know me, then you know that I can’t let a holiday, no matter how big or small, pass without making some cookies (all my friends are probably nodding their head in agreement right about now). I definitely take advantage of all my friends’ sweet tooths (Sweet teeth? What is the plural of sweet tooth?) by making cookies and forcing them upon them every chance I get. 

These cookies are no exception. After making these cookies for a friends bridal shower, I couldn’t wait to try this floral monogram design again. I knew it would be perfect for Mother’s Day. And even better, I know lots of deserving mom’s out there who definitely a couple cookies to help them celebrate. 


For my mom, I made individual letters that spelled out mom and covered them in flowers. But for my friends who are not my mom I made them each individual initial cookies. 

How cute are they? And not just good for Mother’s Day, but they would be great cookies for a bridal shower, baby shower, birthday, wedding….you name it! I am obsessed. 

[Friends, expect to get cookies like these for every birthday from now until the end of time. Thanks.]

The best part is that these cookies are actually quite easy if you have the right piping tips! Just layer on flowers until you have a full letter. 


I like to start with my bigger flowers, like rosettes. I place the rosettes randomly around the cookie leaving space for other flowers. 


Then I go in with my smaller flowers, like drop flowers, and fill in some more space. 

There is obviously some space left, so I go back in and fill them in with some more dots of icing and then fill it in with the leaves. 

Really, there is no technique…just fill up the space!

To go with the monograms, I made some simple little hearts and circle cookies with a single flower and a couple leaves. (Oh, and see those mint “Happy Mother’s Day” plaque cookies? I will show you how I made those on Friday!!)

I am clearly obsessed with these cookies, as you can tell. I think I just like doing the floral designs because they are really impressive without actually being that hard to achieve. 

But that’s just a secret between you and me. If my mom asks, I slaved over these cookies for days just for her. K, thanks! 😉

Recipes Used:

  • 2 batches of my Royal Icing for 40 cookies in flood consistency (the base layer) and stiff consistency (the flowers).
  • 2 1/2 batched of my Sugar Cookie recipe 

Items Used:

  • White Rose – #18 piping tip
  • Light Pink Rose – #16 piping tip
  • Redish Pink Drop Flower/Rose – #225 piping tip
  • Medium Pink Drop flower – #14 piping tip
  • Leaves – #349 piping tip
  • Dots – #2 piping tip
  • Piping Bags
  • Scribe Tool
  • Gel Food Coloring in light pink, watermelon, and forest green

 
[show_shopthepost_widget id=”2668939″]


/ Filed In: Cookies New, Decorated Cookies, Eat
Tagged: cookie decorating, floral, flowers, Mother's Day, piping tips, royal icing, sugar cookies

Eyelet Lace Easter Egg Cookies

March 31, 2017

Quick post today, guys! But it’s a good one, I promise because it has a video! Aren’t those so much better than the ones where I just drone on and one? Probably.

I made these cookies after my cookie decorating class this past weekend. Since this was an intermediate class, one of the techniques that I taught was this eyelet lace effect. I love it uses some pretty basic piping techniques, but it looks much more complicated. 

Just see for yourself!

Unfortunately I didn’t catch the part where I added the flowers. But I have shown you guys that effect in another video, so hopefully you can put the two together!

If you want to make some bunnies to go with your eggs, they are super easy! Just outline and fill the cookies. Once they are crusted over (about 20 minutes) add three small dots scattered around the cookie. Then go in and add some flowers! Easy peasy lemon squeasy! (Ok, I know yall are rolling your eyes at me, but I literally taught these same cookies to a bunch of people who little to know cookie decorating experiences, and their cookies turned out awesome! It’s amazing what a couple piping tips can do!)

Here are some of the things I used to make these cookies:

  • toothpick or scribe tool
  • piping tips #1, #16, #18, #24, #224, #349
  • flood consistency icing in white and the colors of your choice
  • piping consistency icing in white
  • stiff consistency icing in various colors for flowers and leaves

If you try these cookies, I would love to see what you create! 

As always, I used my favorite sugar cookie recipe, with a little lemon zest added, and royal icing recipe. 

Have a hoppy Easter!

PRODUCTS USED: 
[show_shopthepost_widget id=”2566372″]

/ Filed In: Cookies New, Decorated Cookies, Eat
Tagged: bunnies, cookies, Easter, Easter Eggs, royal icing, sugar cookies

Sweet 16 College Logo Cookies

March 22, 2017

I love this time of year! Not only is it my birthday week and month it’s also March Madness! 

This may be somewhat surprising for those who don’t know me personally, but I love me some college basketball. I played as a kid and through high school. And despite not being all that good, I still have love for the sport. My dad used to take me to the tournament when they held games in Los Angeles. Now my husband and I try to go to at least one round whenever it’s hosted here in Charlotte. 

This year I am particularly excited because my team (the Baylor Bears) have advanced to the Sweet 16. Not only that, but they are playing South Carolina in the Sweet 16 game, where a lot of our friends went to school. To mark the occasion, I thought it would be fun to make some cookies with the Baylor and USC logos.(That’s University of South Carolina for those of you out West. It has taken a long time for me to think of USC as South Carolina and not Southern Cal.)

But why stop there? There are 14 other well deserving teams that should also get cookies, right? I know a few Tar Heel friends that would be very upset if I left them out. 

So I did all 16. It was a hell of an afternoon, but it was a lot of fun. And it gives me a chance to demonstrate how you can make your very own college logo cookies! It’s actually not as hard as you may think! 

Can you trace a picture using tracing paper? Then you can trace a logo on parchment with royal icing!


First, start with a print out of your favorite team logo that’s a little smaller than your actual cookie. For reference, my cookies were about 3″ in diameter and I printed out my logos to be 1.5″ to 2″ inches at their widest/tallest (with the exception of Purdue’s P, which is much wider than I expected). 

Cover the logo with a small piece of parchment, then outline the logo in piping consistency royal icing and fill in with flood consistency and use a toothpick to spread out the flood icing to fill in all the corners.

This particular logo (and most logos) has a contrasting border, so I almost always use piping consistency for the border and flood for the interior. If it is a large single color logo (see Wisconsin’s W), I used red flood for the entire thing, but it was harder to get the detail in the W. For thinner logos (Kansas), I used piping consistency for the whole letter. 


Transfer the parchment with the logo to a flat counter or board and tape down all the sides. Parchment has a tendency to “roll” which will cause your logo to be misshapen, so that it won’t lay flat on the cookie. 

Allow the logo to dry for at least 2 hours. You will know the logo is ready when it easily slides off the parchment. If you are met with any resistance when peeling off your logo….continue at your own risk!


Getting your logo onto the cookie is the easy part! When you know your logo is dry, outline and fill your cookie. Immediately drop the logo (or royal icing transfer) onto the wet icing. Use a toothpick, scribe tool, or your finger to press the logo down into the icing. If you have any gaps, you can pipe in some additional icing to fill them in. 

Once your cookies are dry (or dry-ish), you can go back in and add a border! My favorite is to just pipe dots around the side. Just make sure to pipe ever other dot if you are using flood consistency icing. They will run together if you pipe two dots right next to one another without letting one crust over (about 5 minutes) in between. 

As much fun as these cookies were, some of these logos were a pain in the butt. About 10 cookies in, I was creating a bracket in my head with which cookies would advance based on how much I liked making their logo. Ranked from 1 to 16 they are….

  1. Michigan. Straight edges and a nice big solid color was basically everything I could ask for in a logo. 
  2. West Virginia. Samezies ^^
  3. North Carolina. It’s just a fun logo with pretty colors. 
  4. Oregon. You would think with it being so easy that I would have done a better job. 
  5. Baylor. Interlocking letters is challenging, but I am ranking this higher because I am biased. 
  6. Xavier. It’s a little uppity with it’s 3 color logo (you can’t see one of the colors). 
  7. Wisconsin. It looks like it should be simple, but my brain had trouble with the drop shadow.
  8. Kansas. Simple, but also super delicate. I was afraid I was going to break it!
  9. UCLA. This one was tricky, but I was proud of myself for getting something that resembled the letters ‘U’, ‘C’, ‘L’, and ‘A’.
  10. Arizona. Three colors is one color too many. 
  11. Kentucky. This one was only two colors, but it acts like a three color logo, and you already know how I feel about those. 
  12. Purdue. I didn’t like the colors and the logo came out too big. None of this is Purdue’s fault. The actual logo was pretty easy to make. 
  13. South Carolina. Interlocking three letters?! Ugh, might as well have three colors while your at it. 
  14. Florida. It’s like the UCLA logo, but with two more letters, which really just made it impossible for me. 
  15. Gonzaga. I had to alter their normal logo, because there was no way in hell I was going to try to pipe a tiny bull dog.
  16. Butler. I had to MAKE UP a logo for them because their only logo is a freaking bull dog. What is it with bull dogs? Why do they have to be a part of your logo!?

Just kidding, I love bull dogs (all dogs, really), but I did not want to attempt to make one with royal icing. 

So as far as I am concerned, Michigan is the real winner this March Madness. I know at least one Wolverine who will be happy about that! Go Blue!

(…and go Bears!)

Royal Icing recipe 

Sugar Cookie recipe

/ Filed In: Cookies New, Decorated Cookies, Eat
Tagged: college, college logos, cookie decorating, game day, March Madness, sugar cookies

Gluten Free Sugar Cookie Recipe

March 3, 2017

There are a lot of cookie recipes on this little blog of mine. Lots. I have at least 4 different versions of my favorite sugar cookie recipe. But what I haven’t had until now is a gluten free sugar cookie recipe!

This recipe actually came about through my cookie decorating classes! I had a couple girls in my Halloween class ask if I could make them gluten free cookies instead of my normal sugar cookies. Never one to turn down a challenge, I obliged. While that first batch of gluten free sugar cookies were okay, I knew they could be better!

The perfectionist in me kicked in (it lays pretty dormant throughout most of the year, and really only makes an appearance when cookies are involved) and I knew I had to find the perfect gluten free sugar cookie recipe

I essentially put aside a weekend, canceled all my plans (I had none) to devote myself to this baking challenge. Fortunately, it only took a couple hours on a Saturday (which means I had the recipe of the day to catch up on my DVR…adulting, am I right?). The 4th recipe turned out to be so good I didn’t feel like I need to experiment any further. 

But before I get ahead of myself, let’s discuss these four cookies, shall we?

Trial A:

Recipe: 4 parts GF flour to 1 part almond meal, plus a bit of baking powder. 

Results: A crumbly cookie that completely lost it’s shape when baking. 

Trial B:

Recipe: Half GF flour and half almond meal, plus baking powder. Also, baked 5 minutes longer than A.

Results: A big ol’ disaster! 

Trial C:

Recipe: Doubled the GF flour from recipe A and eliminated the baking powder. 

Results: The shape is a lot better, but the taste and texture are still a bit off. 

Trial D:

Recipe: Increased the amounts of both GF flour and almond meal from recipe B, keeping the ratio roughly 50/50, and eliminated the baking powder. 

Results: A delicious cookie with perfect edges and a great texture (although slightly over-baked)

Clearly recipe D was the winner! And really, it all came down to the texture. I could tell the minute I started rolling out the dough for Trial D. The dough felt like my normal sugar cookie dough. It wasn’t too soft or delicate. It rolled out really well and clearly made the best cookie. 


You can see the difference in texture in the pictures above. When I tried to break C in half, the cookie just kinda fell apart. When I broke D in half, it did just that! I don’t know about you but I don’t like my cookies to crumble into a pile of sand after every bite. Gross!

Okay, enough of the nerdy recipe experimenting stuff. Let’s get to the actual recipe!


This recipe starts like my favorite sugar cookie recipe, with butter and sugar, eggs and vanilla. I also added almond extract (my favorite of all the extracts) because it’s delicious and it compliments the almond flavor that will already be in the cookie. Then, like I said above, I mix in an even ratio of gluten free flour and almond meal until I had a pretty solid ball of dough. Something that would feel tacky to the touch but not so soft that your finger sinks right into it. If you think your dough is too soft, add more almond meal.

Baking these cookies is really no different that any other sugar cookie. I did chill the dough for at least 30 minutes before I rolled it out. This dough will inherently be a little bit softer than normal dough, so you may want to work in small batches, keeping the unused dough in the fridge.

I baked the cookies at 350 degrees for 10-12 minutes. I watched them closely after the 10 minute mark because I really didn’t want them to over bake. If they over bake the dry out even more and they get kind of scaly on top (you can see what I am talking about in the picture of the broken D cookie above). Just as soon as they barely start to brown on the edges, it’s time to take them out!

The resulting cookies are delicious and slightly nutty thanks to all that almond meal. I think they would make a great substitute for any sugar cookie for those of you who have cut out gluten from your diet for one reason or another. Even as someone who does not have a gluten intolerance, I gladly taste tested these cookie over and over again.

It was all in the name of science. 🙂

[amd-yrecipe-recipe:136]

PRODUCTS USED:

 [show_shopthepost_widget id=”2479028″]

/ Filed In: Cookies, Cookies New, Eat
Tagged: almond meal, cookie decorating, cookies, gluten free, King Arthur, sugar cookies, vanilla

Rustic Floral Valentine’s Day Cookies

February 6, 2017

It’s been a while since I have decorated a cookies. Actually, it’s only been about an hour. But at the time of making these rustic Valentine’s Day cookies, it had been a while. After the cookie-decorating marathon that is Christmas, I had to take a break. But what better occassion than Valentine’s Day to get back into the cookie decorating game. 

I also used the opportunity to teach myself how to create the wood effect. I have seen a bunch of amazing cookies on Pinterest and I knew it would be a fun thing to try for Valentine’s Day! The best part was that it was a lot easier than I expected. 

But since a cookie that looks like tree bark isn’t very romantic, I added some flowers. And to put it over the top, I carved my husband’s and my initials into it! So cute, right?

Wanna see how I did it?!

I loved the mixture of the wood and the flowers. I actually loved the carved initials cookie so much that I still have it! I put it in bag and it’s sitting on my desk. 

I also loved these cookie so much, I taught this technique in my last cookie decorating class. I think people really liked them, especially the flowers! It’s amazing what a difference piping tips can make.

If you want to make these at home, here are some things you will need:

  • 1 stiff bristled brush
  • toothpick or scribe tool
  • piping tips #18, #20, #224
  • 2 colors of brown piping consistency icing (you don’t want it to thick, or else you won’t be able to spread it very well, but also not to thin that it won’t hold texture)
  • 2-3 colors of pink stiff consistency icing 
  • 1-2 colors of green stiff consistency icing

If you try these cookies, I would love to see what you create! 

As always, I used my favorite sugar cookie recipe (although these would be great with my chocolate sugar cookie, too!) and royal icing recipe. 

PIN NOW, MAKE LATER

PRODUCTS USED:
[show_shopthepost_widget id=”2436432″]


/ Filed In: Cookies New, Decorated Cookies, Eat
Tagged: cookie decorating, cookies, floral, royal icing, sugar cookies, Valentine's day, video

Red Velvet Sugar Cookies

December 7, 2016

Red Velvet Sugar Cookies

After the chocolate sugar cookies I made a couple months ago, I got this little idea in my head to make red velvet sugar cookies, too. I was going to wait for Valentine’s day, but I couldn’t help but think they would also be perfect for Christmas!

The recipe is almost identical to the chocolate sugar cookie recipe, with only some minor adjustments: less cocoa powder, add apple cider vinegar, add red food coloring. 

Red Velvet Sugar Cookies

Thankfully, I didn’t use nearly as much red food coloring as I anticipated. Sometimes red can be a tricky color to make because a lot of times it will end up pink. But I think having that cocoa powder in the dough really helped enrich the color of the red. I only had to use 1 tsp of the gel food coloring to make it that vibrant red dough. 

However, if you use liquid food coloring, you may have to add a bit more. 


And just like with my other sugar cookies, I like to let this dough rest in the fridge for a bit to chill and also help the flavors all meld together. But, if you are in a big of a time crunch, you can roll these out right away. 

Red Velvet Sugar Cookies

Isn’t the red dough so pretty??

Red Velvet Sugar Cookies

I just think they turned out so wonderfully! The red is so vibrant and they taste wonderful! Just like red velvet! I think they would be delicious smeared with a little cream cheese frosting and topped with some sprinkles. Which would be great for Christmas, but also would be great for Valentine’s Day with pink sprinkles. Oh! What about 4th of July if  you add some blue sprinkles? These cookies are turning out to be more versatile than I thought!  

Or you could go simple and just dust them in powdered sugar, appropriate any time of year.

Or…

Red Velvet Christmas Cookies

You could decorate them with royal icing for the holidays!! I just used my favorite royal icing recipe to make some festive designs. The best part is you don’t have to do as much icing because you want the red cookie to show through!

I bet who ever is on the receiving end of these cookies (even if its just your stomach) will be delighted!


[amd-yrecipe-recipe:104]

/ Filed In: Cookies, Cookies New, Eat
Tagged: cookies, red velvet, sugar cookies

The Perfect Christmas Cookies

November 25, 2016

The Perfect Christmas Cookies

I’m sharing everything you need to know to make the perfect Christmas cookies!

By now it’s probably clear that I like to make cookies. They are my go to treat whenever I have to bring something to a party, especially during the holidays. In the last couple years, I have dedicated more and more time to not just baking cookies but decorating them, too! I even teach classes on cookie decorating through a local Charlotte company, SkillPop. Not only is it fun for me to make them, I get love giving them to other people, knowing that they will be enjoyed!

It’s also clear to me that I am not alone in this. I see a MAJOR uptick in traffic to my cookie and icing recipes this time of year. And because I get so many questions about cookie decorating, I thought I would write down all my tips and tricks for you guys so you can not only make the perfect Christmas cookies, but awesome cookies year round!

Be prepared, I have basically written a novel on cookie decorating. I have broken it down into the basics: the dough, the icing: and the decorating. I have linked to a lot of my recipes and other products that I use and recommend to make your cookie decorating experience a bit easier. Know that my recipes and products are not necessary for delicious and beautiful cookies. But they will help.

The Dough 

Christmas Cookies

The dough is the foundation for the perfect Christmas cookie. For just about all my cookies I use my all time favorite sugar cookie recipe. The reason I love this recipe so much is that the cookies hold their shape perfectly, which means whatever they looked like when you cut them out is pretty much how they will look when they come out of the oven. That is key for decorating cookies, because then you have a better guide for outlining your cookie – you aren’t trying to guess what the original shape was. 

I get a lot of compliments on these this cookie recipe. While they aren’t super soft cookies, they aren’t crispy either. I try not to over bake them – taking them out of the oven at the first signs of browning – which ensures that they stay nice and tender. 


To make sure I have evenly shaped cookies every time I use a nice big rolling pin (I recently bought this rolling pin and absolutely LOVE it) and these rolling pin bands. I absolutely swear these bands and tell all my friends (and cookie decorating students) to get them. They ensure that the dough rolled out to a consistent thickness so that each cookie is exactly the same. And in case you are wondering, I use the largest (blue) band to roll out my cookies.  

Christmas Cookies

I also prefer to use the coated metal cookie cutters (like these, these, and this gift set that I bought mainly for the cookie spatula) because they are easier to clean and don’t rust. But I have cookie cutters of all types in my collection and tend to use whatever has the best shape. A tip to ensure that the cookie cutters don’t stick to the dough and potentially warp the cookie shape is to dip it in a pile of flour first, then cut out the dough. 

I also like to roll out my dough on a sheet of parchment paper. This helps me use less flour so that the dough doesn’t stick to the counter tops and makes it a lot easier to lift off the cut out cookie. 


Why you shouldn’t use store bought dough

A lot of people ask me if they can just use store bought dough. The answer is, of course you can – you can use whatever sugar cookie recipe you like best. HOWEVER, your cookies aren’t going to come out the same. Store bought dough and cookie mixes (as well as some other recipes) contain leavening agents (baking soda, baking powder, etc) in it which make the cookies softer, but they will also lose their shape when baked. See the example below. 


I rolled out a very popular brand of sugar cookie dough the exact same way I cut out the cookies in the first picture in this post (the exact same thickness). Once the cookie came out of the oven, it was almost unrecognizable.  

I know making your own dough can be a lot of work, but I promise you, it is worth it! I tend to make big batches of it and store it in the freezer (wrapped in plastic wrap and then bagged in a zip top freezer bag) this time of the year because I know I will go through lots of it. 

Make the dough your own

Chocolate Sugar Cookies

Another added plus to making your own dough is that you can make it whatever flavor (and color) you like by adding various spices and flavorings. During the holidays, I love to add cinnamon and nutmeg to my cookies for that nice holiday spice flavor, or even make chocolate sugar cookies like you see above.

This year I developed 12 new sugar cookie recipes perfect for Christmas, which I published in my Christmas Cookie Guide. 

Making Cookies in Advance

During the holidays, we tend to make LOTS of cookies. Which means, if you are trying to do it all in one day, you will be working for hours! Fortunately, you can make the dough and even bake the cookies well in advance. Here’s what I do:

If I am just making the dough in advance, I wrap it up in plastic wrap and then store in a freezer zip top bag and keep it in the freezer until I am ready to cut out the cookies. I just let the dough sit out on the counter for a couple hours to thaw before rolling it out. The dough will keep in the freezer for a month.

If I am baking the cookies in advance, I will roll out the dough and bake as normal. Then, once they are cooled, I will stack them in a freezer zip-top bag (sometimes 2) and then store them in the freezer until I need them. The cookies will last in the freezer for a couple weeks, if not longer. I like to double bag them if I think they will be in there a while. 

The Icing

The Perfect Christmas Cookies

Okay, so the sugar cookies are probably the part that most of you guys have down. You all have made cookies before so you are pretty much pros! It’s the icing that may be new to you.

I have shared my recipe for my favorite royal icing previously. The main difference between royal icing and your normal icing is the meringue powder (which can also be purchased at your local craft store). It is essentially processed egg whites and when added to powdered sugar and water, it makes the perfect icing for cookie decorating. I forms a nice flat surface on the cookie that hardens perfectly so that the cookies can be stacked and packaged without causing any damage. It can also be made thicker to make more detailed designs, like dots, letters, stripes, flowers, etc.

To color my icing, I prefer to use gel food coloring (here is my favorite brand) because it is super pigmented and won’t water down the icing as much. But no matter what, remember: a little goes a long way! Don’t go overboard with this stuff!

There are two types of icing that I use most often: flood consistency and piping consistency. They are the exact same recipe I linked above, but one uses less water than the other. One other distinction about them is that flood consistency icing takes a few hours to dry completely. Sometimes I like to let them sit overnight. The piping consistency icing will only take about 30 minutes to an hour. Just keep them in mind as you start packing up all your pretty cookies. 

Flood Consistency Icing


The perfect flood consistency icing is icing that settles back into a flat surface within 10 to 15 seconds after you drag a spoon or toothpick across the surface. I use flood consistency icing about 90% of the time. It is what I use to outline and fill (or flood) all my cookies. It is thick enough that it won’t fall over the edges of the cookies, but thin enough that it creates a nice even surface.

To get it to just the right consistency, I add a little water at a time using a spray bottle (if I am working in small batches) or a teaspoon (if I am working in big batches). I add enough water until it starts to feel like its getting a little bit runny. Then I start counting. Yes, I still have to count to 15 every time I make icing so I am sure it’s perfect! 

Piping Consistency Icing


Piping consistency icing is a bit thicker that flood consistency icing. It is what I use to add detail to a cookie. Typically I add detail once the first layer of icing has dried enough that I can pipe right on top. I don’t have an exact formula for piping consistency icing, and sometimes I want it thicker or thinner depending on what I am using it for. Generally, it will fall off the back of a spoon into a soft peak or mound, but not settle into a flat surface. In the cookie above, I used piping consistency icing to make the string of lights. I also use it to write letters, make borders, or other precise details.

I also have this handy video of the process I use to make the icing the right consistency. You can see how thick it is when it’s piping consistency (I actually ended up thinning it down even more than what’s in the video, but it’s pretty close), and how thin it is when it’s flood consistency. 


Making Icing in Advance

Just like with the cookies, you can make the icing in advance, too. However, not at far in advance. If possible, I like to make my icing the same day I am using it. However, for big projects, that may not easy to do. 

If you want to make the icing days (or even weeks) in advance, I recommend that you make the icing but DO NOT thin it down at all. Spoon the icing in an air tight container than cover the icing with plastic wrap. The plastic wrap should be touching the icing so that no air is between the plastic wrap and the icing. Then cover it with a lid and place in the fridge or freezer. You will have to let this come to room temperature before you thin it down or use it. 


If you want to make the icing just 1 day in advance, you could thin down a big batch of icing to flood consistency and store in a bowl or container the same way I described above. Then, when you are ready to decorate, just give the icing a stir and color as normal. Flood consistency icing does not keep very well because the water will start to separate from the rest of the icing. 

Decorating

Now we have our cookies and our icing, so the fun can begin! 

Outlining and Flooding


The first step in most of my cookies is outlining and filling the cookies. I start by outlining the cookie as close to the edge as I am comfortable, then filling in the outline with the same flood consistency icing. I like to fill in the outline so that there is almost no cookie showing underneath. Then I use a toothpick, or scribe tool, to move the icing around in circular motions to get an even layer of icing. 

Here’s a tip I tell everyone, when you are piping your icing, lift the tip of the piping bag up and just let the icing fall onto the cookie. Don’t drag the icing across the surface (you can watch me here). You won’t get a nice straight line if you do it that way. 

Wet on Wet Piping


One of the techniques I use a lot is called the “wet on wet” techniques. That is when I pipe wet icing directly onto the icing I just piped. By doing so, the “fresh” icing settles into the first layer of icing. For instance, in the picture above, I piped the white snowflake immediately onto the blue icing so that it completely blended into the first layer creating a cohesive surface. 

When you pipe wet icing onto wet icing, it also gives you some freedom to manipulate it a little to get just the right shape. In the picture of the Christmas light cookie, I piped an oval of white icing onto the red, then used my toothpick to drag one edge out to create that tear drop shape. 

I also use this technique to make polka dots (like the cheeks of the gingerbread men, above), stripes, scallops, etc. 

Adding Details


The cookies really start to come together for me when I add the little details. This almost always done using piping consistency icing, described above, because it creates sharp lines, dots, or other texture. 

To add the details, I wait for the first layer of icing to crust over. Usually this takes about an hour. If I am adding lots of detail I will sometimes wait overnight so that I don’t mess up the first layer of icing. Then I just pipe my designs right on top. 

Marbling Technique


I love sharing this technique with people because its looks awesome on the cookie but its actually really easy to pull off. You can see in the purple cookies above, that there is this really pretty swirl effect going on behind the gold ‘M’. It probably looks like it took a lot of time and effort to pull off. Nope, not at all. In fact, it was probably easier than outlining and flooding the cookies. 


I start with a bowl of flood consistency icing, then I pipe on contrasting color (or 2 or 3) in a haphazard design. Then I dip my cookie onto the surface and lift straight up, letting all the excess icing drip off. I sometimes twist the cookie a bit to make more of a swirled pattern. Then I just set my cookie out to dry. If there are any air bubbles, I will tap the cookie on the surface to get them to pop. 

Easy right? I think these would look really pretty with a mixture of reds and greens for the holidays. Or you can just do red and white to make them look like peppermint!

My preferred supplies

You don’t need anything special for cookie decorating. In fact, most of the time I use plain old zip top bags. Like the cheap, generic brand zip top bags. Every once and a while, if I feel extra fancy I use piping bags (like these or these), which really aren’t fancy at all. If I want to make sure I have perfect lines, dots, or other decorations (like leaves or roses), I use a piping tip. I bought this case years ago, but I tend to use my Wilton #2 and #3 most often. 

So there you have it, pretty much everything I know about decorating cookies. I hope this will help you create your own masterpieces this holiday season!

P.S. In an effort to be fully transparent, some of the links used in this post are affiliate links, which means that if you were to purchase one of the products I listed, I will receive a very small commission. All proceeds from this post will be used to make more cookies. 

/ Filed In: Cookie Decorating 101, Cookies New, Decorated Cookies, Eat
Tagged: Christmas, christmas cookies, cookies, decorating, icing, sugar cookies

Chocolate Sugar Cookies

October 10, 2016

Chocolate Sugar Cookies

We are heading into cookie season. Well, for me it’s always cookie season. But it really picks up with all the holidays coming up. 

I have been wanting to try some other sugar cookie flavors for a while, and have been testing out a chocolate sugar cookie flavor, which I think will come in really handy for Christmas cookies! It is very similar to my classic sugar cookie recipe and creates the perfect cookie for decorating since the edges stay nice and crisp.

Chocolate Sugar Cooke Dough

Really the only difference with this cookie recipe is the addition of cocoa powder and a bit more sugar. I also like adding a little bit of coffee extract (which you can easily make at home by soaking coffee beans in vodka for a couple weeks) in addition to the vanilla because the coffee flavor really enhances the cocoa flavor. 

Chocolate Sugar Cookies

One of the biggest questions I get about my cookie dough recipe is how to know when the dough is the right texture or consistency. Some people find the dough to be too dry then some people will make the exact same recipe and it will be so moist that it sticks to their counters. So, here is what I do:

After the butter, sugar, eggs, and extracts are all mixed together, I mix in the first cup of flour. Then I mix in the next 1/2 cup and test the dough.

I test the dough by pressing it with a finger and if the dough sticks to my finger it’s not ready.

Add 1/2 cup more, then test. 

Add 1/2 cup more, then test.

By this point, the dough should be tacky, but not stick to my fingers. If it does, I keep adding flour 1/4 cup at a time. 

Chocolate Sugar Cookies

I hope that helps clarify the recipe. Because you want these cookies to keep their shape when they bake, it’s best for the dough to be pretty dry. They aren’t going to be like Lofthouse-soft sugar cookies. They are going to be more like a shortbread cookie. Unfortunately, I don’t know of a way to get the best of both worlds. 

The great thing about these chocolate sugar cookies is that the cocoa powder has a bit of extra fat in it which makes these cookies a little bit more moist than normal. Almost like a brownie in cookie form….almost. 

Either way, be prepared to see a lot of these chocolate sugar cookies on Instagram and Snapchat in the next couple months. They are going to be my go-to recipe between now and Christmas. 

PIN NOW, MAKE LATER

Chocolate Sugar Cookies

[amd-yrecipe-recipe:85]


/ Filed In: Cookies, Cookies New
Tagged: chocolate, christmas cookies, cookies, sugar cookies

Funfetti Sugar Cookies

September 19, 2016

Funfetti Sugar Cookies

Guys! It’s been so long since I have written a blog post! Anything posted in the last 3 weeks was written before we left for Germany. Honestly, the break was nice. Especially last week, when I took a legitimate break and didn’t post anything. But the timing couldn’t have been better because work was crazy and I had so many extracurricular activities. I would have had a break down if I had made myself post anything. 

But now I am back and so excited to share this funfetti sugar cookie recipe with you! 

Funfetti Sugar Cookies

This past weekend I spent pretty much every free minute in the kitchen making cookies for a friend who’s company is turning 1! Very exciting, right? Her company, SkillPop, hosts pop-up classes for adults on any number of subjects from personal finances to water coloring. I am actually teaching a cookie decorating SkillPop class this week!

But instead of just making any old sugar cookie, I decided to make funfetti sugar cookies. Because to me, a it isn’t a birthday without funfetti!

Funfetti cookie dough

The recipe is essentially my sugar cookie recipe with sprinkles added. I also added lemon zest to the dough and lemon juice to the icing to really make the flavor pop.

While I did end up covering these cookies with icing, they little bits of sprinkles still made an appearance. They are like a little fun surprise when you bite into the cookie. 

PIN NOW, MAKE LATER

Funfetti Sugar Cookies

[amd-yrecipe-recipe:77]


/ Filed In: Cookies, Cookies New, Eat
Tagged: birthday, cookies, funfetti, sprinkles, sugar cookies

Gingerbread Men Sugar Cookies

December 15, 2015

Gingerbread Men Cookies-8

It’s time for Christmas cookies!! I am so excited to share some of the Christmas cookies I made this past weekend. I love making decorated cookies every year for the holidays, and gingerbread men are some of my favorite. Until recently, I just used store bought dough, icing, and sprinkles. Now I have graduated to the homemade dough and icing, and much more intricate designs. 

I didn’t use actual gingerbread for these little guys, I used my favorite sugar cookie dough, then iced them with brown royal icing to give the effect they were gingerbread. But, you could make these same cookies with gingerbread and skip the brown icing.

To set your expectations accordingly, these cookies do take at least a couple hours to decorate. However, those few hours are punctuated by long periods of waiting. In total, give yourself about 2 days to make the dough and icing then decorate. My process is spread out over a few more days. I made the dough and baked the cookies earlier in the week, then froze the cookies. On Friday, I iced the first layer and let it dry. On Saturday morning, I finished them off with their faces and scarves, and I was done by lunch. By spreading out all the steps, it makes it feel a lot less time consuming. 

Gingerbread Men

  1. Start by outlining the cookie in light brown flood consistency royal icing. Then fill in the outline with a generous amount of icing. [See my flooding/piping technique in this video or this one]
  2. Using a toothpick or scribe tool, even out the icing. Use the toothpick to push the icing towards the edge of the cookie. Tap the cookie to even out the icing and get rid of any bubbles. 
  3. While the brown icing is still wet, pipe two small dots of pink flood consistency icing to form the cheeks. Let the cookie dry for at least 4 hours, or overnight. 
  4. Once dry, use black piping consistency royal icing to make a smile between the two cheeks. Pipe two small dots for the eyes and three dots down the torso for the buttons (see in picture 5). [Also refer to this guide I put together for making the perfect Christmas cookies]
  5. Use white consistency royal icing and pipe a squiggly line at the base of the arms and feet. Let dry for at least 30 minutes. 
  6. With red (or the color of your choice) flood consistency royal icing, pipe a curved line at the base of the gingerbread mans head. Pipe another line about 1/4″ inch below and two lines on the side to connect the two lines. Fill in the with icing and even out with a toothpick. Let crust, about 30 minutes.
  7. Pipe two more lines over the top of the scarf and down one side of the torso, about the same width apart as the first part of the scarf. Fill in with icing and even out with a toothpick.
  8. To make tassels for the edge of the scarf, pipe a small line of icing at the end of the scarf. Use the toothpick to “pull” threads of icing down at different angles. Then pipe small dots on top of the “threads”. Let dry for at least 2 hours.

Gingerbread Men Cookies-10

I thought they turned out so cute! You could do various styles with the scarves. For some of them, I used a piping consistency icing to make it appear like they were knit scarves or had more texture. 

You could also use icing to make little pants, hats, ear muffs, or whatever pieces of clothing you want. I like the scarves because they are easy. 🙂

Gingerbread Men Cookies-9

/ Filed In: Cookies, Cookies New, Desserts, Eat
Tagged: Christmas, gingerbread men, sugar cookies

  • Newer Entries
  • 1
  • 2

Follow

Hey There!

Hey there, I'm Lindsey. I'm a number cruncher by day and a home cook and baker by night. While I love to eat healthy and find fresh and healthy alternatives for my favorite foods, I will never turn down dessert! Life is all about moderation, right?

Recipes

  • All Recipes
  • Breakfast
  • Appetizers
  • Salads
  • Main Dishes
  • Side Dishes
  • Desserts
  • Drinks

Favorite Finds

[show_lookbook_widget id=”388783″]

Theme by 17th Avenue · Powered by WordPress & Genesis