• Home
  • Eat
    • Breakfast
    • Appetizers
    • Main Dishes
      • Chicken
      • Beef
      • Seafood
      • Healthy Dishes
      • Paleo Dishes
      • Salads
    • Desserts
      • Decorated Cookies
      • Cookies
      • Bars and Brownies
      • Cakes and Cupcakes
  • Shop
    • Cookie Decorating Supplies
    • Bakeware
    • Cookware
    • Kitchen Gadgets
    • House
  • About
    • Contact
    • Bucket List
  • Cookie Decorating 101

Follow the Ruels

Homemade Ricotta Cheese

July 24, 2017

If the only ricotta cheese you have had has been from a container purchased at the grocery store, then you, my friend, haven’t had real ricotta cheese. Real, full-fat ricotta cheese is so creamy and delicious, not dry and grainy. 

A long time ago I tried to make “skim-milk” ricotta at home (because back then I still thought fat was the enemy). It was a disaster. I determined that ricotta cheese cannot be made at home. 

Boy was I wrong! It is so easy to make at home! As long as you do it the right way….with all of the fat.

Ricotta cheese is essentially just lightly curdled milk and cream, that is then drained of any excess liquid to make a creamy, soft, spreadable cheese (if you want a more scientific explanation, you can read this). 

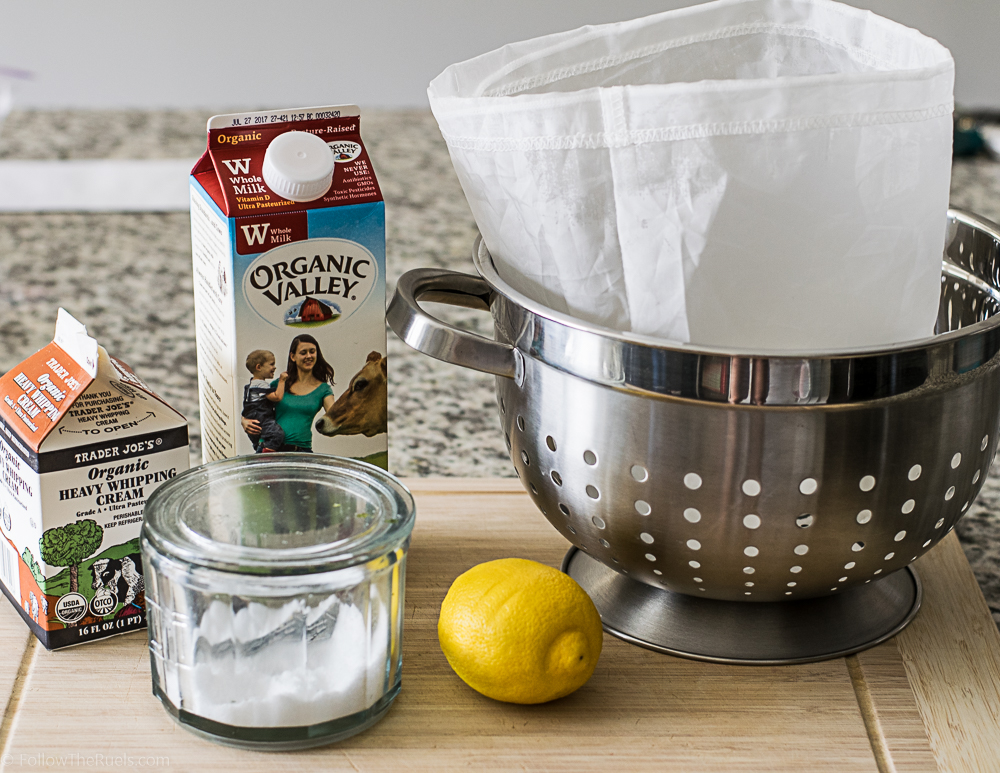
A traditional ricotta is made from sheep’s or goat’s milk. Unfortunately, neither of those are readily available (to me at least), so plain old cows milk (whole) and heavy cream will do just fine. The acid from the lemon juice will activate the curdling. However, you could also use white vinegar to achieve the same result. 

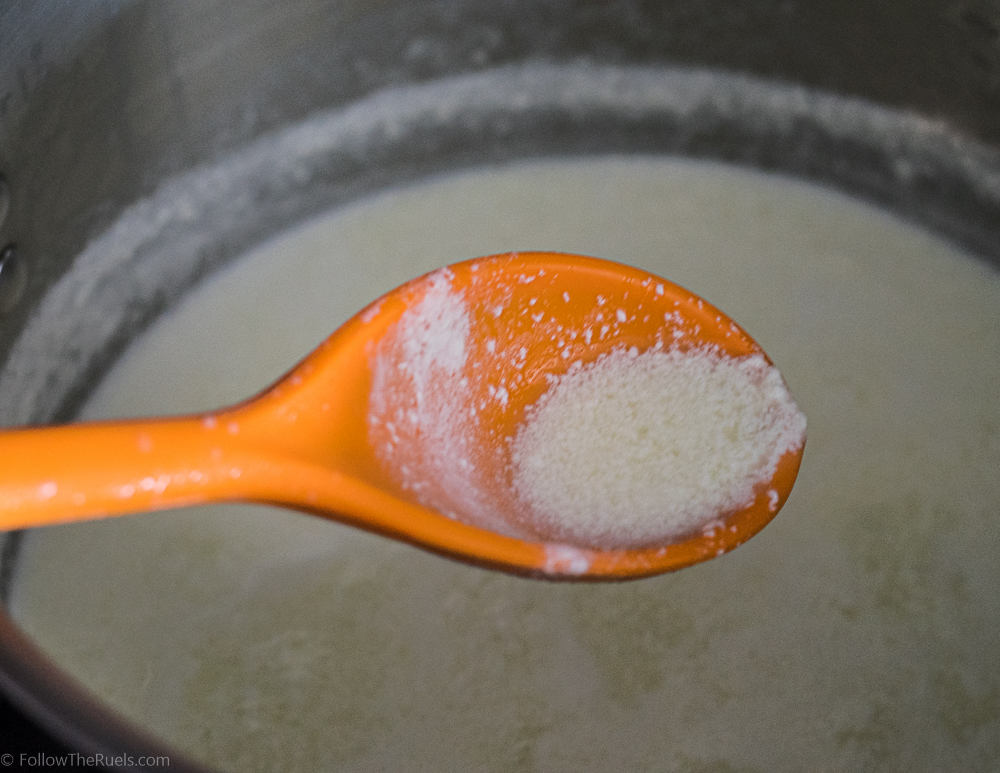
Bring the milk and cream to a boil, then add the lemon juice. After about 30 seconds, you will notice that the milk will form small curdles. Continue to let the mixture sit for another minute or so.


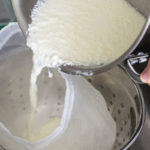
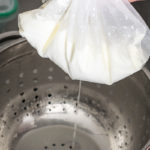
After the milk has almost completely curdled, pour it over a cheese cloth lined strainer and let all of the excess moisture drain from the ricotta.  

I actually used my favorite nut milk bag that I also use for making almond milk. I prefer this to cheesecloth because 1) it’s reusable, 2) it’s made from a very fine mesh, so none of the ricotta curds will slip through, and 3) it has a hand dandy drawstring closure.


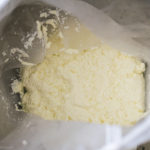
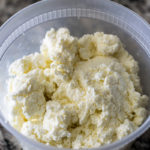
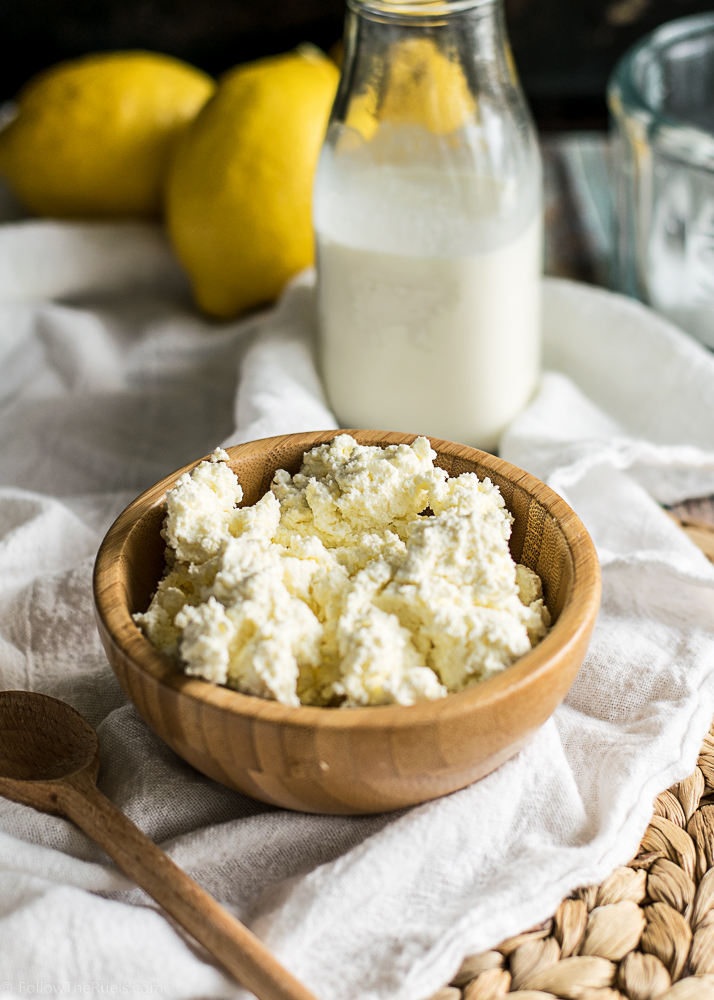
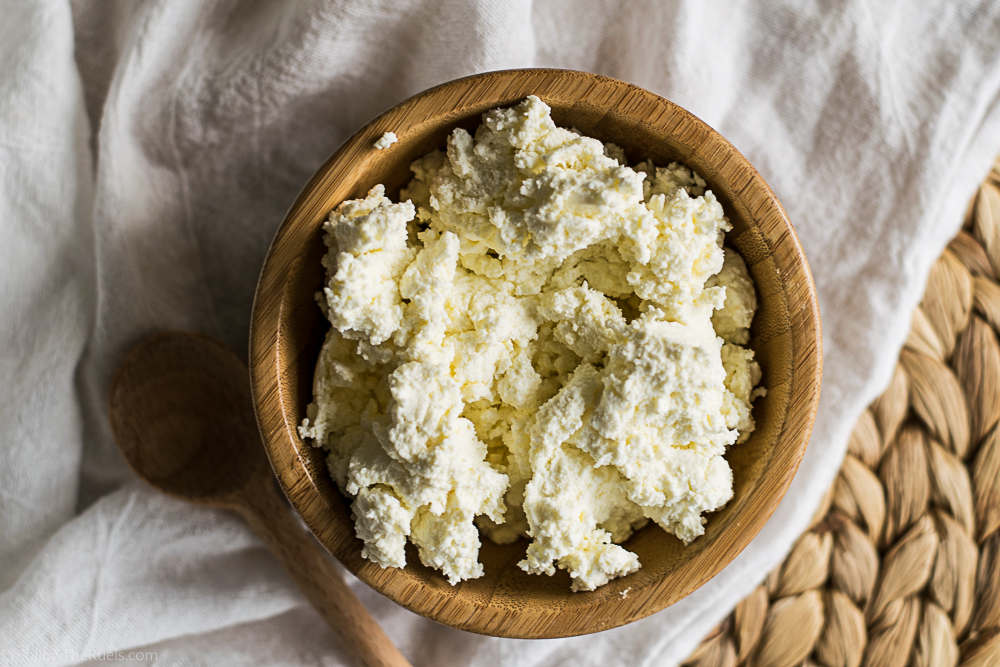
After your ricotta has drained for about 30 minutes to an hour, it should look a bit like a cottage cheese-butter hybrid. Not too wet, like cottage cheese, but not super smooth like butter. Something in the middle. 

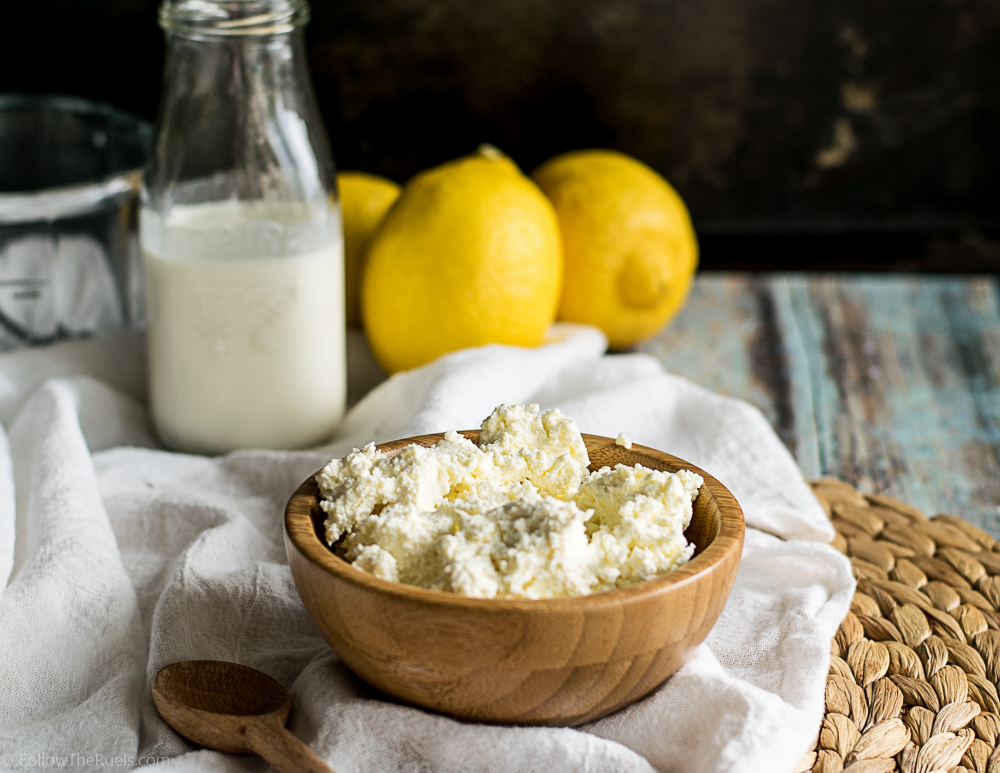
Now you have yourself some delicious and creamy ricotta cheese that you can use to make lasagna, Italian cheesecake, or just spread on some fresh baguette slices for an easy appetizer. 

You can save it for up to five days in the fridge. I wouldn’t try to keep it much longer since this homemade version has absolutely no preservatives. Another reason why it’s so good! But now that you know how easy it is to whip up, you can make it whenever you need it!

[yumprint-recipe id=’119′]

/ Filed In: Eat, Side Dishes
Tagged: cheese, cream, dairy, milk, ricotta cheese

Tres Leches Cupcakes with Salted Dolce de Leche Topping

May 17, 2017

Do you love dry, crumbly cakes? Well then, this cake is not for you. Tres leches cake is one of the most moist and spongy cakes I have ever had. 

Tres leches is a classic Southern American cake made by soaking the cake in a mixture of three different milks: evaporated milk, condensed milk, and heavy cream. 

But there is actually a forth milk in these cupcakes in the form of the dolce de leche topping, which is essentially a caramel made from sweetened milk. There are lots of ways to make dolce de leche, but my favorite (because it requires little to no babysitting) is the slow-cooker method. You place jars of sweetened condensed milk in a water bath in a slow cooker and let them cook on low for 8 hours. When they come out you have a delicious, caramel sauce.


When I made these tres leches cupcakes, I started with the topping since that would take literally all day. But I went on with my day (in this case, work), and came home to find all the hard work done for me. 

The cupcakes aren’t quite so easy, in that you actually have to lift a finger. The recipe is very similar to a yellow cake, but I added a touch of cinnamon and nutmeg for some extra flavor.


Start by creaming together the butter and sugar. Then add the egg yolks in one at a time. Whisk the egg whites up separately until they are nice and fluffy. Alternate mixing in the dry ingredients with the wet ingredients until you have a nice smooth batter. Then fold in the egg whites. This will make sure your cupcakes are nice and airy.


Once the cupcakes have cooked and cooled, whisk together your milks: evaporated milk, condensed milk, and heavy cream. Pour that (carefully) over the tops of your cupcakes. 

Once your cupcakes have soaked in all that milk you can determine if they need a little more. It may feel like you are adding a lot of the milk, but I promise they will soak it right up.

When they are all milked out, you can top them with the dolce de leche topping. Just slather that stuff on the top. You really can’t go overboard with it. 

And because caramel needs a little something extra, sprinkle some sea salt on top and thank me later. All that sweetness needs something to balance it out.

These cupcakes were to. die. for. The cake is super moist but not soggy. It’s also nice and light and airy. The dolce de leche is the perfect topping because the cake isn’t overly flavorful on it’s own. The kiss of sea salt at the very end just puts it over the top. You should probably charge your friends and family $4 a pop for these cupcakes, because the only other place you will find a cupcake this good is in a fancy bakery.

But if cupcakes aren’t your thing, you can make this same recipe in square pan and cut out slices. There is truly no wrong way to eat tres leches cake.

[amd-yrecipe-recipe:161]

/ Filed In: Cakes and Cupcakes, Cakes New, Eat
Tagged: cake, caramel, cream, cupcakes, dolce de leche, milk, salted caramel, tres leches

Milk and Cookie Shots

May 28, 2014

BBC-Cookie-Cups7Last year, Dominque Ansel turned pastry making on its head when he came out with the cronut. Now, it seems like he is making it his full time job to come up with crazy, delicious, hybrids of some of our favorite treats. A few months ago, I saw a couple things pop up on Pinterest about one of his latest creations – cookie shots. Now, I had actually attempted to make a cronut but completely and utterly failed. The cookie shot, on the other hand, seemed like something I could do!

A few other sites have tried their own version of the cookie shot, too. While I am sure they are wonderful and delicious, what I didn’t really like about those is that they used some weird metal form to get the shot glass shape that I doubt anyone just keeps on hand in their kitchen. At least I sure don’t. So I turned to my trusty popover tin! The beauty of it is that its deeper and a bit narrower than a muffin tin. And while it might be bigger than a shot glass, who really cares when that shot glass is a cookie?


I did, however, use an actual shot glass (this one is from the good ol’ college days and has my sorority crest on it – classy!) to help me form the cookie shot. The dough itself is very crumbly – I basically just altered a standard shortbread recipe – so it can be a bit challenging to form. I first packed in about 1 tbsp of dough on the bottom, set the shot glass in place, and filled the space around it with more dough. Then I wiggled the glass around to help me press the dough against the walls of the tin. I went back in with my fingers to make sure the dough was nice and packed. Once all 6 tins were done, I popped them in the oven to bake for about 10 minutes.


After allowing the cups to cool completely and removing the baked cups from the tin, I poured in some melted chocolate working it around the cup until it covered all sides. Once it was coated how I liked, I flipped the cup upside down on a wire rack over a baking sheet covered in parchment. This not only helps to get the chocolate evenly disbursed, but any extra chocolate will just drip right on to the sheet. Once they were all lined with chocolate, I placed the whole sheet into the freezer for about 15 minutes until the chocolate was hard.

BBC-Cookie-Cups8From here, you could just leave them in the freezer until ready to use, or immediately fill them up with milk. I chose to add in a bit of Baileys to make it more of an adult treat. Needless to say, if making these for kids, forgo the Baileys. But you could add some coffee creamers to the milk to make different flavors. Or if you are really feeling indulgent, what about espresso or ice cream?

BBC-Cookie-Cups9

[yumprint-recipe id=’18’]

/ Filed In: Eat
Tagged: bake, chocolate, chocolate chips, cookie, cups, milk

Follow

Hey There!

Hey there, I'm Lindsey. I'm a number cruncher by day and a home cook and baker by night. While I love to eat healthy and find fresh and healthy alternatives for my favorite foods, I will never turn down dessert! Life is all about moderation, right?

Recipes

  • All Recipes
  • Breakfast
  • Appetizers
  • Salads
  • Main Dishes
  • Side Dishes
  • Desserts
  • Drinks

Favorite Finds

[show_lookbook_widget id=”388783″]

Theme by 17th Avenue · Powered by WordPress & Genesis